1. Prerequisites
To use OperatorFabric, you need a linux OS with the following:
-
Docker install with 4Gb of space
-
4Gb of free RAM
2. Install and run server
To start OperatorFabric, you first need to clone the getting started git
git clone https://github.com/opfab/operatorfabric-getting-started.git
Launch the startserver.sh in the server directory. You need to wait for all the services to start (it usually takes one minute to start), it is done when the console prompt is available again.
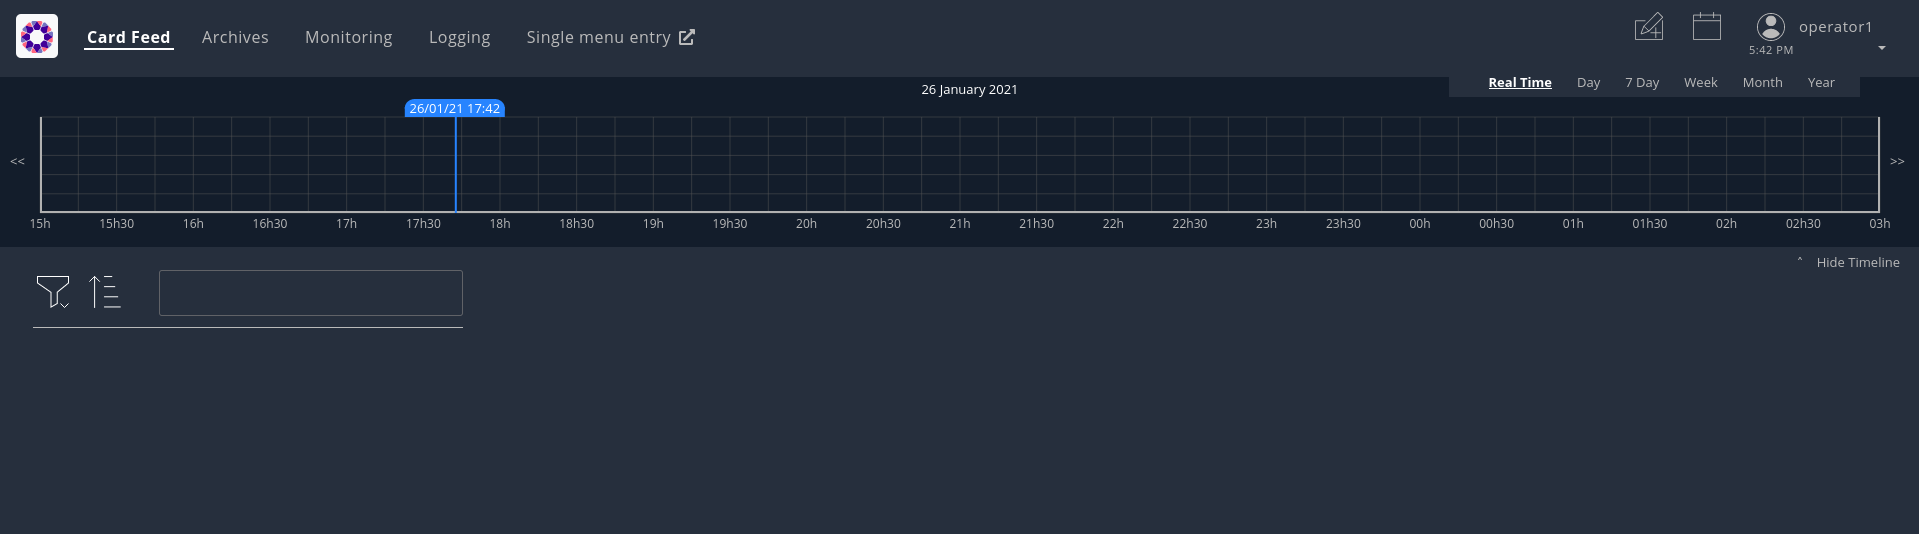
Test the connection to the UI: to connect to OperatorFabric, open in a browser the following page: localhost:2002/ and use operator1_fr as login and test as password.
After connection, you should see the following screen
To stop the server, use:
./stopServer.sh
3. Examples
For each example, relevant files and scripts are in the directory client/exampleX.
All examples assume you connect to the server from localhost (otherwise change the provided scripts)
3.1. Example 1: Send and update a basic card
Go in the directory client/example1.
To receive the test cards it is necessary to configure a perimeter which you will have a closer look at in Example 5.
Configure the required perimeter by executing the provided script:
./setupPerimeter.sh perimeter.json
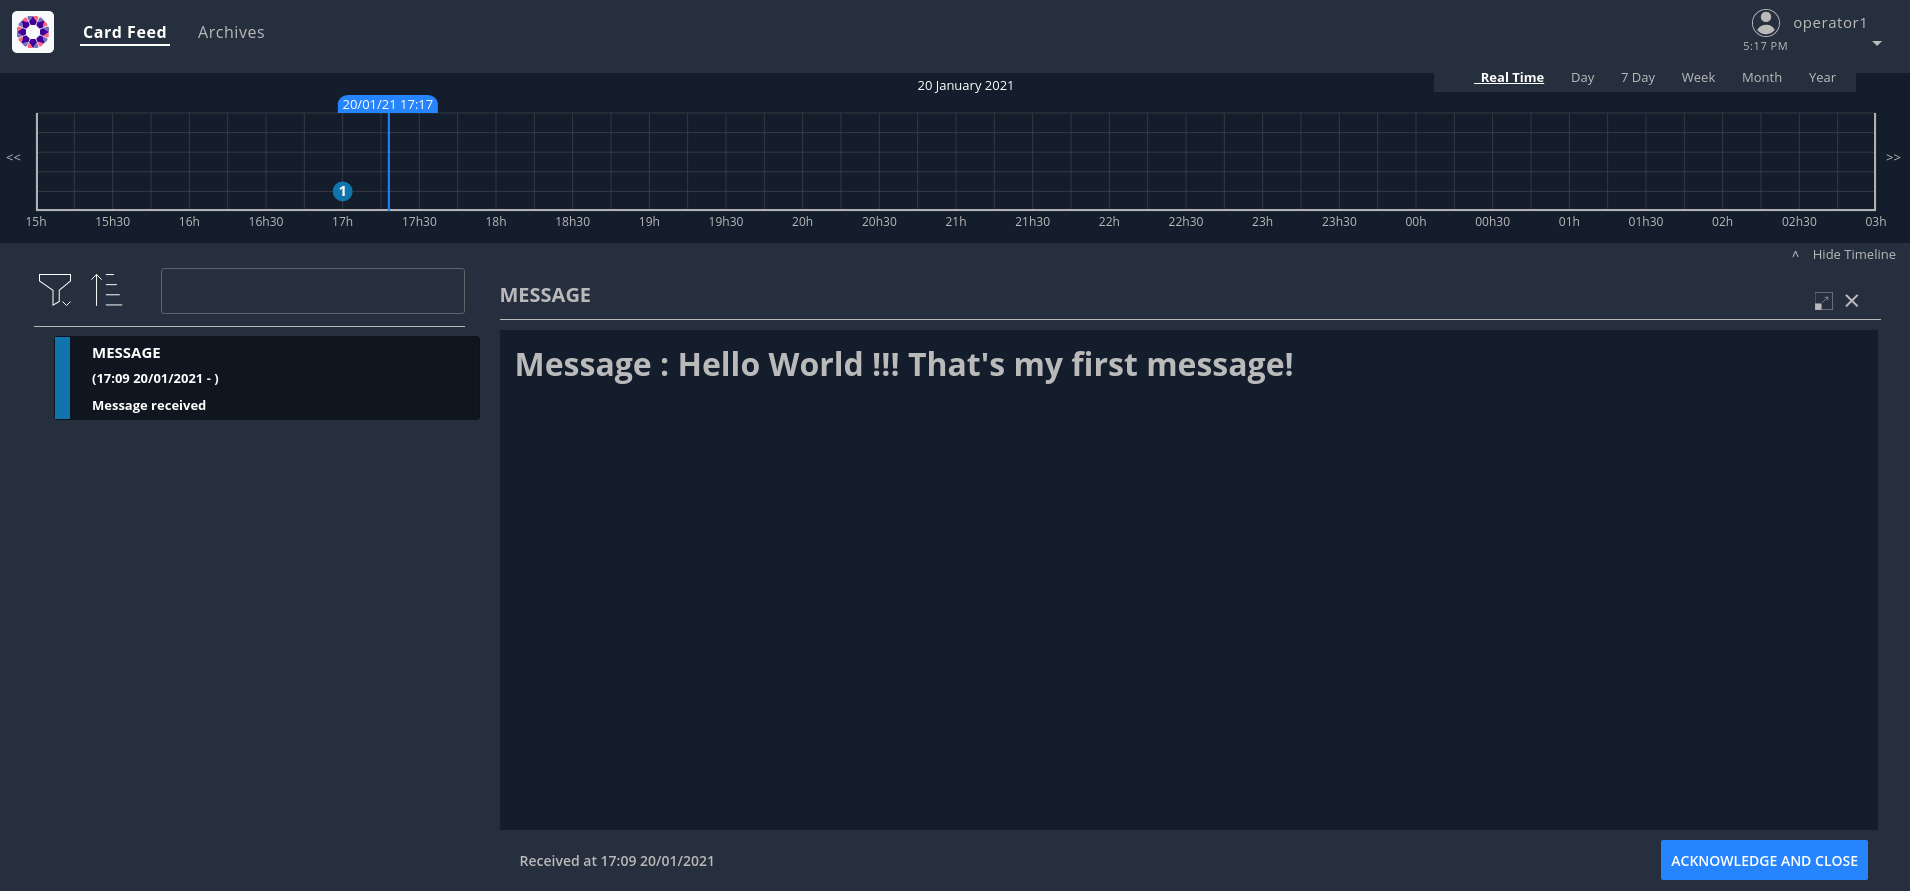
Send a card, using the provided script :
./sendCard.sh card.json
The result should be a 201 Http status.
See the result in the UI, you should see a card, if you click on it you’ll see the detail
3.1.1. Anatomy of the card :
A card is containing information regarding the publisher, the recipients, the process, the data to show…
More information can be found in the Card Structure section of the reference documentation.
{
        "publisher" : "message-publisher",
        "processVersion" : "1",
        "process" :"defaultProcess",
        "processInstanceId" : "hello-world-1",
        "state" : "messageState",
        "groupRecipients": ["Dispatcher"],
        "severity" : "INFORMATION",
        "startDate" : 1553186770681,
        "summary" : {"key" : "defaultProcess.summary"},
        "title" : {"key" : "defaultProcess.title"},
        "data" : {"message" :"Hello World !!! That's my first message"}
}| If you open the json file of the card, you will see '${current_date_in_milliseconds_from_epoch}' for the field 'startDate'. We have used this so that the date of the card is the current day (or the next day in some other examples). Indeed, in the shell script that sends the card, you will see that we create an environment variable with the current date which is then injected into the json file. |
3.1.2. Update the card
We can send a new version of the card (updateCard.json):
-
change the message, field data.message in the JSON File
-
the severity , field severity in the JSON File
{
        "publisher" : "message-publisher",
        "processVersion" : "1",
        "process"  :"defaultProcess",
        "processInstanceId" : "hello-world-1",
        "state" : "messageState",
        "groupRecipients": ["Dispatcher"],
        "severity" : "ALARM",
        "startDate" : 1553186770681,
        "summary" : {"key" : "defaultProcess.summary"},
        "title" : {"key" : "defaultProcess.title"},
        "data" : {"message" :":That's my second message"}
}
You can send the updated card with:
./sendCard.sh cardUpdate.json
The card should be updated on the UI.
3.2. Example 2: Publish a new bundle
The way the card is displayed on the UI is defined by a Bundle containing templates and a process description.
The bundle structure is the following:
├── css : stylesheets files
└── template : handlebar templates for detail card rendering
config.json : process description and global configuration
i18n.json : internationalization file
The bundle is provided in the bundle directory of example2. It contains a new version of the bundle used in example1.
We just change the template and the stylesheet instead of displaying:
Message : The message
we display:
You received the following message

The message
If you look at the template file (template/template.handlebars):
<h2> You received the following message </h2>

{{card.data.message}}
In the stylesheet css/style.css we just change the color value to red (#ff0000):
h2{
        color:#ff0000;
        font-weight: bold;
}
The global configuration is defined in config.json :
{
        "id":"defaultProcess",
        "version":"2",
        "states":{
                "messageState" : {
                        "templateName" : "template",
                        "styles" : [ "style" ]
                }
        }
}
To keep the old bundle, we create a new version by setting version to 2.
3.2.1. Package your bundle
Your bundle needs to be packaged in a tar.gz file, a script is available:
./packageBundle.sh
A file name bundle.tar.gz will be created.
3.2.2. Get a Token
To send the bundle you need to be authenticated. To get a token you can source the provided script:
source ../getToken.sh
This will run the following command:
curl -s -X POST -d "username=admin&password=test&grant_type=password" http://localhost:2002/auth/token
This should return a JSON a response like this:
{"access_token":"eyJhbGciOiJSUzI1NiIsInR5cCIgOiAiSldUIiwia2lkIiA6ICJSbXFOVTNLN0x4ck5SRmtIVTJxcTZZcTEya1RDaXNtRkw5U2NwbkNPeDBjIn0.eyJqdGkiOiIzZDhlODY3MS1jMDhjLTQ3NDktOTQyOC1hZTdhOTE5OWRmNjIiLCJleHAiOjE1NzU1ODQ0NTYsIm5iZiI6MCwiaWF0IjoxNTc1NTQ4NDU2LCJpc3MiOiJodHRwOi8va2V5Y2xvYWs6ODA4MC9hdXRoL3JlYWxtcy9kZXYiLCJhdWQiOiJhY2NvdW50Iiwic3ViIjoiYTNhM2IxYTYtMWVlYi00NDI5LWE2OGItNWQ1YWI1YjNhMTI5IiwidHlwIjoiQmVhcmVyIiwiYXpwIjoib3BmYWItY2xpZW50IiwiYXV0aF90aW1lIjowLCJzZXNzaW9uX3N0YXRlIjoiODc3NzZjOTktYjA1MC00NmQxLTg5YjYtNDljYzIxNTQyMDBhIiwiYWNyIjoiMSIsInJlYWxtX2FjY2VzcyI6eyJyb2xlcyI6WyJvZmZsaW5lX2FjY2VzcyIsInVtYV9hdXRob3JpemF0aW9uIl19LCJyZXNvdXJjZV9hY2Nlc3MiOnsiYWNjb3VudCI6eyJyb2xlcyI6WyJtYW5hZ2UtYWNjb3VudCIsIm1hbmFnZS1hY2NvdW50LWxpbmtzIiwidmlldy1wcm9maWxlIl19fSwic2NvcGUiOiJlbWFpbCBwcm9maWxlIiwic3ViIjoiYWRtaW4iLCJlbWFpbF92ZXJpZmllZCI6ZmFsc2UsInByZWZlcnJlZF91c2VybmFtZSI6ImFkbWluIn0.XMLjdOJV-A-iZrtq7sobcvU9XtJVmKKv9Tnv921PjtvJ85CnHP-qXp2hYf5D8TXnn32lILVD3g8F9iXs0otMAbpA9j9Re2QPadwRnGNLIzmD5pLzjJ7c18PWZUVscbaqdP5PfVFA67-j-YmQBwxiys8psF8keJFvmg-ExOGh66lCayClceQaUUdxpeuKFDxOSkFVEJcVxdelFtrEbpoq0KNPtYk7vtoG74zO3KjNGrzLkSE_e4wR6MHVFrZVJwG9cEPd_dLGS-GmkYjB6lorXPyJJ9WYvig56CKDaFry3Vn8AjX_SFSgTB28WkWHYZknTwm9EKeRCsBQlU6MLe4Sng","expires_in":36000,"refresh_expires_in":1800,"refresh_token":"eyJhbGciOiJIUzI1NiIsInR5cCIgOiAiSldUIiwia2lkIiA6ICIzZjdkZTM0OC05N2Q5LTRiOTUtYjViNi04MjExYTI3YjdlNzYifQ.eyJqdGkiOiJhZDY4ODQ4NS1hZGE0LTQwNWEtYjQ4MS1hNmNkMTM2YWY0YWYiLCJleHAiOjE1NzU1NTAyNTYsIm5iZiI6MCwiaWF0IjoxNTc1NTQ4NDU2LCJpc3MiOiJodHRwOi8va2V5Y2xvYWs6ODA4MC9hdXRoL3JlYWxtcy9kZXYiLCJhdWQiOiJodHRwOi8va2V5Y2xvYWs6ODA4MC9hdXRoL3JlYWxtcy9kZXYiLCJzdWIiOiJhM2EzYjFhNi0xZWViLTQ0MjktYTY4Yi01ZDVhYjViM2ExMjkiLCJ0eXAiOiJSZWZyZXNoIiwiYXpwIjoib3BmYWItY2xpZW50IiwiYXV0aF90aW1lIjowLCJzZXNzaW9uX3N0YXRlIjoiODc3NzZjOTktYjA1MC00NmQxLTg5YjYtNDljYzIxNTQyMDBhIiwicmVhbG1fYWNjZXNzIjp7InJvbGVzIjpbIm9mZmxpbmVfYWNjZXNzIiwidW1hX2F1dGhvcml6YXRpb24iXX0sInJlc291cmNlX2FjY2VzcyI6eyJhY2NvdW50Ijp7InJvbGVzIjpbIm1hbmFnZS1hY2NvdW50IiwibWFuYWdlLWFjY291bnQtbGlua3MiLCJ2aWV3LXByb2ZpbGUiXX19LCJzY29wZSI6ImVtYWlsIHByb2ZpbGUifQ.sHskPtatqlU9Z8Sfq6yvzUP_L6y-Rv26oPpykyPgzmk","token_type":"bearer","not-before-policy":0,"session_state":"87776c99-b050-46d1-89b6-49cc2154200a","scope":"email profile"}Your token is the access_token value in the JSON, which the script will export to a $token environment variable.
The sendBundle.sh script below will use this variable.
| The token will be valid for 10 hours, after that you will need to ask for a new one. |
3.2.3. Send the bundle
Executing the sendBundle.sh script will send the bundle.
You can now execute the script, it will send the bundle.
./sendBundle.sh
You should receive the following JSON in response, describing your bundle.
{"id":"defaultProcess","name":"process.name","version":"2","states":{"messageState":{"responseData":null,"acknowledgmentAllowed":"Always","color":null,"name":null,"description":null,"showDetailCardHeader":null,"userCard":null,"templateName":"template","styles":["style"],"type":null,"response":null}},"uiVisibility":null}3.2.4. Send a card
You can send the following card to test your new bundle:
{
        "publisher" : "message-publisher",
        "processVersion" : "2",
        "process"  :"defaultProcess",
        "processInstanceId" : "hello-world-1",
        "state": "messageState",
        "groupRecipients": ["Dispatcher"],
        "severity" : "INFORMATION",
        "startDate" : 1553186770681,
        "summary" : {"key" : "defaultProcess.summary"},
        "title" : {"key" : "defaultProcess.title"},
        "data" : {"message":"Hello world in new version"}
}
To use the new bundle, we set processVersion to "2"
To send the card:
./sendCard.sh
You should see in the UI the detail card with the new template.
3.3. Example 3: Process with state
For this example, we will set the following process:
-
Step 1: A critical situation arises on the High Voltage grid
-
Step 2: The critical situation evolve
-
Step 3: The critical situation ends
To model this process in OperatorFabric, we will use a "Process" with "States", we will model this in the config.json
of the bundle:
{
        "id":"criticalSituation",
        "name": "Critical situation process",
        "version":"1",
        "states":{
                "criticalSituation-begin" : {
                        "templateName" : "criticalSituationTemplate",
                        "styles" : [ "style" ],
                        "acknowledgmentAllowed": "Always"
                },
                "criticalSituation-update" : {
                        "templateName" : "criticalSituationTemplate",
                        "styles" : [ "style" ],
                        "acknowledgmentAllowed": "Always"
                },
                "criticalSituation-end" : {
                        "templateName" : "endCriticalSituationTemplate",
                        "styles" : [ "style" ],
                        "acknowledgmentAllowed": "Always"
                }
        }
}
You can see in the JSON we define a process name "criticalSituation" with 3 states: criticalSituation-begin, criticalSituation-update and criticalSituation-end. For each state we define a title for the card, and the template of stylesheet to use.
The title is a key which refers to the i18n.json file:
{
        "criticalSituation-begin":{
                "title":"CRITICAL SITUATION",
                "summary":" CRITICAL SITUATION ON THE GRID , SEE DETAIL FOR INSTRUCTION"
        },
        "criticalSituation-update":{
                "title":"CRITICAL SITUATION - UPDATE",
                "summary":" CRITICAL SITUATION ON THE GRID , SEE DETAIL FOR INSTRUCTION"
        },
        "criticalSituation-end":{
                "title":"CRITICAL SITUATION - END",
                "summary":" CRITICAL SITUATION ENDED"
        }

}
The templates can be found in the template directory.
Before sending cards it is necessary to configure the required perimeter by executing the provided script:
./setupPerimeter.sh perimeter.json
We can now send cards and simulate the process, first we send a card at the beginning of the critical situation:
{
        "publisher" : "alert-publisher",
        "processVersion" : "1",
        "process"  :"criticalSituation",
        "processInstanceId" : "alert1",
        "state": "criticalSituation-begin",
        "groupRecipients": ["Dispatcher"],
        "severity" : "ALARM",
        "startDate" : 1553186770681,
        "summary" : {"key" : "criticalSituation-begin.summary"},
        "title" : {"key" : "criticalSituation-begin.title"},
        "data" : {"instruction":"Critical situation on the grid : stop immediatly all maintenance on the grid"}
}
The card refers to the process "criticalSituation" as defined in the config.json, the state attribute is put to "criticalSituation-begin" which is the first step of the process, again as defined in the config.json. The card can be sent via the provided script :
./sendCard.sh card.json
Two other cards have been provided to continue the process
-
cardUpdate.json: the state is criticalSituation-update
-
cardEnd.json: the state is criticalSituation-end and severity set to "compliant"
You can send these cards:
./sendCard.sh cardUpdate.json
./sendCard.sh cardEnd.json
3.4. Example 4: Time Line
To view the card in the time line, you need to set times in the card using timeSpans attributes as in the following card:
{
"publisher" : "scheduledMaintenance-publisher",
"processVersion" : "1",
"process" :"maintenanceProcess",
"processInstanceId" : "maintenance-1",
"state": "planned",
"groupRecipients": ["Dispatcher"],
"severity" : "INFORMATION",
"startDate" : 1553186770681,
"summary" : {"key" : "maintenanceProcess.summary"},
"title" : {"key" : "maintenanceProcess.title"},
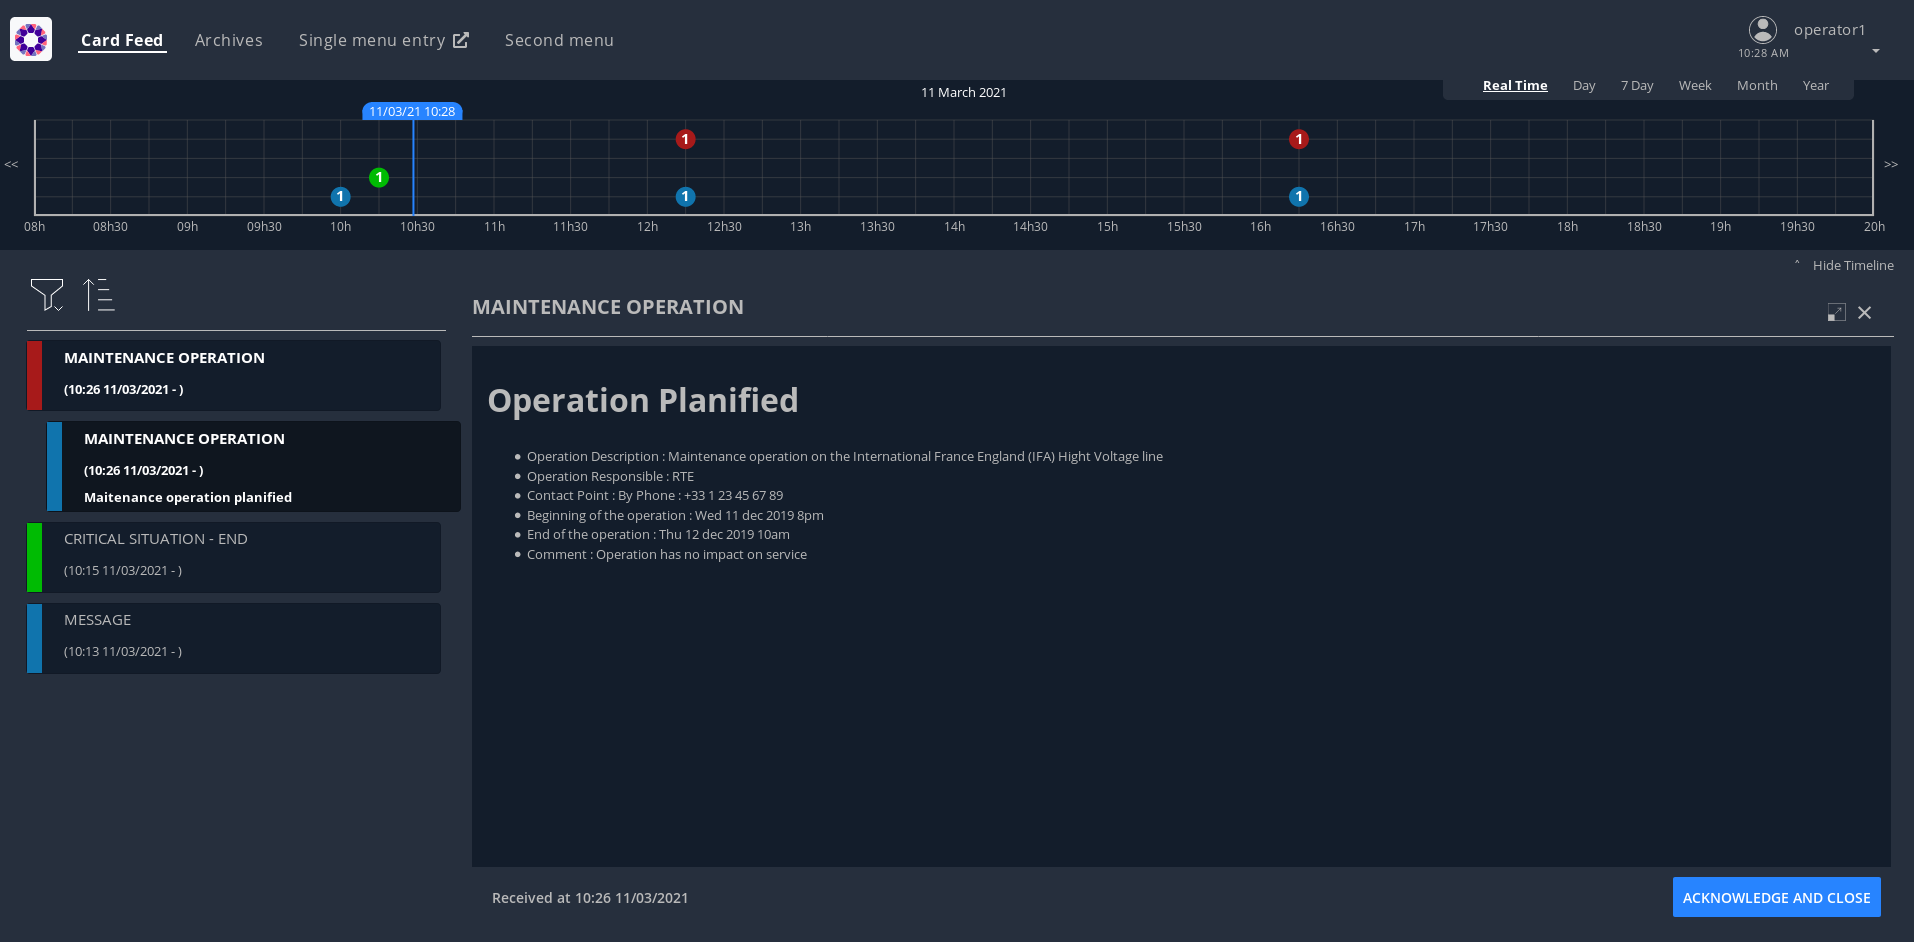
"data" : {
"operationDescription":"Maintenance operation on the International France England (IFA) High Voltage line ",
"operationResponsible":"RTE",
"contactPoint":"By Phone : +33 1 23 45 67 89 ",
"operationStartingTime":"Wed 11 dec 2019 8pm",
"operationEndTime":"Thu 12 dec 2019 10am",
"comment":"Operation has no impact on service"
},
"timeSpans" : [
{"start" : 1576080876779},
{"start" : 1576104912066}
]
}For this example, we use a new publisher called "scheduledMaintenance-publisher". You won’t need to post the corresponding bundle to the businessconfig service as it has been loaded in advance to be available out of the box (only for the getting started). If you want to take a look at its content you can find it under server/businessconfig-storage/scheduledMaintenance-publisher/1.
Before sending the provided cards, you need to set the correct time values as epoch (ms) in the json. For each value you set, you will have a dot on the timeline. In our example, the first dot represents the beginning of the maintenance operation, and the second the end of the maintenance operation.
For example cards the dates are calculated automatically in the provided sendCard.sh script.
It is possible to change dates values by editing the card’s json file. To get the dates in Epoch, you can use the following commands:
For the first date:
date -d "+ 60 minutes" +%s%N | cut -b1-13
And for the second
date -d "+ 120 minutes" +%s%N | cut -b1-13
Before sending cards it is necessary to configure the required perimeter by executing the provided script:
./setupPerimeter.sh perimeter.json
To send the card use the provided script in example4 directory
./sendCard.sh card.json
A second card (card2.json) is provided as example, as before you can eventually change times values in the json file and then send it
./sendCard.sh card2.json
This time the severity of the card is ALERT, you should see the dot in red on the timeline
3.5. Example 5: Card routing mechanism
3.5.1. Card sent to a group
As we saw previously, if a card is sent to a group, then you need to be a member of the group and have the process / state of the card within the group’s perimeter to receive it.
3.5.2. Card sent to an entity
If a card is sent to an entity, then you must be a member of this entity and have the process / state of the card within the user’s perimeter. As the perimeters are attached to groups, the user must therefore be a member of a group attached to this perimeter.
Let’s send this card :
{
    "publisher" : "message-publisher",
    "processVersion" : "1",
    "entityRecipients" : ["ENTITY1_FR"],
    "process" :"defaultProcess",
    "processInstanceId" : "cardExample5",
    "state" : "messageState1",
    "severity" : "INFORMATION",
    "startDate" : 1553186770681,
    "summary" : {"key" : "defaultProcess.summary"},
    "title" : {"key" : "defaultProcess.title"},
    "data" : {"message" : "Hello World !!! Here is a message for ENTITY1_FR"}
}
Use the provided script :
./sendCard.sh cardSentToEntity.json
The result should be a 201 Http status.
Look at the result in the UI, you should not be able to see the card.
To receive the card you need to create a perimeter and to do it you need to be authenticated. To get a token you can source the provided script:
source ../getToken.sh
Now let’s create this perimeter :
{
  "id" : "getting-startedPerimeter",
  "process" : "defaultProcess",
  "stateRights" : [
    {
      "state" : "messageState1",
      "right" : "Receive"
    }
  ]
}
You can use this command line :
curl -X POST http://localhost:2103/perimeters -H "Content-type:application/json" -H "Authorization:Bearer $token" --data @perimeter.json
or use the provided script :
./createPerimeter.sh perimeter.json
The result should be a 201 Http status, and a json object such as:
{"id":"getting-startedPerimeter","process":"defaultProcess","stateRights":[{"state":"messageState","right":"Receive"}]}Now let’s attach this perimeter to the Dispatcher group. You can use this command line :
curl -X PUT http://localhost:2103/perimeters/getting-startedPerimeter/groups -H "Content-type:application/json" -H "Authorization:Bearer $token" --data "[\"Dispatcher\"]"
or use the provided script :
./putPerimeterForGroup.sh
The result should be a 200 Http status.
Now, if you refresh the UI or send again the card, you should see the card.
3.5.3. Card sent to a group and an entity
If a card is sent to a group and an entity, then to receive the card the user must be both a member of this entity and a member of this group and have the process / state of the card within the group’s perimeter.
Let’s send this card (for ENTITY1_FR and Dispatcher group with process/state not in user’s perimeter) :
{
        "publisher" : "message-publisher",
        "processVersion" : "1",
        "entityRecipients" : ["ENTITY1_FR"],
        "process"  :"defaultProcess",
        "processInstanceId" : "cardExample5_1",
        "state": "messageState2",
        "groupRecipients": ["Dispatcher"],
        "severity" : "INFORMATION",
        "startDate" : 1553186770681,
        "summary" : {"key" : "defaultProcess.summary"},
        "title" : {"key" : "defaultProcess.title"},
        "data" : {"message" : "Hello World !!! Here is a message for ENTITY1_FR and group Dispatcher - process/state not in operator1_fr perimeter "}
}
Use the provided script :
./sendCard.sh cardSentToEntityAndGroup_1.json
The result should be a 201 Http status.
Look at the result in the UI, you should not be able to see the card.
Now let’s send this card (for ENTITY1_FR and Dispatcher group with process/state in user’s perimeter) :
{
        "publisher" : "message-publisher",
        "processVersion" : "1",
        "entityRecipients" : ["ENTITY1_FR"],
        "process"  :"defaultProcess",
        "processInstanceId" : "cardExample5_2",
        "state": "messageState",
        "groupRecipients": ["Dispatcher"],
        "severity" : "INFORMATION",
        "startDate" : 1553186770681,
        "summary" : {"key" : "defaultProcess.summary"},
        "title" : {"key" : "defaultProcess.title"},
        "data" : {"message" : "Hello World !!! Here is a message for ENTITY1_FR and group Planner - process/state in operator1_fr perimeter "}
}
Use the provided script :
./sendCard.sh cardSentToEntityAndGroup_2.json
The result should be a 201 Http status.
Look at the result in the UI, you should be able to see the card.
3.6. Example 6: Sending cards from the UI
3.6.1. Updating the perimeter
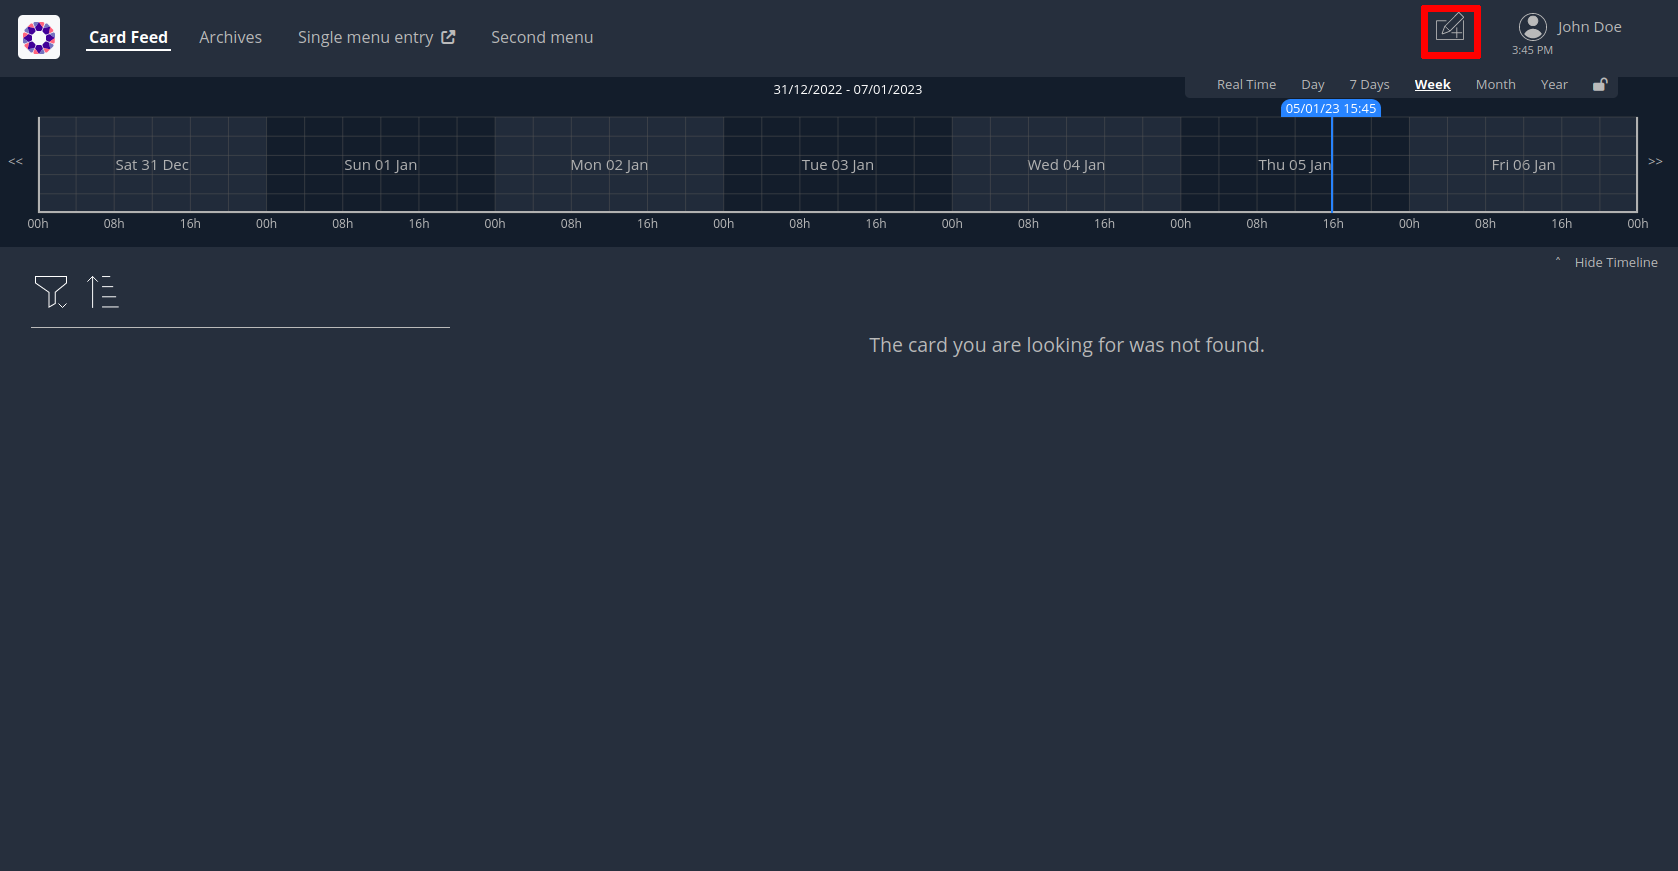
In the top right corner, left to your username, there is the button to send a new card.
If you click on it now, you shouldn’t be able to send a card because none of the groups you’re part of has the right to send a card. So first we need to set up a new perimeter with the correct rights and associate it to one of your group.
{
        "id" : "example6-Perimeter",
        "process" : "defaultProcess",
        "stateRights" : [
                {
                        "state" : "messageState",
                        "right" : "ReceiveAndWrite"
                }
        ]
}
Use the provided script :
./setupPerimeter.sh perimeter.json
3.6.2. Creating the template to send a card
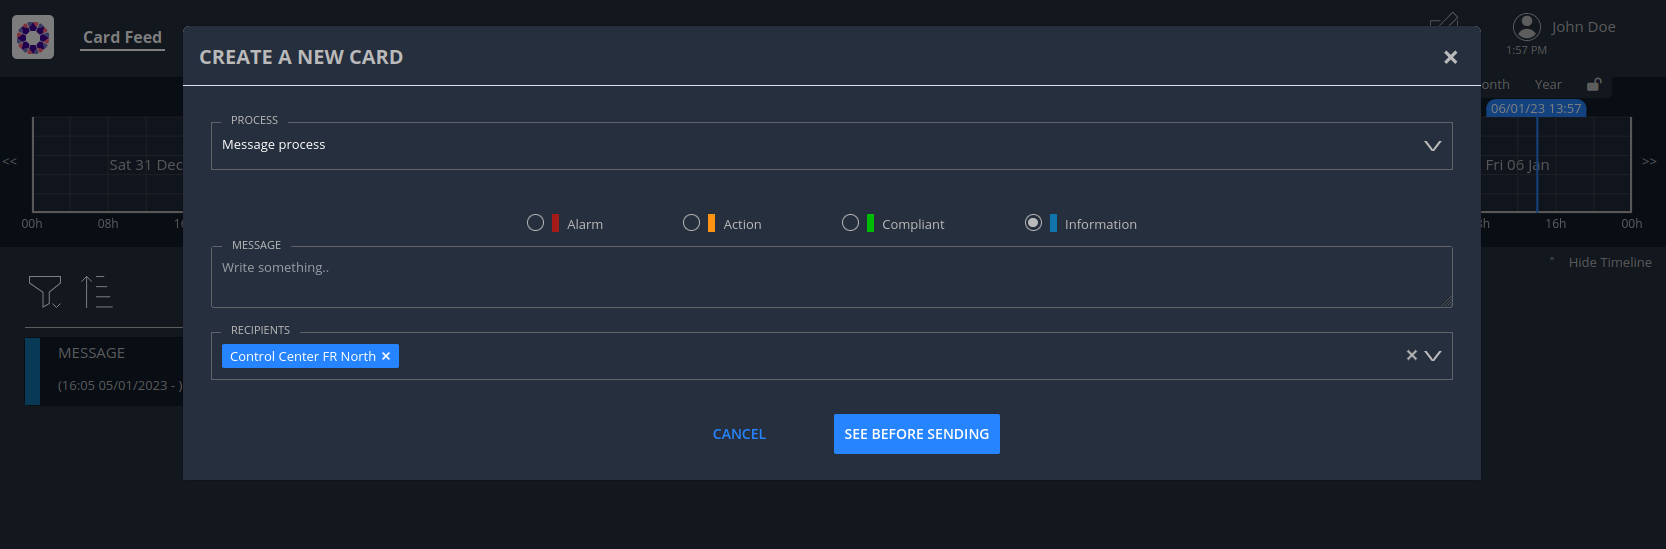
Now you need to update the bundle to include a template for the card sending screen. In the config.json file of the bundle, it is necessary to define the userCard object.
{
        "id":"defaultProcess",
        "name": "Message process",
        "version":"2",
        "states": {
                "messageState": {
                  "name": "Message",
                  "description": "Message",
                  "userCard" : {
                        "template" : "usercard_message",
                        "startDateVisible": false,
                        "endDateVisible" : false,
                        "lttdVisible" : false,
                        "expirationDateVisible" : false
                  },
                  "templateName": "message"
                }
        }
}
The bundle folder now contains usercard_message.handlebars:
<div class="opfab-textarea">
        <label> MESSAGE </label>
        <textarea id="message" name="message" placeholder="Write something.."
                style="width:100%">{{card.data.message}}</textarea>
</div>


<script>
    usercardTemplateGateway.getSpecificCardInformation = function () {
        const message = document.getElementById('message').value;
        const card = {
        summary : {key : "message.summary"},
                title : {key : "message.title"},
        data : {message: message},
        };
        if (message.length<1) return { valid:false , errorMsg:'You must provide a message'}
        return {
            valid: true,
            card: card
        };

    }

</script>
You can package it and send it to the server with the provided scripts :
./packageBundle.sh | ./sendBundle.sh
Now if you reload the page, you should be able to send a card. Don’t forget to send it to an entity you’re a part of to receive it. For instance Control Center FR North.
3.6.3. Customize the card sending template
To go further you can check out the folder named bundle_updated to see a template where it is possible to add an object to the message similar to e-mails.
You can see the updated UI using this command line and refreshing the page to update the bundle.
./packageBundle_updated.sh | ./sendBundle.sh
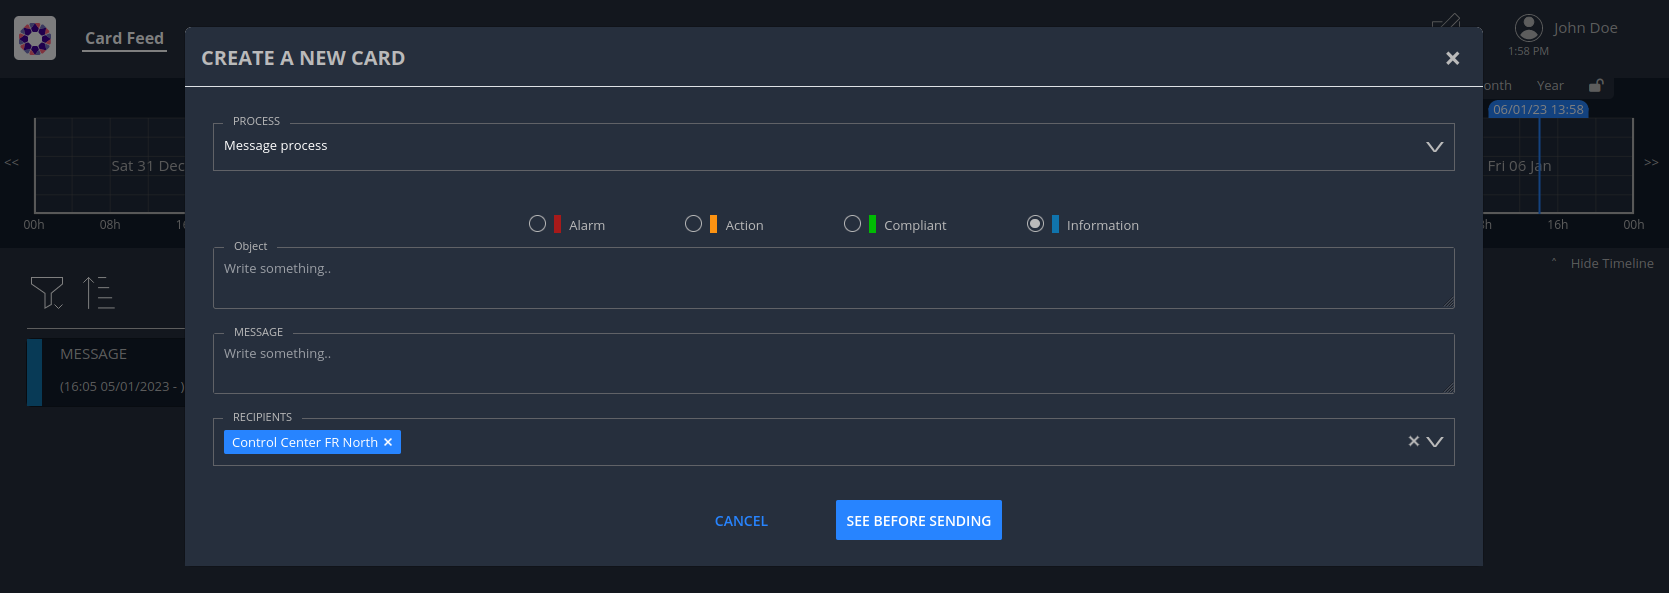
The object attribute is defined in the userCard template in the usercard_message.handlebars file.
        <div class="opfab-textarea">
            <label> Object </label>
            <textarea id="object" name="object" placeholder="Write something.."
                style="width:100%">{{card.data.object}}</textarea>
        </div>
        <br/>

        <div class="opfab-textarea">
            <label> MESSAGE </label>
            <textarea id="message" name="message" placeholder="Write something.."
                style="width:100%">{{card.data.message}}</textarea>
        </div>

<script>
    usercardTemplateGateway.getSpecificCardInformation = function () {
        const message = document.getElementById('message').value;
        const object = document.getElementById('object').value;
        const card = {
        summary : {key : "message.summary"},
                title : {key : "message.title"},
        data : {message: message, object: object},
        };
        if (message.length<1) return { valid:false , errorMsg:'You must provide a message'}
        return {
            valid: true,
            card: card
        };

    }

</script>
If you look at the message.handlebars file in the bundle, you will see how the template was changed to take the object attribute into account:
<h2><b>Object:</b> {{card.data.object}}</h2>

{{card.data.message}}
See the card documentation for further information on cards.
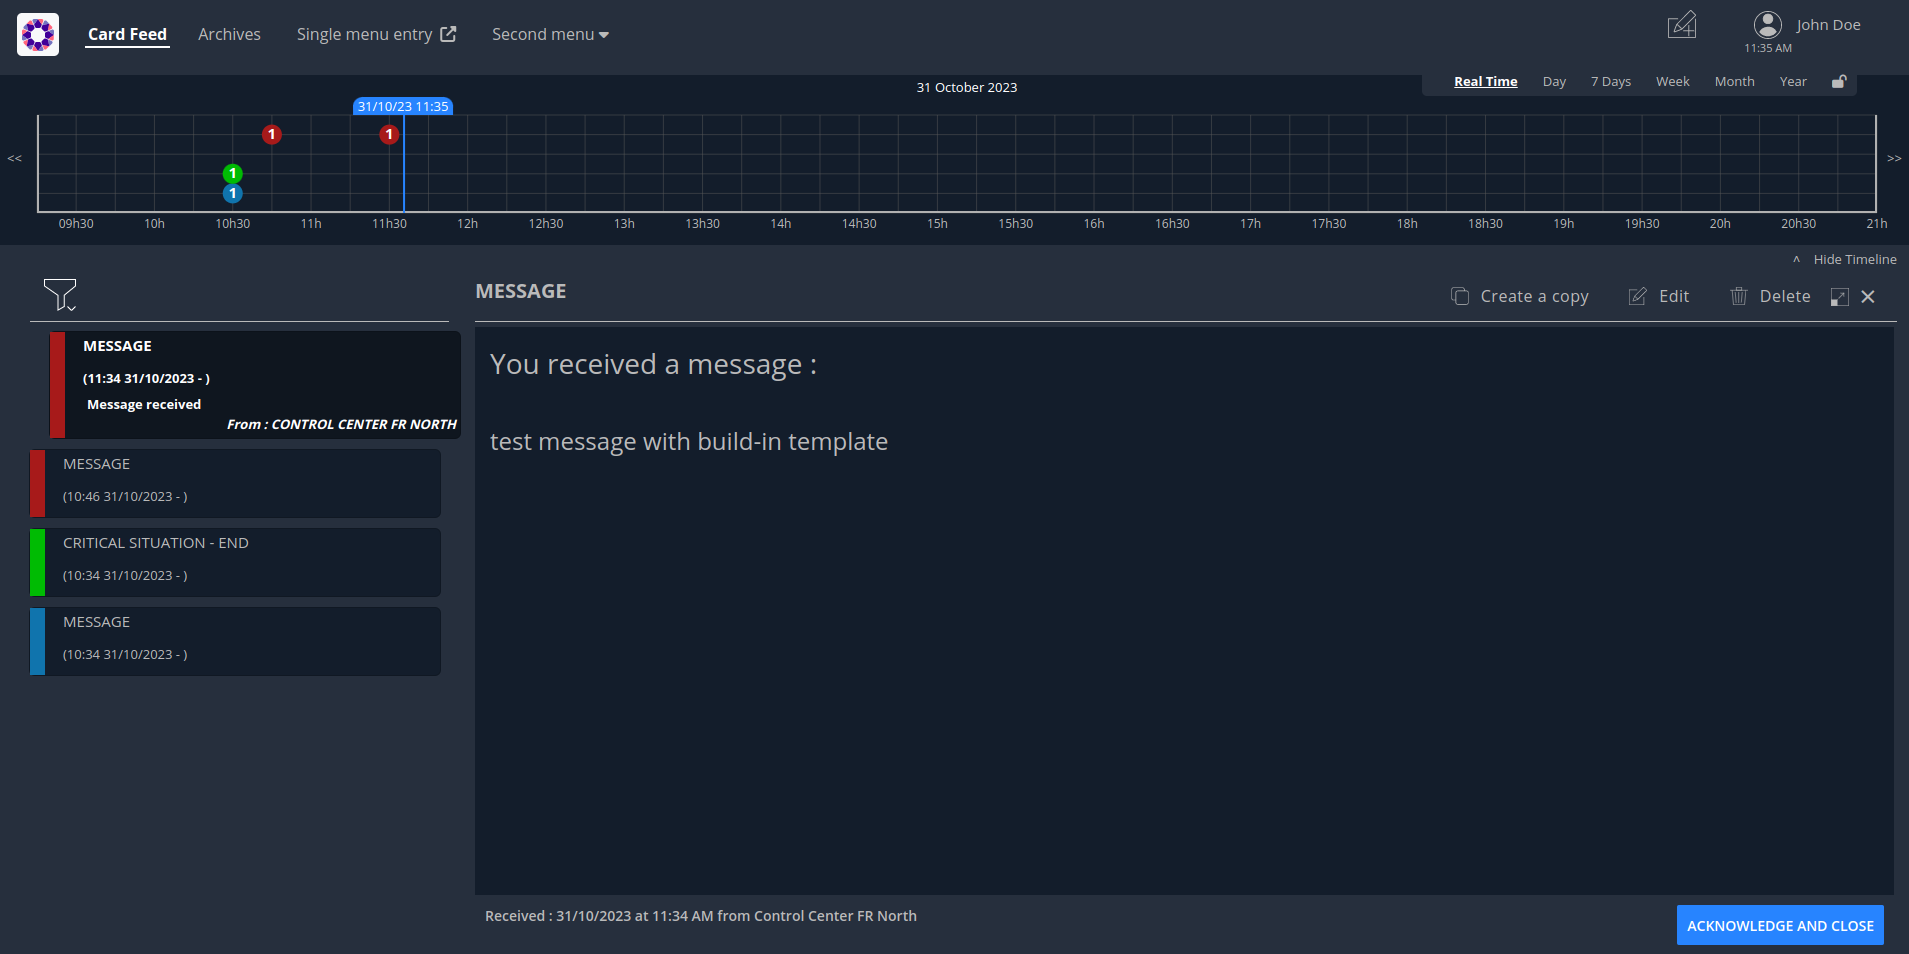
3.7. Example 7: Message card using "built-in" templates
Instead of coding your own templates for message cards or user cards, you can use opfab built-in templates if it suits your needs. In the following example, we are going to modify the templates of the previous bundle (the message card).
If you want to show only a simple message, you can use the message built-in template, to achieve this, first you have to
put in your handlebar file message.handlebars:
<opfab-message-card> </opfab-message-card>
The built-in template supposes the message is stored in the card in field data.message.
|
Then you have to put in your handlebar file message_usercard.handlebars:
<opfab-message-usercard> </opfab-message-usercard>
The message will be stored in the field data.message of the card.
|
You can package the bundle and send it to the server with the provided scripts :
./packageBundle.sh | ./sendBundle.sh
Now if you reload the page, you should be able to create a card using built-in template.
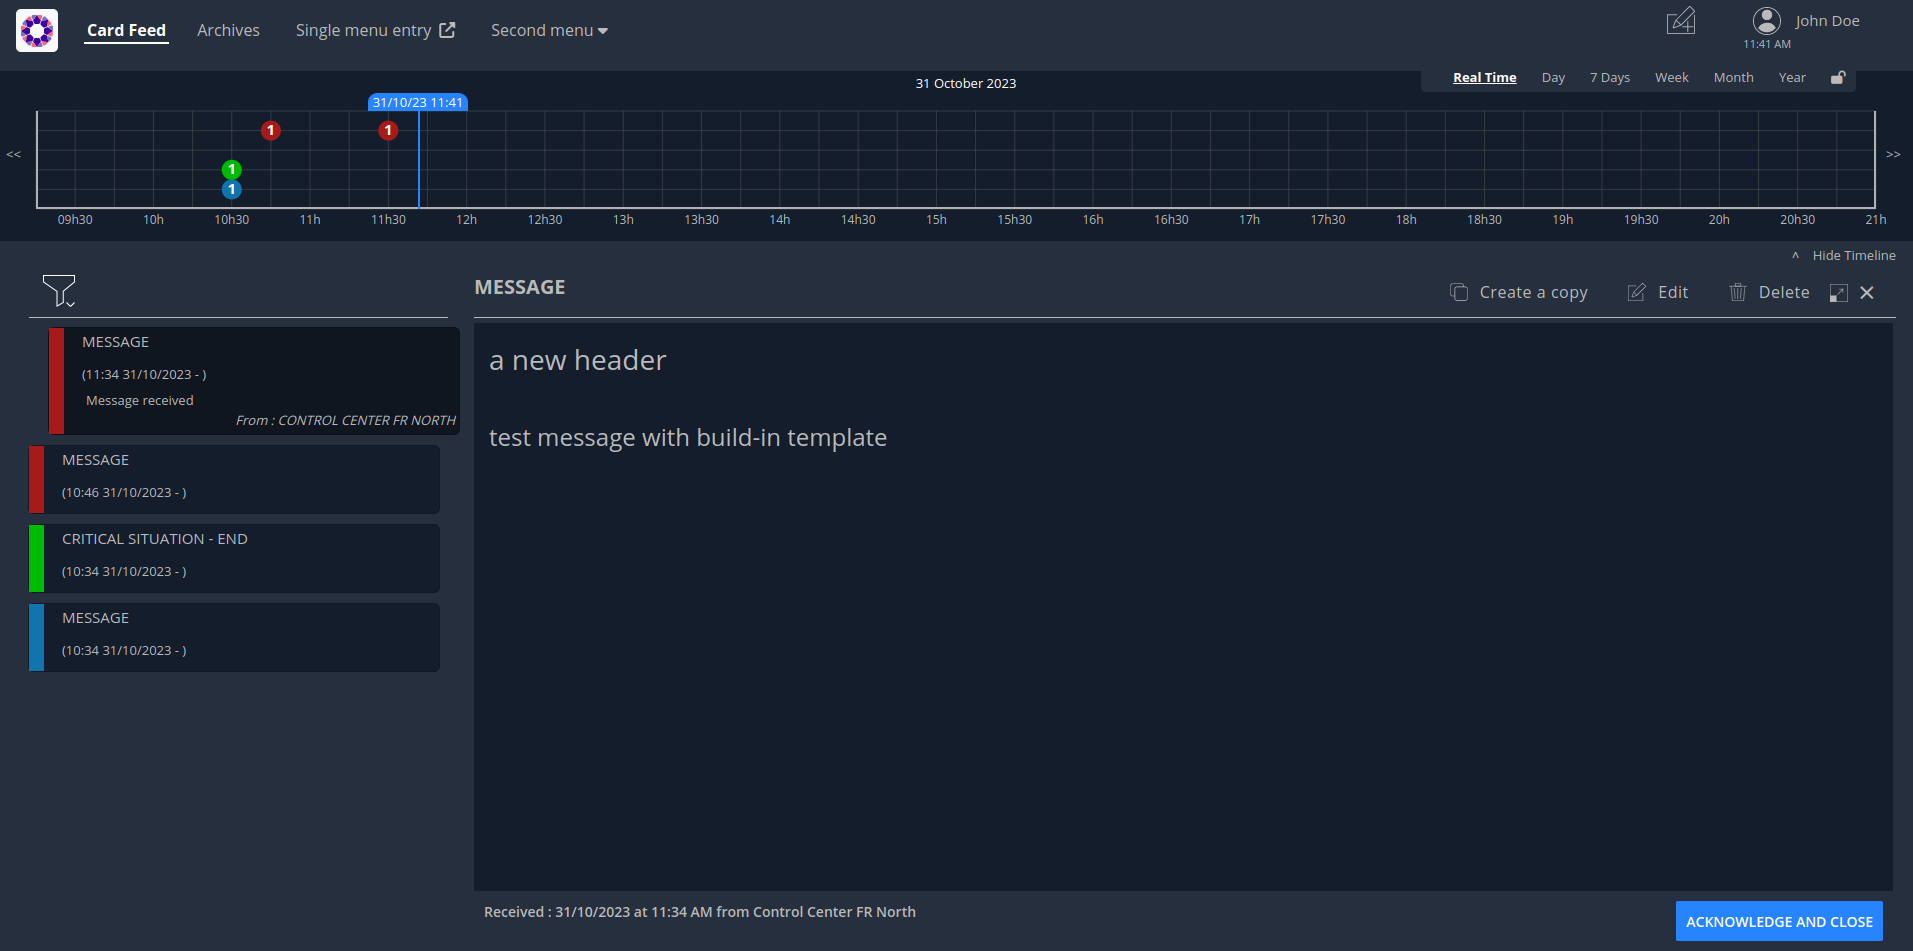
You can change the text header by providing the message-header attribute:
<opfab-message-card message-header="a new header"> </opfab-message-card>By using attributes you can set some parameters regarding recipients, see common attributes for user cards
You can see the updated UI using this command line and refreshing the page to update the bundle.
./packageBundle_updated.sh | ./sendBundle.sh
3.8. Example 8: Question card using "built-in" templates
Another example of templating is a question/response use case. Opfab allows you to send a response which will be attached to the card. This mechanism can be illustrated via the built-in template for question card.
To show a question and see user responses, first you have to put in your handlebar file question.handlebars:
<opfab-question-card> </opfab-question-card>
The built-in template supposes the question is stored in the card in the field data.question.
|
Then you have to put in your handlebar file question_usercard.handlebars:
<opfab-question-usercard> </opfab-question-usercard>
The question will be stored in the field data.question of the card.
|
Like the message built-in template, you can set default attributes : common attributes for user cards
Use the provided script to add rights to send question card :
./setupPerimeter.sh perimeter.json
You can package the bundle and send it to the server with the provided scripts :
./packageBundle.sh | ./sendBundle.sh
Example for using a question card with the previous built-in template :
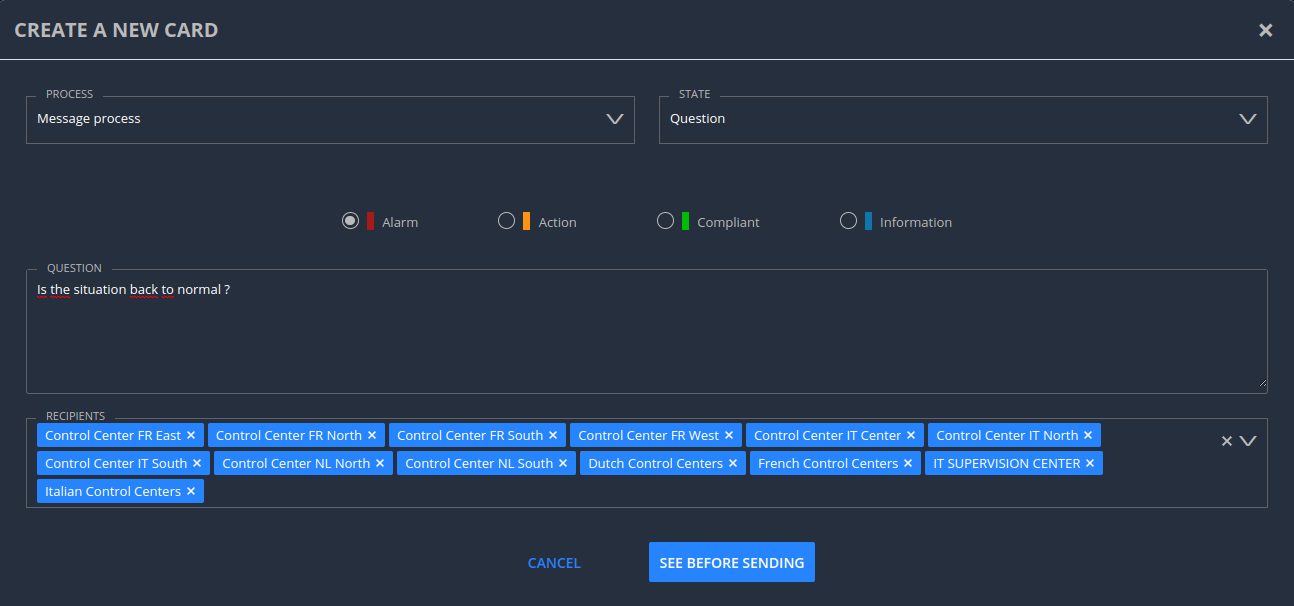
First, operator1_fr log in and create the question card :
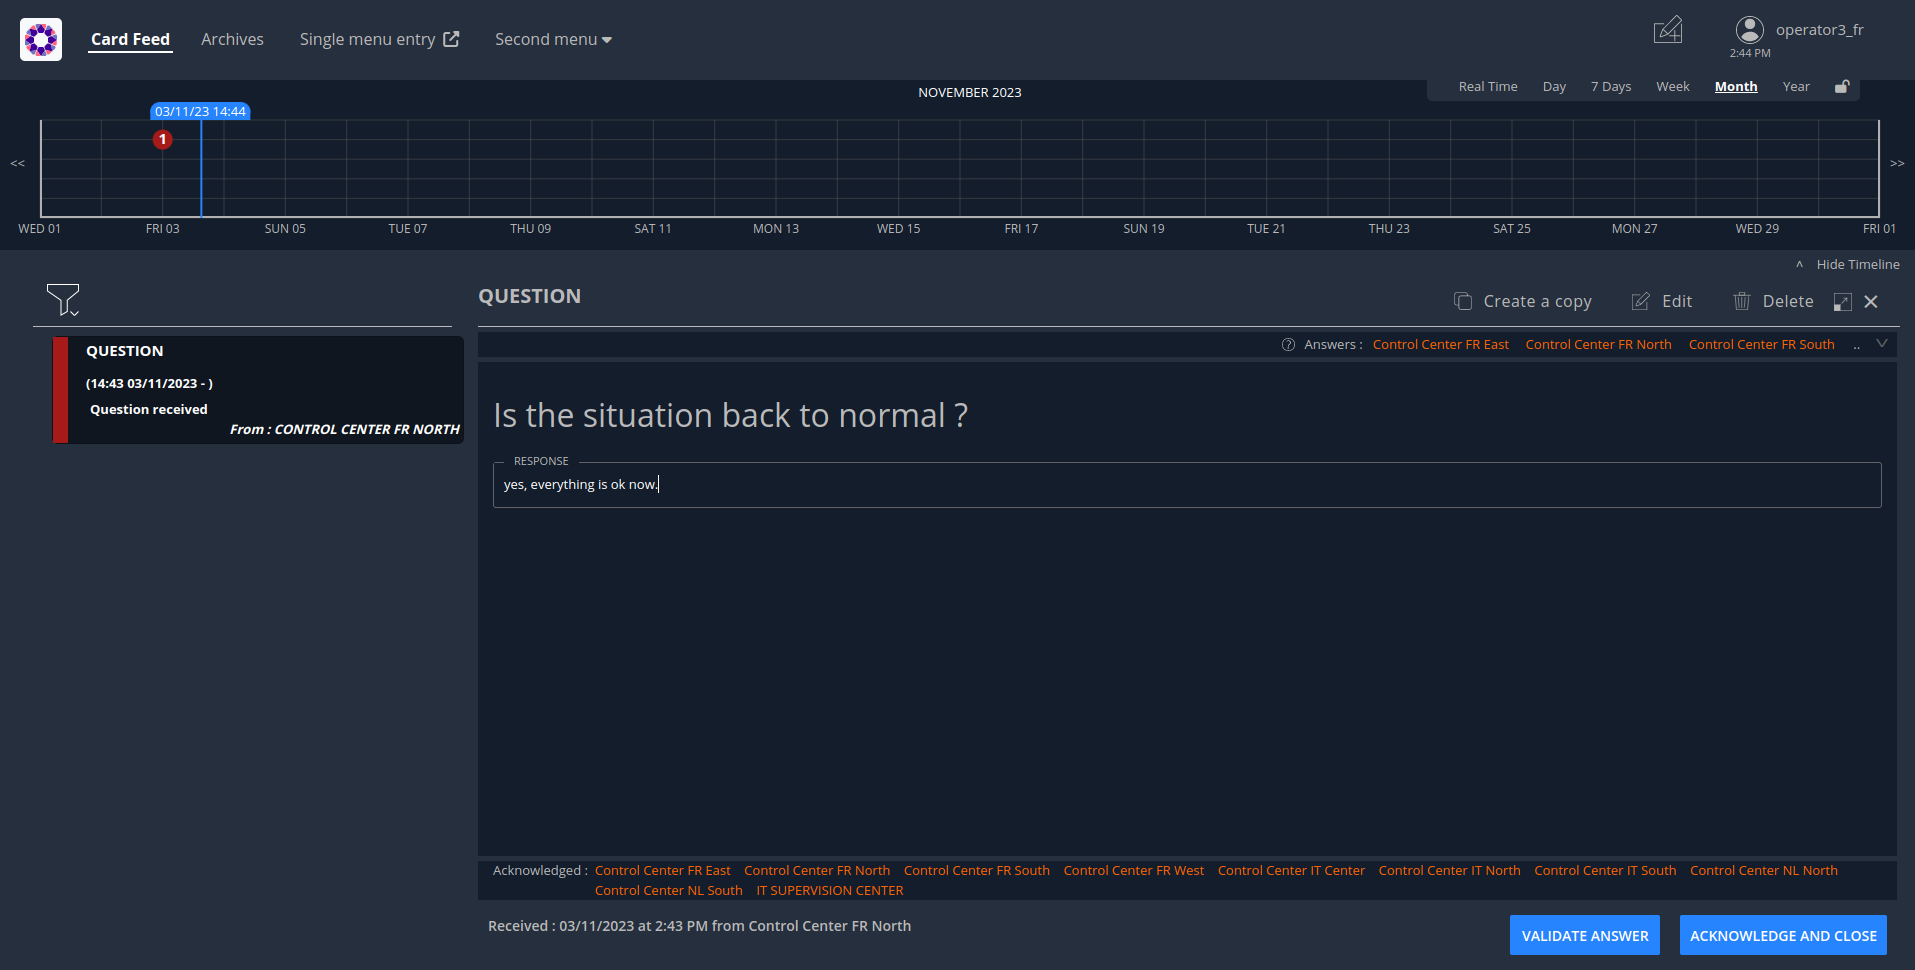
Then, operator3_fr log in, read the question card and answer to it :
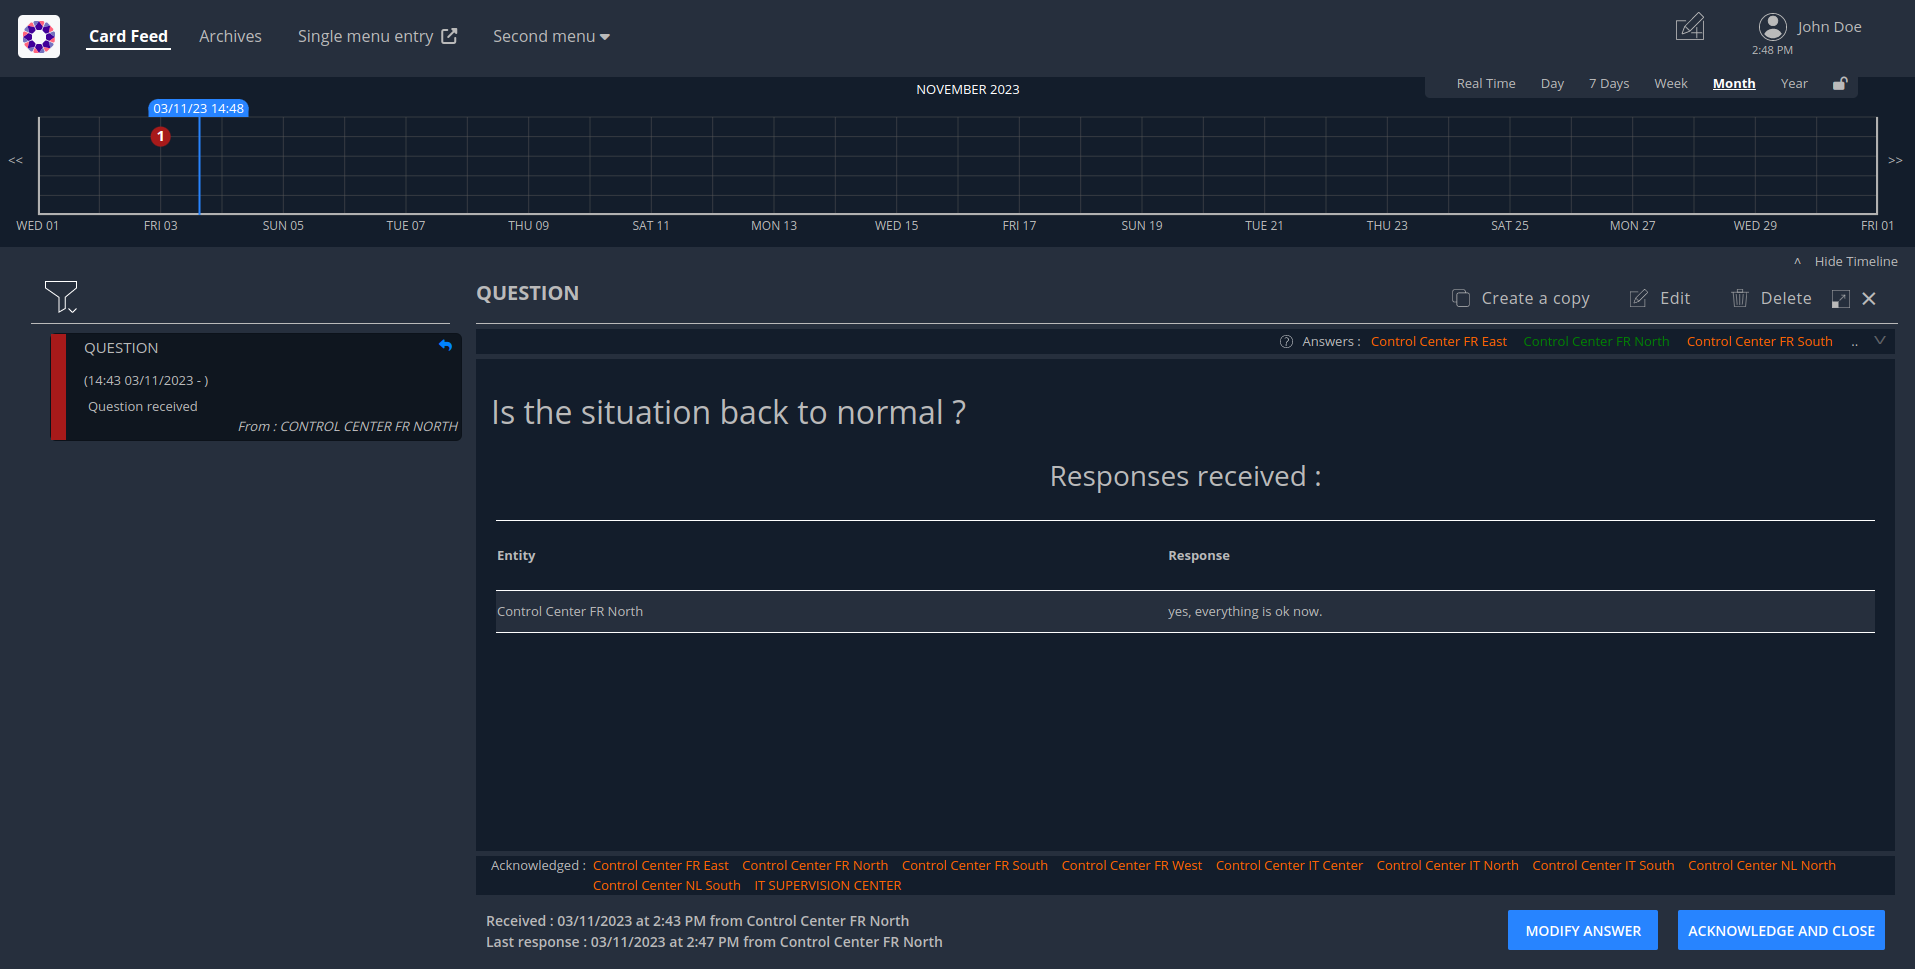
Finally, operator1_fr sees the answer of operator3_fr :
4. Demonstration
For demonstration purposes, a "demo" folder containing examples is included. In this folder, bundles of generic cards are included as well as scripts to load the configuration. The bundles include 4 built-in templates :
-
message
-
message_or_question_list
-
question
-
task
The scripts allow to create or delete the bundles, businessData, perimeters or realTimeScreens as necessary. While inside the "client/demo" folder, the script
./loadDemoConf.sh
is available to set it all up.
5. Troubleshooting
5.1. My bundle is not loaded
The server send a {"status":"BAD_REQUEST","message":"unable to open submitted
file","errors":["Error detected parsing the header"]}, despite correct http
headers.
The uploaded bundle is corrupted. Test your bundle in a terminal (Linux solution).
Example for a bundle archive named MyBundleToTest.tar.gz giving the
mentioned error when uploaded :
tar -tzf MyBundleToTest.tar.gz >/dev/null
tar: This does not look like a tar archive
tar: Skipping to next header
tar: Exiting with failure status due to previous errors
5.2. I can’t upload my bundle
The server responds with a message like the following:
{"status":"BAD_REQUEST","message":"unable to open submitted
file","errors":["Input is not in the .gz format"]}
The bundle has been compressed using an unmanaged format.
5.2.1. Format verification
5.2.1.1. Linux solution
Command line example to verify the format of a bundle archive named
MyBundleToTest.tar.gz(which gives the mentioned error when uploaded):
tar -tzf MyBundleToTest.tar.gz >/dev/null
which should return in such case the following messages:
gzip: stdin: not in gzip format
tar: Child returned status 1
tar: Error is not recoverable: exiting now
5.3. My bundle is rejected due to internal structure
The server sends {"status":"BAD_REQUEST","message":"Incorrect inner file
structure","errors":["$OPERATOR_FABRIC_INSTANCE_PATH/d91ba68c-de6b-4635-a8e8-b58
fff77dfd2/config.json (Aucun fichier ou dossier de ce type)"]}
Where $OPERATOR_FABRIC_INSTANCE_PATH is the folder where businessconfig files are
stored server side.