OperatorFabric Getting Started
1. Prerequisites
To use OperatorFabric, you need a linux OS with the following:
-
Docker install with 4Gb of space
-
16Gb of RAM
2. Install and run server
To start OperatorFabric, you first need to clone the getting started git
git clone https://github.com/opfab/operatorfabric-getting-started.git
Launch the startserver.sh in the server directory. You need to wait for all the services to start (it usually takes one minute to start), it is done when the console prompt is available again.
Test the connection to the UI: to connect to OperatorFabric, open in a browser the following page: localhost:2002/ui/ and use operator1_fr as login and test as password.
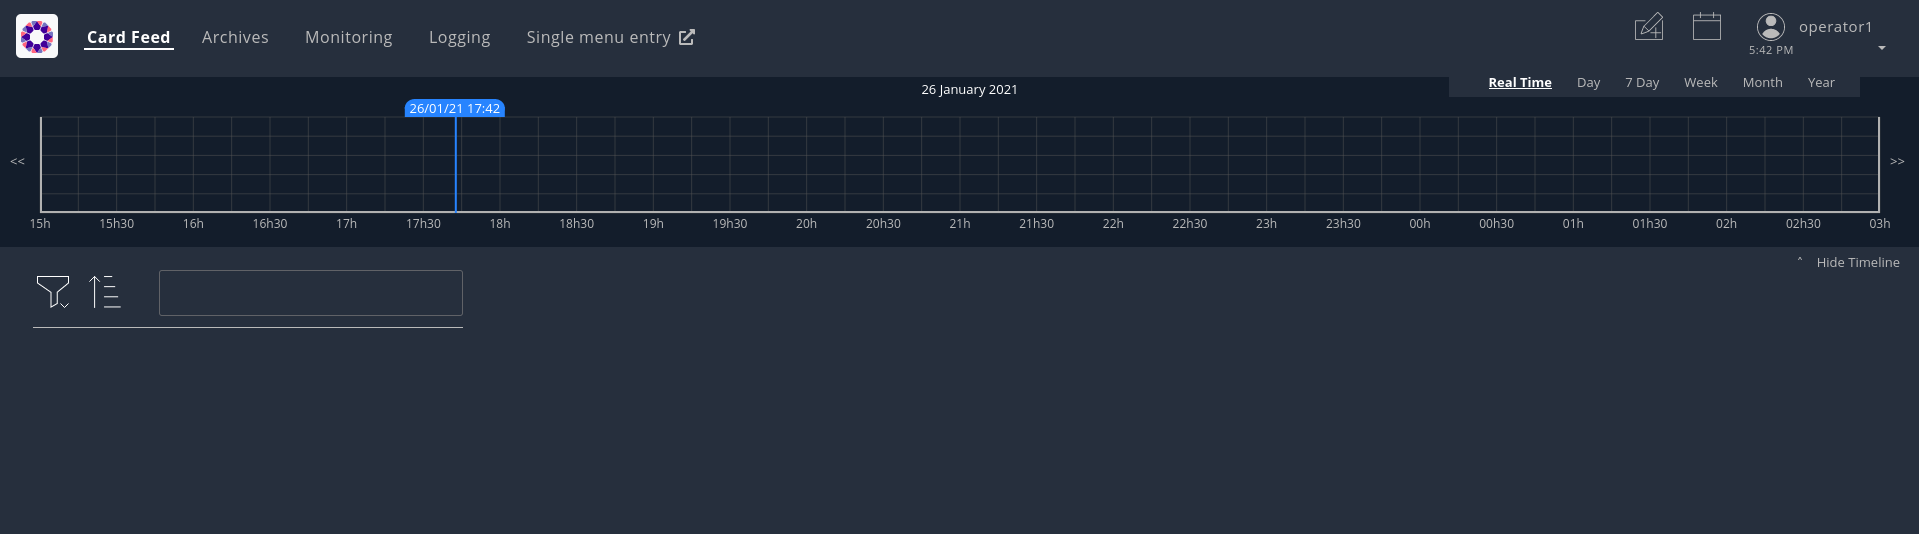
After connection, you should see the following screen
To stop the server (if you start it in background), use:
docker-compose down &
3. Examples
For each example, useful files and scripts are in the directory client/exampleX.
All examples assume you connect to the server from localhost (otherwise change the provided scripts)
3.1. Example 1: Send and update a basic card
Go in directory client/example1.
To receive the test cards it is necessary to configure a perimeter as you will see in details in Example 5.
Configure the required perimeter by executing the provided script:
./setupPerimeter.sh perimeter.json
Send a card, using the provided script :
./sendCard.sh card.json
The result should be a 201 Http status.
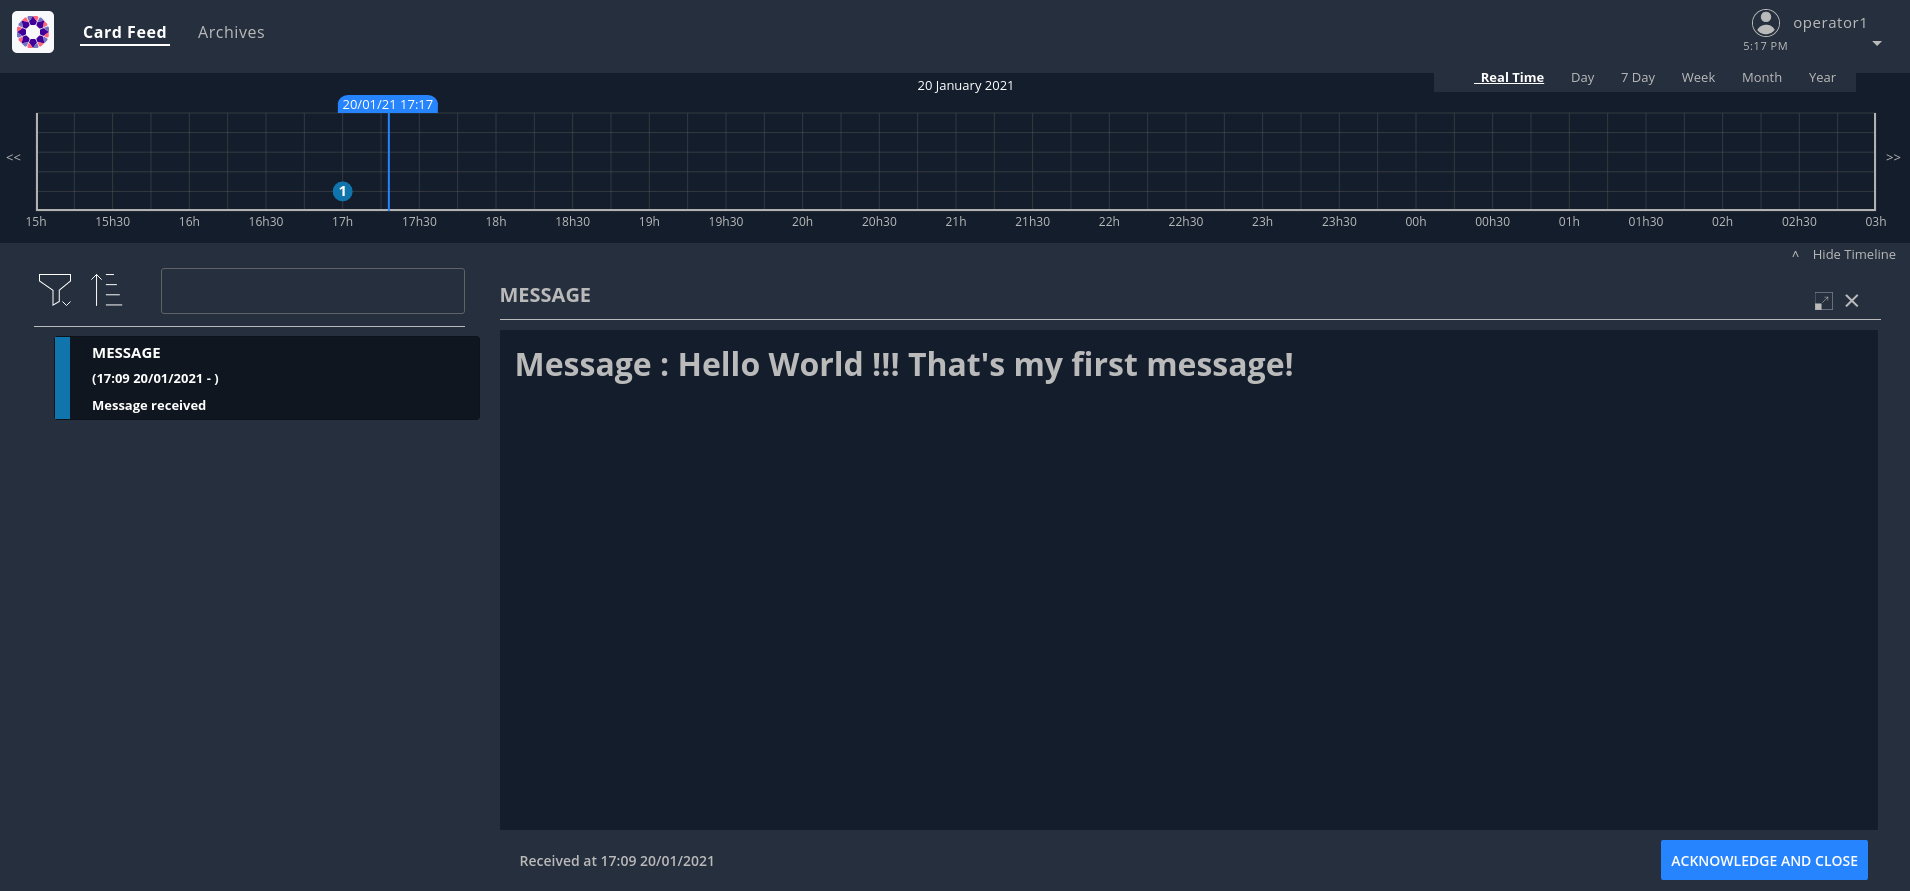
See the result in the UI, you should see a card, if you click on it you’ll see the detail
3.1.1. Anatomy of the card :
A card is containing information regarding the publisher, the recipients, the process, the data to show…
More information can be found in the Card Structure section of the reference documentation.
{
        "publisher" : "message-publisher",
        "processVersion" : "1",
        "process" :"defaultProcess",
        "processInstanceId" : "hello-world-1",
        "state" : "messageState",
        "groupRecipients": ["Dispatcher"],
        "severity" : "INFORMATION",
        "startDate" : 1553186770681,
        "summary" : {"key" : "defaultProcess.summary"},
        "title" : {"key" : "defaultProcess.title"},
        "data" : {"message" :"Hello World !!! That's my first message"}
}| If you open the json file of the card, you will see '${current_date_in_milliseconds_from_epoch}' for the field 'startDate'. We have used this so that the date of the card is the current day (or the next day in some other examples). Indeed, in the shell script that sends the card, you will see that we create an environment variable with the current date which is then injected into the json file. |
3.1.2. Update the card
We can send a new version of the card (updateCard.json):
-
change the message, field data.message in the JSON File
-
the severity , field severity in the JSON File
{
        "publisher" : "message-publisher",
        "processVersion" : "1",
        "process"  :"defaultProcess",
        "processInstanceId" : "hello-world-1",
        "state" : "messageState",
        "groupRecipients": ["Dispatcher"],
        "severity" : "ALARM",
        "startDate" : 1553186770681,
        "summary" : {"key" : "defaultProcess.summary"},
        "title" : {"key" : "defaultProcess.title"},
        "data" : {"message" :":That's my second message"}
}
You can send the updated card with:
./sendCard.sh cardUpdate.json
The card should be updated on the UI.
3.2. Example 2: Publish a new bundle
The way the card is display in the UI is defined via a Bundle containing templates and process description.
The bundle structure is the following:
├── css : stylesheets files
└── template : handlebar templates for detail card rendering
config.json : process description and global configuration
i18n.json : internalization file
The bundle is provided in the bundle directory of example2. It contains a new version of the bundle used in example1.
We just change the template and the stylesheet instead of displaying:
Message : The message
we display:
You received the following message

The message
If you look at the template file (template/template.handlebars):
<h2> You received the following message </h2>

{{card.data.message}}
In the stylesheet css/style.css we just change the color value to red (#ff0000):
h2{
        color:#ff0000;
        font-weight: bold;
}
The global configuration is defined in config.json :
{
        "id":"defaultProcess",
        "version":"2",
        "states":{
                "messageState" : {
                        "templateName" : "template",
                        "styles" : [ "style" ]
                }
        }
}
To keep the old bundle, we create a new version by setting version to 2.
3.2.1. Package your bundle
Your bundle need to be package in a tar.gz file, a script is available
./packageBundle.sh
A file name bundle.tar.gz will be created.
3.2.2. Get a Token
To send the bundle you need to be authenticated. To get a token you can source the provided script:
source ../getToken.sh
This will run the following command:
curl -s -X POST -d "username=admin&password=test&grant_type=password&client_id=opfab-client" http://localhost:2002/auth/token
This should return a JSON a response like this:
{"access_token":"eyJhbGciOiJSUzI1NiIsInR5cCIgOiAiSldUIiwia2lkIiA6ICJSbXFOVTNLN0x4ck5SRmtIVTJxcTZZcTEya1RDaXNtRkw5U2NwbkNPeDBjIn0.eyJqdGkiOiIzZDhlODY3MS1jMDhjLTQ3NDktOTQyOC1hZTdhOTE5OWRmNjIiLCJleHAiOjE1NzU1ODQ0NTYsIm5iZiI6MCwiaWF0IjoxNTc1NTQ4NDU2LCJpc3MiOiJodHRwOi8va2V5Y2xvYWs6ODA4MC9hdXRoL3JlYWxtcy9kZXYiLCJhdWQiOiJhY2NvdW50Iiwic3ViIjoiYTNhM2IxYTYtMWVlYi00NDI5LWE2OGItNWQ1YWI1YjNhMTI5IiwidHlwIjoiQmVhcmVyIiwiYXpwIjoib3BmYWItY2xpZW50IiwiYXV0aF90aW1lIjowLCJzZXNzaW9uX3N0YXRlIjoiODc3NzZjOTktYjA1MC00NmQxLTg5YjYtNDljYzIxNTQyMDBhIiwiYWNyIjoiMSIsInJlYWxtX2FjY2VzcyI6eyJyb2xlcyI6WyJvZmZsaW5lX2FjY2VzcyIsInVtYV9hdXRob3JpemF0aW9uIl19LCJyZXNvdXJjZV9hY2Nlc3MiOnsiYWNjb3VudCI6eyJyb2xlcyI6WyJtYW5hZ2UtYWNjb3VudCIsIm1hbmFnZS1hY2NvdW50LWxpbmtzIiwidmlldy1wcm9maWxlIl19fSwic2NvcGUiOiJlbWFpbCBwcm9maWxlIiwic3ViIjoiYWRtaW4iLCJlbWFpbF92ZXJpZmllZCI6ZmFsc2UsInByZWZlcnJlZF91c2VybmFtZSI6ImFkbWluIn0.XMLjdOJV-A-iZrtq7sobcvU9XtJVmKKv9Tnv921PjtvJ85CnHP-qXp2hYf5D8TXnn32lILVD3g8F9iXs0otMAbpA9j9Re2QPadwRnGNLIzmD5pLzjJ7c18PWZUVscbaqdP5PfVFA67-j-YmQBwxiys8psF8keJFvmg-ExOGh66lCayClceQaUUdxpeuKFDxOSkFVEJcVxdelFtrEbpoq0KNPtYk7vtoG74zO3KjNGrzLkSE_e4wR6MHVFrZVJwG9cEPd_dLGS-GmkYjB6lorXPyJJ9WYvig56CKDaFry3Vn8AjX_SFSgTB28WkWHYZknTwm9EKeRCsBQlU6MLe4Sng","expires_in":36000,"refresh_expires_in":1800,"refresh_token":"eyJhbGciOiJIUzI1NiIsInR5cCIgOiAiSldUIiwia2lkIiA6ICIzZjdkZTM0OC05N2Q5LTRiOTUtYjViNi04MjExYTI3YjdlNzYifQ.eyJqdGkiOiJhZDY4ODQ4NS1hZGE0LTQwNWEtYjQ4MS1hNmNkMTM2YWY0YWYiLCJleHAiOjE1NzU1NTAyNTYsIm5iZiI6MCwiaWF0IjoxNTc1NTQ4NDU2LCJpc3MiOiJodHRwOi8va2V5Y2xvYWs6ODA4MC9hdXRoL3JlYWxtcy9kZXYiLCJhdWQiOiJodHRwOi8va2V5Y2xvYWs6ODA4MC9hdXRoL3JlYWxtcy9kZXYiLCJzdWIiOiJhM2EzYjFhNi0xZWViLTQ0MjktYTY4Yi01ZDVhYjViM2ExMjkiLCJ0eXAiOiJSZWZyZXNoIiwiYXpwIjoib3BmYWItY2xpZW50IiwiYXV0aF90aW1lIjowLCJzZXNzaW9uX3N0YXRlIjoiODc3NzZjOTktYjA1MC00NmQxLTg5YjYtNDljYzIxNTQyMDBhIiwicmVhbG1fYWNjZXNzIjp7InJvbGVzIjpbIm9mZmxpbmVfYWNjZXNzIiwidW1hX2F1dGhvcml6YXRpb24iXX0sInJlc291cmNlX2FjY2VzcyI6eyJhY2NvdW50Ijp7InJvbGVzIjpbIm1hbmFnZS1hY2NvdW50IiwibWFuYWdlLWFjY291bnQtbGlua3MiLCJ2aWV3LXByb2ZpbGUiXX19LCJzY29wZSI6ImVtYWlsIHByb2ZpbGUifQ.sHskPtatqlU9Z8Sfq6yvzUP_L6y-Rv26oPpykyPgzmk","token_type":"bearer","not-before-policy":0,"session_state":"87776c99-b050-46d1-89b6-49cc2154200a","scope":"email profile"}Your token is the access_token value in the JSON, which the script will export to a $token environment variable.
The sendBundle.sh script below will use of this variable.
| The token will be valid for 10 hours, after you will need to ask for a new one. |
3.2.3. Send the bundle
Executing the sendBundle.sh script will send the bundle.
You can now execute the script, it will send the bundle.
./sendBundle.sh
You should received the following JSON in response, describing your bundle.
{"id":"defaultProcess","name":"process.name","version":"2","states":{"messageState":{"responseData":null,"acknowledgmentAllowed":"Always","color":null,"name":null,"description":null,"showDetailCardHeader":null,"userCard":null,"templateName":"template","styles":["style"],"type":null,"response":null}},"uiVisibility":null}3.2.4. Send a card
You can send the following card to test your new bundle:
{
        "publisher" : "message-publisher",
        "processVersion" : "2",
        "process"  :"defaultProcess",
        "processInstanceId" : "hello-world-1",
        "state": "messageState",
        "groupRecipients": ["Dispatcher"],
        "severity" : "INFORMATION",
        "startDate" : 1553186770681,
        "summary" : {"key" : "defaultProcess.summary"},
        "title" : {"key" : "defaultProcess.title"},
        "data" : {"message":"Hello world in new version"}
}
To use the new bundle, we set processVersion to "2"
To send the card:
./sendCard.sh
You should see in the UI the detail card with the new template.
3.3. Example 3: Process with state
For this example, we will set the following process:
-
Step 1: A critical situation arises on the High Voltage grid
-
Step 2: The critical situation evolve
-
Step 3: The critical situation ends
To model this process in OperatorFabric, we will use a "Process" with "States", we will model this in the config.json
of the bundle:
{
        "id":"criticalSituation",
        "name": "Critical situation process",
        "version":"1",
        "states":{
                "criticalSituation-begin" : {
                        "templateName" : "criticalSituationTemplate",
                        "styles" : [ "style" ],
                        "acknowledgmentAllowed": "Always"
                },
                "criticalSituation-update" : {
                        "templateName" : "criticalSituationTemplate",
                        "styles" : [ "style" ],
                        "acknowledgmentAllowed": "Always"
                },
                "criticalSituation-end" : {
                        "templateName" : "endCriticalSituationTemplate",
                        "styles" : [ "style" ],
                        "acknowledgmentAllowed": "Always"
                }
        }
}
You can see in the JSON we define a process name "criticalSituation" with 3 states: criticalSituation-begin, criticalSituation-update and criticalSituation-end. For each state we define a title for the card, and the template a stylesheets to use.
The title is a key which refer to i18n.json file:
{
        "criticalSituation-begin":{
                "title":"CRITICAL SITUATION",
                "summary":" CRITICAL SITUATION ON THE GRID , SEE DETAIL FOR INSTRUCTION"
        },
        "criticalSituation-update":{
                "title":"CRITICAL SITUATION - UPDATE",
                "summary":" CRITICAL SITUATION ON THE GRID , SEE DETAIL FOR INSTRUCTION"
        },
        "criticalSituation-end":{
                "title":"CRITICAL SITUATION - END",
                "summary":" CRITICAL SITUATION ENDED"
        }

}
The templates can be found in the template directory.
Before sending cards it is necessary to configure the required perimeter by executing the provided script:
./setupPerimeter.sh perimeter.json
We can now send cards and simulate the process, first we send a card at the beginning of the critical situation:
{
        "publisher" : "alert-publisher",
        "processVersion" : "1",
        "process"  :"criticalSituation",
        "processInstanceId" : "alert1",
        "state": "criticalSituation-begin",
        "groupRecipients": ["Dispatcher"],
        "severity" : "ALARM",
        "startDate" : 1553186770681,
        "summary" : {"key" : "criticalSituation-begin.summary"},
        "title" : {"key" : "criticalSituation-begin.title"},
        "data" : {"instruction":"Critical situation on the grid : stop immediatly all maintenance on the grid"}
}
The card refers to the process "criticalSituation" as defined in the config.json, the state attribute is put to "criticalSituation-begin" which is the first step of the process, again as defined in the config.json. The card can be sent via provided script :
./sendCard.sh card.json
Two other card have be provided to continue the process
-
cardUpdate.json: the state is criticalSituation-update
-
cardEnd.json: the state is criticalSituation-end and severity set to "compliant"
You can send these cards:
./sendCard.sh cardUpdate.json
./sendCard.sh cardEnd.json
3.4. Example 4: Time Line
To view the card in the time line, you need to set times in the card using timeSpans attributes as in the following card:
 {
        "publisher" : "scheduledMaintenance-publisher",
        "processVersion" : "1",
        "process"  :"maintenanceProcess",
        "processInstanceId" : "maintenance-1",
        "state": "planned",
        "groupRecipients": ["Dispatcher"],
        "severity" : "INFORMATION",
        "startDate" : 1553186770681,
        "summary" : {"key" : "maintenanceProcess.summary"},
        "title" : {"key" : "maintenanceProcess.title"},
        "data" : {
                "operationDescription":"Maintenance operation on the International France England (IFA) High Voltage line ",
                "operationResponsible":"RTE",
                "contactPoint":"By Phone : +33 1 23 45 67 89 ",
                "operationStartingTime":"Wed 11 dec 2019 8pm",
                "operationEndTime":"Thu 12 dec 2019 10am",
                "comment":"Operation has no impact on service"
                },
        "timeSpans" : [
        {"start" : 1576080876779},
        {"start" : 1576104912066}
            ]
}
For this example, we use a new publisher called "scheduledMaintenance-publisher". You won’t need to post the corresponding bundle to the businessconfig service as it has been loaded in advance to be available out of the box (only for the getting started). If you want to take a look at its content you can find it under server/businessconfig-storage/scheduledMaintenance-publisher/1.
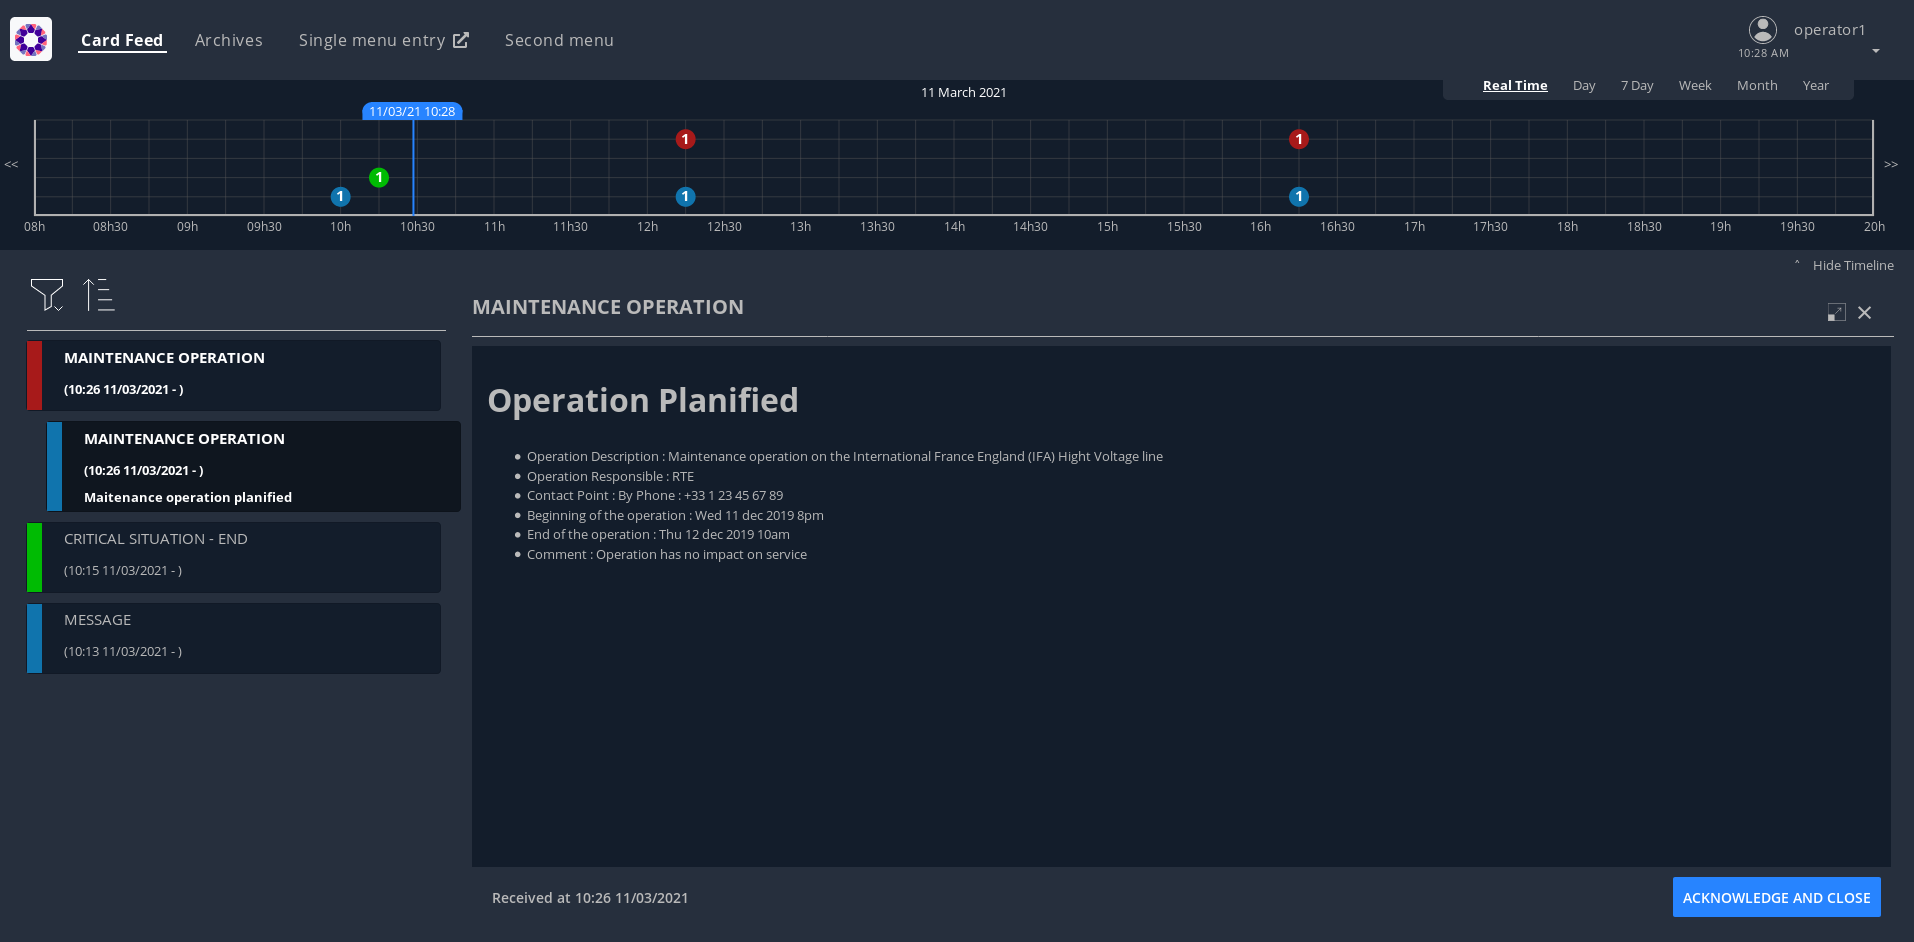
Before sending the provided card provided, you need to set the good time values as epoch (ms) in the json. For each value you set, you will have a point in the timeline. In our example, the first point represent the beginning of the maintenance operation, and the second the end of the maintenance operation.
For example cards the dates are calculated automatically in the provided sendCard.sh script.
It is possible to change dates values by editing the card json file. To get the dates in Epoch, you can use the following commands:
For the first date:
date -d "+ 60 minutes" +%s%N | cut -b1-13
And for the second
date -d "+ 120 minutes" +%s%N | cut -b1-13
Before sending cards it is necessary to configure the required perimeter by executing the provided script:
./setupPerimeter.sh perimeter.json
To send the card use the provided script in example4 directory
./sendCard.sh card.json
A second card (card2.json) is provided as example, as before you can eventually change times values in the json file and then send it
./sendCard.sh card2.json
This time the severity of the card is ALERT, you should see the point in red in the timeline
3.5. Example 5: Card routing mechanism
3.5.1. Card sent to a group
As we saw previously, if a card is sent to a group, then you need to be a member of the group and have the process / state of the card within the group’s perimeter to receive it.
3.5.2. Card sent to an entity
If a card is sent to an entity, then you must be a member of this entity and have the process / state of the card within the user’s perimeter. As the perimeters are attached to groups, the user must therefore be a member of a group attached to this perimeter.
Let’s send this card :
{
    "publisher" : "message-publisher",
    "processVersion" : "1",
    "entityRecipients" : ["ENTITY1_FR"],
    "process" :"defaultProcess",
    "processInstanceId" : "cardExample5",
    "state" : "messageState1",
    "severity" : "INFORMATION",
    "startDate" : 1553186770681,
    "summary" : {"key" : "defaultProcess.summary"},
    "title" : {"key" : "defaultProcess.title"},
    "data" : {"message" : "Hello World !!! Here is a message for ENTITY1_FR"}
}
Use the provided script :
./sendCard.sh cardSentToEntity.json
The result should be a 201 Http status.
See the result in the UI, you should not see the card.
To receive the card you need to create a perimeter and to do it you need to be authenticated. To get a token you can source the provided script:
source ../getToken.sh
Now let’s create this perimeter :
{
  "id" : "getting-startedPerimeter",
  "process" : "defaultProcess",
  "stateRights" : [
    {
      "state" : "messageState1",
      "right" : "Receive"
    }
  ]
}
You can use this command line :
curl -X POST http://localhost:2103/perimeters -H "Content-type:application/json" -H "Authorization:Bearer $token" --data @perimeter.json
or use the provided script :
./createPerimeter.sh perimeter.json
The result should be a 201 Http status, and a json object such as:
{"id":"getting-startedPerimeter","process":"defaultProcess","stateRights":[{"state":"messageState","right":"Receive"}]}Now let’s attach this perimeter to the Dispatcher group. You can use this command line :
curl -X PUT http://localhost:2103/perimeters/getting-startedPerimeter/groups -H "Content-type:application/json" -H "Authorization:Bearer $token" --data "[\"Dispatcher\"]"
or use the provided script :
./putPerimeterForGroup.sh
The result should be a 200 Http status.
Now, if you refresh the UI or send again the card, you should see the card.
3.5.3. Card sent to a group and an entity
If a card is sent to a group and an entity, then to receive the card the user must both a member of this entity and a member of this group and have the process / state of the card within the group’s perimeter.
Let’s send this card (for ENTITY1_FR and Dispatcher group with process/state not in user’s perimeter) :
{
        "publisher" : "message-publisher",
        "processVersion" : "1",
        "entityRecipients" : ["ENTITY1_FR"],
        "process"  :"defaultProcess",
        "processInstanceId" : "cardExample5_1",
        "state": "messageState2",
        "groupRecipients": ["Dispatcher"],
        "severity" : "INFORMATION",
        "startDate" : 1553186770681,
        "summary" : {"key" : "defaultProcess.summary"},
        "title" : {"key" : "defaultProcess.title"},
        "data" : {"message" : "Hello World !!! Here is a message for ENTITY1_FR and group Dispatcher - process/state not in operator1_fr perimeter "}
}
Use the provided script :
./sendCard.sh cardSentToEntityAndGroup_1.json
The result should be a 201 Http status.
See the result in the UI, you should not see the card.
Now let’s send this card (for ENTITY1_FR and Dispatcher group with process/state in user’s perimeter) :
{
        "publisher" : "message-publisher",
        "processVersion" : "1",
        "entityRecipients" : ["ENTITY1_FR"],
        "process"  :"defaultProcess",
        "processInstanceId" : "cardExample5_2",
        "state": "messageState",
        "groupRecipients": ["Dispatcher"],
        "severity" : "INFORMATION",
        "startDate" : 1553186770681,
        "summary" : {"key" : "defaultProcess.summary"},
        "title" : {"key" : "defaultProcess.title"},
        "data" : {"message" : "Hello World !!! Here is a message for ENTITY1_FR and group Planner - process/state in operator1_fr perimeter "}
}
Use the provided script :
./sendCard.sh cardSentToEntityAndGroup_2.json
The result should be a 201 Http status.
See the result in the UI, you should see the card.
4. Troubleshooting
4.1. My bundle is not loaded
The server send a {"status":"BAD_REQUEST","message":"unable to open submitted
file","errors":["Error detected parsing the header"]}, despite correct http
headers.
The uploaded bundle is corrupted. Test your bundle in a terminal (Linux solution).
Example for a bundle archive named MyBundleToTest.tar.gz giving the
mentioned error when uploaded :
tar -tzf MyBundleToTest.tar.gz >/dev/null
tar: This does not look like a tar archive
tar: Skipping to next header
tar: Exiting with failure status due to previous errors
4.2. I can’t upload my bundle
The server responds with a message like the following:
{"status":"BAD_REQUEST","message":"unable to open submitted
file","errors":["Input is not in the .gz format"]}
The bundle has been compressed using an unmanaged format.
4.2.1. Format verification
4.2.1.1. Linux solution
Command line example to verify the format of a bundle archive named
MyBundleToTest.tar.gz(which gives the mentioned error when uploaded):
tar -tzf MyBundleToTest.tar.gz >/dev/null
which should return in such case the following messages:
gzip: stdin: not in gzip format
tar: Child returned status 1
tar: Error is not recoverable: exiting now
4.3. My bundle is rejected due to internal structure
The server sends {"status":"BAD_REQUEST","message":"Incorrect inner file
structure","errors":["$OPERATOR_FABRIC_INSTANCE_PATH/d91ba68c-de6b-4635-a8e8-b58
fff77dfd2/config.json (Aucun fichier ou dossier de ce type)"]}
Where $OPERATOR_FABRIC_INSTANCE_PATH is the folder where businessconfig files are
stored server side.
OperatorFabric Architecture
5. Introduction
The aim of this document is to describe the architecture of the solution, first by defining the business concepts it deals with and then showing how this translates into the technical architecture.
6. Business Architecture
OperatorFabric is based on the concept of cards, which contain data regarding events that are relevant for the operator. A third party tool publishes cards and the cards are received on the screen of the operators. Depending on the type of the cards, the operator can send back information to the third party via a "response card".
6.1. Business components
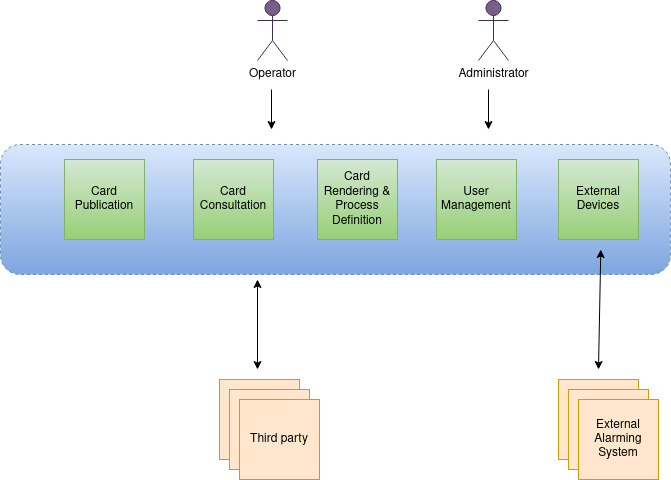
To do the job, the following business components are defined :
-
Card Publication : this component receives the cards from third-party tools or users
-
Card Consultation : this component delivers the cards to the operators and provide access to all cards exchanged (archives)
-
Card rendering and process definition : this component stores the information for the card rendering (templates, internationalization, …) and a light description of the process associate (states, response card, …). This configuration data can be provided either by an administrator or by a third party tool.
-
User Management : this component is used to manage users, groups, entities and perimeters.
-
External devices : this optional component permit to send alarm to an external device instead of playing a sound on the user computer. For now, only one driver exists using modbus protocol.
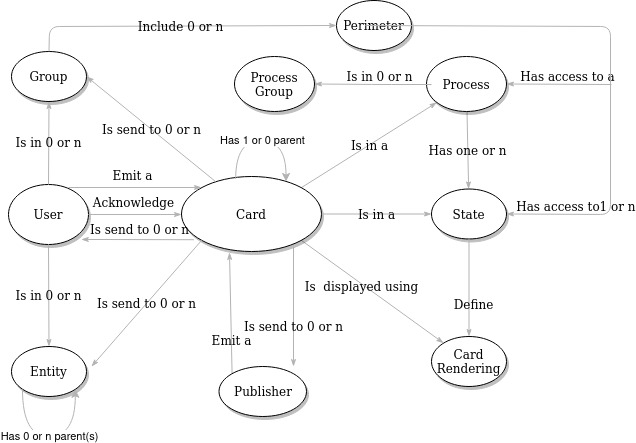
6.2. Business objects
The business objects can be represented as follows :
-
Card : the core business object which contains the data to show to the user(or operator)
-
Publisher : the emitter of the card (be it a third-party tool or an entity)
-
User : the operator receiving cards and responding via response cards
-
Entity : an entity (containing a list of users) , it can be used to model organizations (examples : control center, company , department… ) . An entity can be part of another entity or even of several entities.
-
Group : a group (containing a list of users) , it can be used to model roles in organizations (examples : supervisor, dispatcher … )
-
Process : the process the card is about
-
Process Group : a way to group processes on the user interface
-
State : the step in the process
-
Perimeter : for a defined group the visibility of a card for a specific process and state
-
Card Rendering : data for card rendering
A card can have a parent card, in this case the card can be named child card.
7. Technical Architecture
The architecture is based on independent modules. All business services are accessible via REST API.
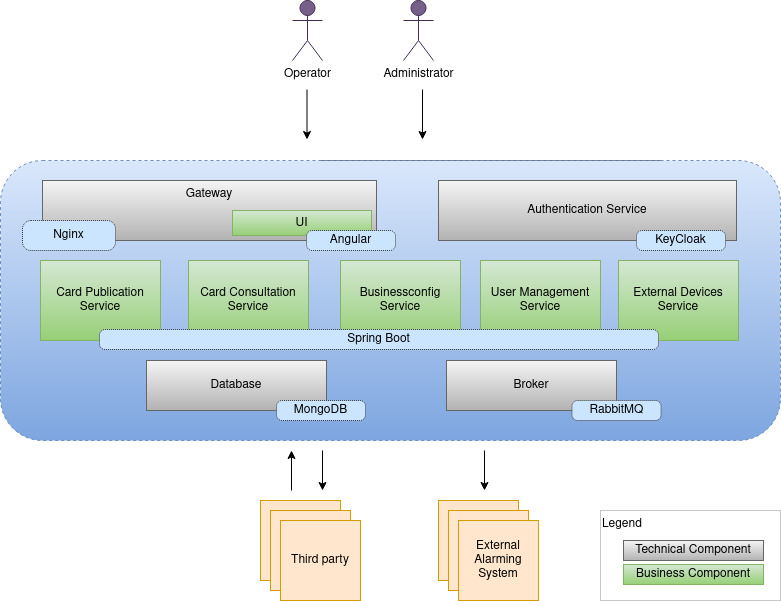
7.1. Business components
We find here the business component seen before:
-
We have a "UI" component which stores the static pages and the UI code that is downloaded by the browser. The UI is based an Angular and Handlebars for the card templating.
-
The business component named "Card rendering and process definition" is at the technical level known as "Businessconfig service". This service receive card rendering and process definition as a bundle. The bundle is a tar.gz file containing
-
json process configuration file (containing states & actions)
-
templates for rendering
-
stylesheets
-
internationalization information
-
Except form the UI, which is based on angular, all business components are based on SpringBoot and packaged via Docker.
Spring WebFlux is used to provide the card in a fluid way.
7.2. Technical components
7.2.1. Gateway
It provides a filtered view of the APIS and static served pages for external access through browsers or other http compliant accesses. It provides the rooting for accessing the services from outside. It is a nginx server package with docker, this component contains the angular UI component.
7.2.2. Broker
The broker is used to share information asynchronously across the whole services. It is implemented via RabbitMQ
7.2.3. Authentication
The architecture provides a default authentication service via KeyCloak but it can delegate it to an external provider. Authentication is done through the use of Oauth2, three flows are supported : implicit, authorization code and password.
7.2.4. Database
The cards are stored in a MongoDb database. The bundles are stored in a file system.
OperatorFabric Reference Documentation
The aim of this document is to:
-
Explain what OperatorFabric is about and define the concepts it relies on
-
Give a basic tour of its features from a user perspective
8. Introduction
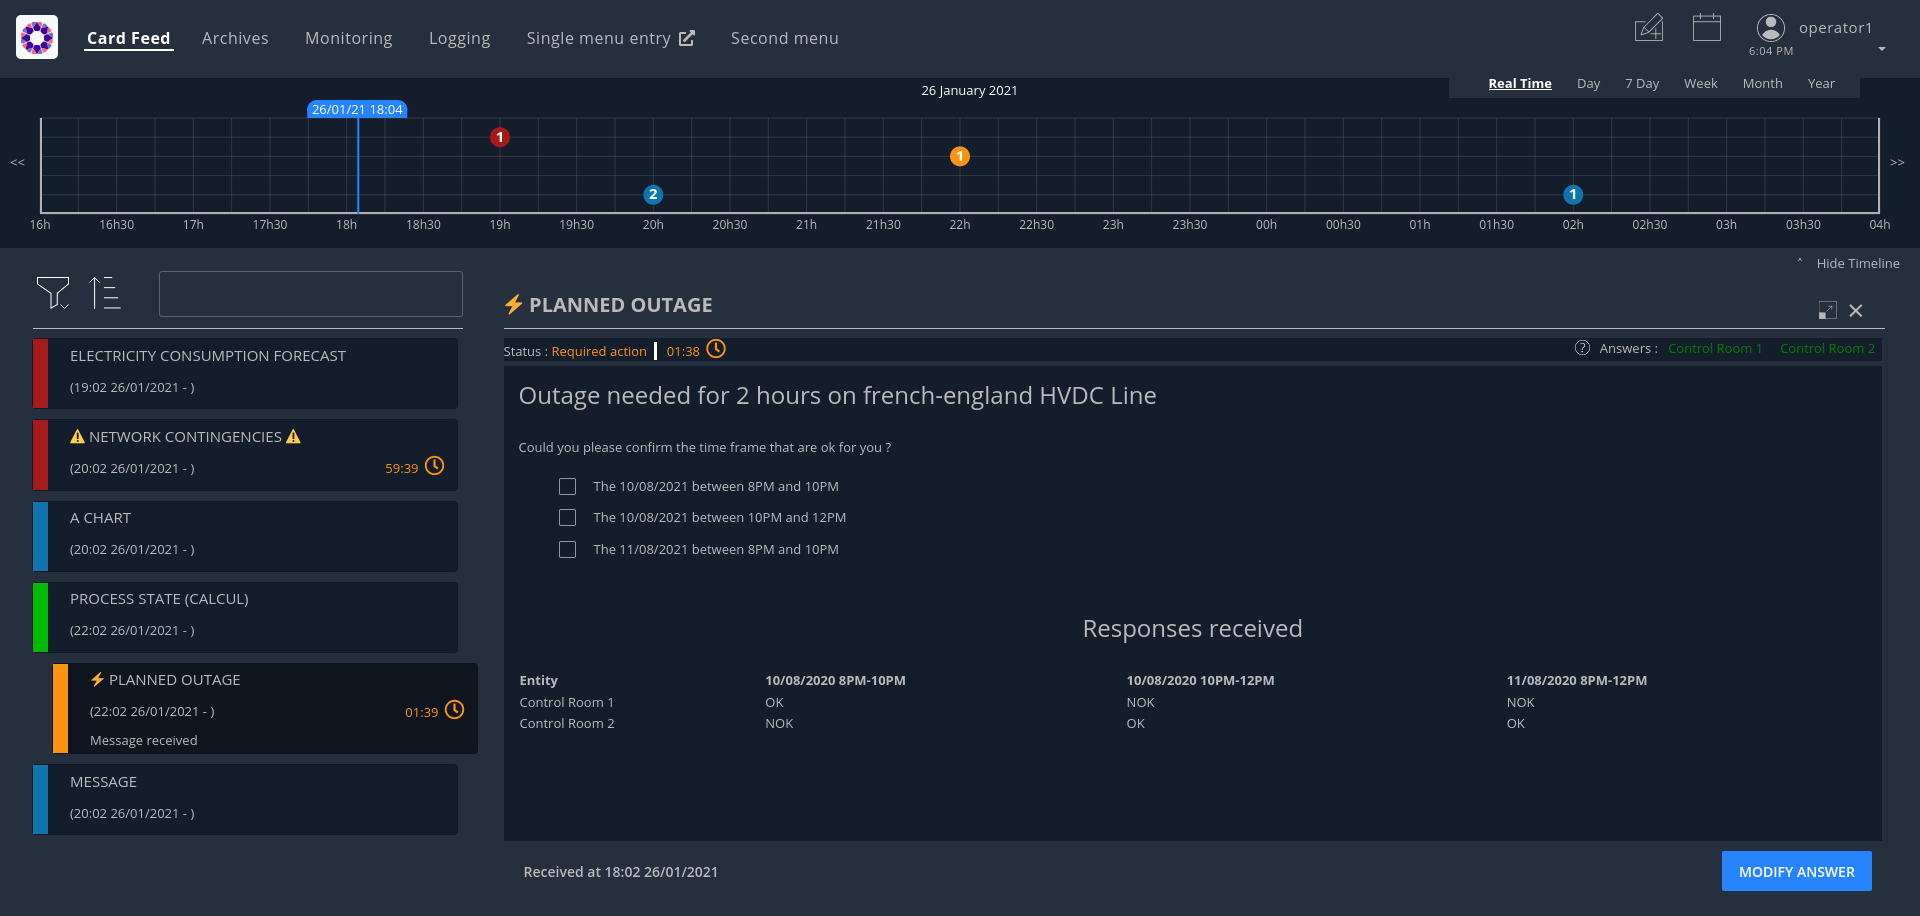
To perform their duties, an operator has to interact with multiple applications (perform actions, watch for alerts, etc.), which can prove difficult if there are too many of them.
The idea is to aggregate all the notifications from all these applications into a single screen, and to allow the operator to act on them if needed.

These notifications are materialized by cards sorted in a feed according to their period of relevance and their severity. When a card is selected in the feed, the right-hand pane displays the details of the card.
In addition, the cards will also translate as events displayed on a timeline at the top of the screen.
Part of the value of OperatorFabric is that it makes the integration very simple on the part of the third-party applications. To start publishing cards to users in an OperatorFabric instance, all they have to do is:
-
Register as a publisher through the "Businessconfig" service and provide a "bundle" containing handlebars templates defining how cards should be rendered, i18n info etc.
-
Publish cards as json containing card data through the card publication API
OperatorFabric will then:
-
Dispatch the cards to the appropriate users (by computing the actual users who should receive the card from the recipients rules defined in the card)
-
Take care of the rendering of the cards
-
Display relevant information from the cards in the timeline
A card is not only information, it could be question(s) the operator has to answer. When the operator is responding, a card is emitted to the sender of the initial card and the response could be seen by other operators.
It is also possible for users to directly send card to other users using predefined card templates.
9. Sending cards
The Cards Publication Service exposes a REST API through which third-party applications, or "publishers" can post cards to OperatorFabric. It then handles those cards:
-
Time-stamping them with a "publishDate"
-
Sending them to the message broker (RabbitMQ) to be delivered in real time to the appropriate operators
-
Persisting them to the database (MongoDB) for later consultation
9.1. Card Structure
Cards are represented as Json objects. The technical design of cards is described in
the cards api documentation
. A card correspond to the state of a Process in OperatorFabric.
9.1.1. Technical Information of the card
Those attributes are used by OperatorFabric to manage how cards are stored, to whom and when they’re sent.
9.1.1.1. Mandatory information
Below, the json technical key is in the '()' following the title.
Publisher (publisher)
The publisher field bears the identifier of the emitter of the card, be it an entity or an external service.
Process (process)
This field indicates which process the card is attached to. This information is used to resolve the presentation resources (bundle) used to render the card and card details.
Process Version (processVersion)
The rendering of cards of a given process can evolve over time. To allow for this while making sure previous cards
remain correctly handled, OperatorFabric can manage several versions of the same process.
The processVersion field indicate which version of the process should be used to retrieve the presentation resources
(i18n, templates, etc.) to render this card.
Process Instance Identifier (processInstanceId)
A card is associated to a given process, which defines how it is rendered, but it is also more precisely associated to
a specific instance of this process. The processInstanceId field contains the unique identifier of the process instance.
State in the process (state)
The card represents a specific state in the process. In addition to the process, this information is used to resolve the presentation resources used to render the card and card details.
Severity (severity)
The severity is a core principe of the OperatorFabric Card system. There are 4 severities available. A color is associated in the GUI to each severity. Here the details about severity and their meaning for OperatorFabric:
-
ALARM: represents a critical state of the associated process, need an action from the operator. In the UI, the card is red;
-
ACTION: the associated process need an action form operators in order to evolve correctly. In the UI, the card is orange;
-
COMPLIANT: the process related to the card is in a compliant status. In the UI, the card is green.;
-
INFORMATION: give information to the operator. In the UI, the card is blue.
9.1.1.2. Optional information
EntityRecipients (entityRecipients)
Used to send cards to entity : all users members of the listed entities who have the right for the process/state of the card will receive it.
GroupRecipients (groupRecipients)
Used to send cards to groups : all users members of the groups will receive it. If this field is used in conjunction with entityRecipients, to receive the cards :
-
users must be members of one of the entities AND one of the groups to receive the cards.
OR
-
users must be members of one of the entities AND have the right for the process/state of the card.
UserRecipients (userRecipients)
Used to send cards directly to users without using groups or entities for card routing.
Last Time to Decide (lttd)
Fixes the moment until when a response is possible for the card. After this moment, the response button won’t be useable. When lttd time is approaching, a clock is visible on the card in the feed with the residual time. The lttd time can be set for cards that don’t expect any response
SecondsBeforeTimeSpanForReminder (secondsBeforeTimeSpanForReminder)
Fixes the time for remind before the event define by the card see Card reminder
ToNotify (toNotify)
Boolean attribute. If the card must not be displayed in the feed and in monitoring screen, this field must be set to false. In that case, it means the card is stored only in archivedCards collection and not in cards collection.
Publisher type (publisherType)
-
EXTERNAL - The sender is an external service
-
ENTITY - The sender of the card is the user on behalf of the entity
9.1.1.3. Business period
We define the business period as starting form startDate to endDate. The card will be visible on the UI if the business period overlap the user chosen period (i.e the period selected on the timeline). If endDate is not set, the card will be visible as soon as the startDate is between start and end date of the chosen period.
9.1.1.4. Store information
uid (uid)
Unique identifier of the card in the OperatorFabric system. This attribute can be sent with card, but by default it’s managed by OperatorFabric.
9.1.2. User destined Information of the card
There are two kind of User destined information in a card. Some are restricted to the card format, others are defined by the publisher as long as there are encoded in json format.
9.1.2.2. Custom part
Data (data)
Determines where custom information is store. The content in this attribute, is purely publisher choice.
This content, as long as it’s in json format can be used to display details. For the way the details are
displayed, see below.
| You must not use dot in json field names. In this case, the card will be refused with following message : "Error, unable to handle pushed Cards: Map key xxx.xxx contains dots but no replacement was configured!"" |
9.1.3. Presentation Information of the card
9.1.3.1. TimeSpans (timeSpans)
When the simple startDate and endDate are not enough to characterize your process business times, you can add a list of TimeSpan to your card. TimeSpans are rendered in the timeline component as cluster bubbles. This has no effect on the feed content.
example :
to display the card two times in the timeline you can add two TimeSpan to your card:
{
	"publisher":"Dispatcher",
	"publisherVersion":"0.1",
	"process":"process",
	"processInstanceId":"process-000",
	"startDate":1546297200000,
	"severity":"INFORMATION",
	...
	"timeSpans" : [
        {"start" : 1546297200000},
        {"start" : 1546297500000}
    ]

}
In this sample, the card will be displayed twice in the time line. The card start date will be ignored.
For timeSpans, you can specify an end date but it is not implemented in OperatorFabric (it was intended for future uses but it will be deprecated).
9.2. Cards Examples
Before detailing the content of cards, let’s show you what cards look like through few examples of json.
9.2.1. Minimal Card
The OperatorFabric Card specification defines mandatory attributes, but some optional attributes are needed for cards to be useful in OperatorFabric. Let’s clarify those point through few examples of minimal cards and what happens when they’re used as if.
9.2.1.1. Rules for receiving cards
Whatever the recipient(s) of the card (user directly, group and/or entity), the user must have the receive right on the process/state of the card to receive it (Receive or ReceiveAndWrite).
So the rules for receiving cards are :
1) If the card is sent to user1, the card is received and visible for user1 if he has the receive right for the corresponding process/state
2) If the card is sent to GROUP1 (or ENTITY1_FR), the card is received and visible for user if all of the following is true :
-
he’s a member of GROUP1 (or ENTITY1_FR)
-
he has the receive right for the corresponding process/state
3) If the card is sent to ENTITY1_FR and GROUP1, the card is received and visible for user if all of the following is true :
-
he’s a member of ENTITY1_FR (either directly or through one of its children entities)
-
he’s a member of GROUP1
-
he has the receive right for the corresponding process/state
In this chapter, when we talk about receive right, it means Receive or ReceiveAndWrite.
9.2.1.2. Send to One User
The following card contains only the mandatory attributes.
{
	"publisher":"TEST_PUBLISHER",
	"processVersion":"0.1",
	"process":"process",
	"processInstanceId":"process-000",
	"state":"myState",
	"startDate":1546297200000,
	"severity":"INFORMATION",
	"title":{"key":"card.title.key"},
	"summary":{"key":"card.summary.key"},
	"userRecipients": ["operator1_fr"]

}
This an information about the process instance process-000 of process process, sent by TEST_PUBLISHER. The title and the summary refer to i18n keys
defined in the associated i18n file of the process. This card is displayable since the first january 2019 and
should only be received by the user using the operator1_fr login (provided that this user has receive right on this process/state).
9.2.1.3. Send to several users
Simple case (sending to a group)
The following example is nearly the same as the previous one except for the recipient.
{
	"publisher":"TEST_PUBLISHER",
	"processVersion":"0.1",
	"process":"process",
	"processInstanceId":"process-000",
	"state":"myState",
	"startDate":1546297200000,
	"severity":"INFORMATION",
	"title":{"key":"card.title.key"},
	"summary":{"key":"card.summary.key"},
	"groupRecipients": ["Dispatcher"]
}
Here, the recipient is a group, the Dispatcher. So all users who are members of this group and who have receive right on the process/state of the card will receive it.
Simple case (sending to an entity)
The following example is nearly the same as the previous one except for the recipient.
{
	"publisher":"TEST_PUBLISHER",
	"processVersion":"0.1",
	"process":"process",
	"processInstanceId":"process-000",
	"state":"myState",
	"startDate":1546297200000,
	"severity":"INFORMATION",
	"title":{"key":"card.title.key"},
	"summary":{"key":"card.summary.key"},
	"entityRecipients" : ["ENTITY1_FR"]
}
Here, the recipient is an entity, ENTITY1_FR, and there is no group recipient anymore. So all users who are members of this entity and who have a receive right for the process/state of the card will receive it. More information on perimeters can be found in
<<'users_management,user documentation'>>
Example : Given this perimeter :
{
    "id" : "perimeter1",
    "process" : "process",
    "stateRights" : [
        {
            "state" : "myState",
            "right" : "Receive"
        },
        {
            "state" : "myState2",
            "right" : "Write"
        }
    ]
}
Given this group :
{
    "id": "group1",
    "name": "group number 1",
    "description": "group number 1 for documentation example"
}
Perimeters can only be linked to groups, so let’s link the perimeter perimeter1 to the group group1. You can do this with this command line for example ($token is your access token) :
curl -X PUT http://localhost:2103/perimeters/perimeter1/groups -H "Content-type:application/json" -H "Authorization:Bearer $token" --data "[\"group1\"]"
Then you can see group1 is now :
{
    "id": "group1",
    "name": "group number 1",
    "description": "group number 1 for documentation example",
    "perimeters": ["perimeter1"]
}
If the connected user is a member of group1, then he has a Receive right on process/state process/myState. So if the user is also a member of ENTITY1_FR then he will receive the card.
Simple case (sending to a group and an entity)
The following example is nearly the same as the previous one except for the recipient.
{
	"publisher":"TEST_PUBLISHER",
	"processVersion":"0.1",
	"process":"process",
	"processInstanceId":"process-000",
	"state":"myState",
	"startDate":1546297200000,
	"severity":"INFORMATION",
	"title":{"key":"card.title.key"},
	"summary":{"key":"card.summary.key"},
	"groupRecipients": ["Dispatcher"],
	"entityRecipients" : ["ENTITY1_FR"]
}
Here, the recipients are a group and an entity, the Dispatcher group and ENTITY1_FR entity. To receive the card, the user must be a member of both ENTITY1_FR and GROUP1 and must have the receive right for the corresponding process/state.
Complex case
If this card need to be viewed by a user who is not in the Dispatcher group, it’s possible to tune more precisely the
definition of the recipient. If the operator2_fr needs to see also this card, the recipient definition could be(the following code details only the recipient part):
"groupRecipients": ["Dispatcher"],
"userRecipients": ["operator2_fr"]
So here, all the users of the Dispatcher group will receive the INFORMATION as should the tos2-operator user.
Another example, if a card is destined to the operators of Dispatcher and Planner and needs to be also seen by the admin, the recipient configuration looks like:
"groupRecipients": ["Dispatcher", "Planner"],
"userRecipients": ["admin"]
9.2.2. Regular Card
The previous cards were nearly empty regarding information carrying. In fact, cards are intended to contain more information than a title and a summary. The optional attribute data is here for that. This attribute is destined to contain any json object. The creator of the card is free to put any information needed as long as it’s in a json format.
9.2.2.1. Full of Hidden data
For this example we will use our previous example for the Dispatcher group with a data attribute containing the definition of a json object containing two attributes: stringExample and numberExample.
{
	"publisher":"TEST_PUBLISHER",
	"processVersion":"0.1",
	"process":"process",
	"processInstanceId":"process-000",
	"state":"myState",
	"startDate":1546297200000,
	"severity":"INFORMATION",
	"title":{"key":"card.title.key"},
	"summary":{"key":"card.summary.key"},
	"userRecipients": ["operator1_fr"],
	"data":{
		"stringExample":"This is a not so random string of characters.",
		"numberExample":123
		}

}
This card contains some data but when selected in the feed nothing more than the previous example of card happen because there is no rendering configuration.
9.2.2.2. Fully useful
When a card is selected in the feed (of the GUI), the data is displayed in the detail panel.
The way details are formatted depends on the template contained in the bundle associated with the process as
described here
. To have an effective example without to many actions to performed, the following example will use an already existing
configuration.The one presents in the development version of OperatorFabric, for test purpose(TEST bundle).
At the card level, the attributes in the card telling OperatorFabric which template to use are the process and state attributes, the templateName can be retrieved from the definition of the bundle.
{
	"publisher":"TEST_PUBLISHER",
	"processVersion":"1",
	"process":"TEST",
	"processInstanceId":"process-000",
	"state":"myState",
	"startDate":1546297200000,
	"severity":"INFORMATION",
	"title":{"key":"process.title"},
	"summary":{"key":"process.summary"},
	"userRecipients": ["operator1_fr"],
	"data":{"rootProp":"Data displayed in the detail panel"},

}
So here a single custom data is defined and it’s rootProp. This attribute is used by the template called by the templateName attribute.
10. Card rendering
As stated above, third applications interact with OperatorFabric by sending cards.
The Businessconfig service allows them to tell OperatorFabric for each process how these cards should be rendered including translation if several languages are supported. Configuration is done via files zipped in a "bundle", these files are send to OperatorFabric via a REST end point.
In addition, it lets third-party applications define additional menu entries for the navbar (for example linking back to the third-party application) that can be integrated either as iframe or external links.
10.1. Process: Declaration and Configuration
To declare and configure a Process, OperatorFabric uses bundles.
This section describes their content and how to use them.
An OperatorFabric Process is a way to define a business configuration.
Once this bundle fully created, it must be uploaded to the server through the Businessconfig service.
Some examples show how to configure a process using a bundle before diving in more technical details of the configuration.
The following instructions describe tests to perform on OperatorFabric to understand how customizations are possible.
10.1.1. Bundle as Process declaration
A bundle contains all the configuration regarding a given business process, describing for example the various steps of the process but also how the associated cards and card details should be displayed.
Bundle are technically tar.gz archives containing at least a descriptor file named config.json.
To display the card date, some css files, i18n file and handlebars templates must be added.
For didactic purposes, in this section, the businessconfig bundle name is BUNDLE_TEST (to match the parameters used by the script).
The l10n (localization) configurations is English.
As detailed in the Businessconfig core service README the bundle contains at least a metadata file called config.json, a file i18n.json, a css folder and a template folder.
Except for the config.json file, all elements are optional.
The file organization within a bundle:
bundle
├── config.json
├── i18n.json
├── css
│   └── bundleTest.css
└── template
    ├── template1.handlebars
    └── template2.handlebars
10.1.2. The config.json file
It’s a description file in json format.
It lists the content of the bundle.
example
{
  "id": "TEST",
  "version": "1",
  "uiVisibility": {
    "monitoring": true,
    "logging": true,
    "calendar": true
  },
  "name": "process.label",
  "defaultLocale": "fr",
  "states": {
    "firstState": {
      "name":  "state.label",
      "color": "blue",
      "templateName": "operation",
      "acknowledgmentAllowed": "Never"
    }
  }
}-
id: id of the process; -
name: process name; -
version: enables the correct display of the card data, even for the old ones. The server store the previous versions in its file system. This field value should match a businessconfig configuration for a correct rendering; -
states: lists the available states which each declares associated actions, associated templates and if cards could be acknowledged by users; -
uiVisibility: in the monitoring, logging and calendar screens, not all the cards are visible, it depends on the business process they are part of. For a card to be visible in these screens, the corresponding parameter must be set to true.
The mandatory field are id,name and version.
See the Businessconfig API documentation for details.
10.1.3. The i18n.json file
This file contains internationalization information, in particular the translation for title and summary fields
If there is no i18n file or key is missing, OperatorFabric displays i18n key, such as BUNDLE_TEST.1.missing-i18n-key.
In the case where the bundle declares no i18n key corresponds to missing-i18n-key.
The choice of i18n keys is up to the maintainer of the Businessconfig process.
10.1.3.1. Template folder
The template folder contains one template file for each process/state. They will be used for the card details rendering.
Example
For this example, the name of the process is Bundle Test and its technical name is BUNDLE_TEST.
The bundle provides an english l10n.
Title and summary have to be localized.
Here is the content of i18n.json
{
  "TEST": {
    "title": "Test: Process {{value}}",
    "summary": "This sums up the content of the card: {{value}}",
    "detail": {
      "title": "card title"
    }
  },
  "process": {
    "label": "Test Process"
  },
  "state": {
    "label": "Test State"
  },
  "template": {
    "title": "Asset details"
  }
}
To check the i18n, after the upload of the bundle, use a GET request against the businessconfig service.
The simpler is to ask for the i18n file, as described
here
.
Set the version of the bundle and the technical name of the businessconfig party to get json in the response.
For example, to check if the french l10n data of the version 1 of the BUNDLE_TEST businessconfig party use the following command line:
curl "http://localhost:2100/businessconfig/processes/BUNDLE_TEST/i18n?version=1" \
-H  "Authorization: Bearer ${token}"
where ${token} is a valid token for operatorfabric use.
The businessconfig service should answer with a 200 status associated with the following json:
{
  "TEST": {
    "title": "Test: Process {{value}}",
    "summary": "This sums up the content of the card: {{value}}",
    "detail": {
      "title": "card title"
    }
  },
  "process": {
    "label": "Test Process"
  },
  "state": {
    "label": "Test State"
  },
  "template": {
    "title": "Asset details"
  }
}
10.1.3.2. Processes and States
Each Process declares associated states. Each state declares specific templates for card details and specific actions.
The purpose of this section is to display elements of businessconfig card data in a custom format.
configuration
The process entry in the configuration file is a dictionary of processes, each key maps to a process definition. A process definition is itself a dictionary of states, each key maps to a state definition.
Templates
For demonstration purposes, there will be two simple templates.
For more advance feature go to the section detailing the handlebars templates and associated helpers available in OperatorFabric.
As the card used in this example are created above, the bundle template folder needs to contain 2 templates: template1.handlebars and template2.handlebars.
Examples of template (i18n versions)
The following template displays a title and a line containing the value of the scope property card.level1.level1Prop.
The value of this key is 'This is a root property'.
/template/template1.handlebars
<h2>Template Number One</h2>
<div class="bundle-test">'{{card.data.level1.level1Prop}}'</div>
The following template example displays also a title and a list of numeric values from 1 to 3.
/template/template2.handlebars
<h2>Second Template</h2>
<ul class="bundle-test-list">
        {{#each card.data.level1.level1Array}}
                <li class="bunle-test-list-item">{{this.level1ArrayProp}}</li>
        {{/each}}
</ul>
CSS
This folder contains regular css files.
The file name must be declared in the config.json file in order to be used in the templates and applied to them.
As above, all parts of files irrelevant for our example are symbolised by a … character.
Declaration of css files in config.json file
{
        …
    "states" : {
            "state1" : {
                  …
                        "styles":["bundleTest"]
                  }
              }
        …
}
CSS Class used in ./template/template1.handlebars
        …
        <div class="bundle-test">'{{card.data.level1.level1Prop}}'</div>
        …
As seen above, the value of {{card.data.level1.level1Prop}} of a test card is This is a level1 property
Style declaration in ./css/bundleTest.css
.h2{
        color:#fd9312;
        font-weight: bold;
}
Expected result

10.1.3.3. Upload
To upload a bundle to the OperatorFabric server use a POST http request as described in the
Businessconfig Service API documentation
.
Example
cd ${BUNDLE_FOLDER}
curl -X POST "http://localhost:2100/businessconfig/processes"\
        -H  "accept: application/json"\
        -H  "Content-Type: multipart/form-data"\
        -F "file=@bundle-test.tar.gz;type=application/gzip"
Where:
-
${BUNDLE_FOLDER}is the folder containing the bundle archive to be uploaded. -
bundle-test.tar.gzis the name of the uploaded bundle.
These command line should return a 200 http status response with the details of the bundle in the response body such as :
{
  "id":"BUNDLE_TEST"
  "name": "BUNDLE_TEST",
  "version": "1",
  "states" : {
          "start" : {
            "templateName" : "template1"
          },
          "end" : {
            "templateName" : "template2",
            "styles" : [ "bundleTest.css" ]
          }
      }
}
For further help check the Troubleshooting section which resumes how to resolve common problems.
10.1.4. Processes groups
OperatorFabric offers the possibility of defining process groups. These groups have an impact only on the UI, for example on the notification configuration screen, by offering a more organized view of all the processes.
| A process can only belong to one process group. |
To define processes groups, you have to upload a file via a POST http request as described in the
Example
cd ${PROCESSES_GROUPS_FOLDER}
curl -X POST "http://localhost:2100/businessconfig/processgroups"\
        -H "accept: application/json"\
        -H "Content-Type: multipart/form-data"\
        -F "file=@processesGroups.json"\
        -H "Authorization: Bearer ${token}"
Where:
-
${PROCESSES_GROUPS_FOLDER}is the folder containing the processes groups file to upload. -
processesGroups.jsonis the name of the uploaded file. -
${token}is a valid token for OperatorFabric use.
Example of content for uploaded file :
{
  "groups": [
    {
      "id": "processgroup1",
      "name": "Process Group 1",
      "processes": [
        "process1",
        "process2"
      ]
    },
    {
      "id": "processgroup2",
      "name": "Process Group 2",
      "processes": [
        "process3",
        "process4"
      ]
    }
  ]
}
These command line should return a 201 http status.
10.2. Templates
Templates are Handlebars template files. Templates are then filled with data coming from two sources:
-
a card property (See card data model for more information)
-
a userContext :
-
login: user login
-
token: user jwt token
-
firstName: user first name
-
lastName: user last name
-
Please do not prefix id attributes of DOM elements of your templates with "opfab". Indeed, so that there is no confusion between the elements of OperatorFabric and those of your templates, we have prefixed all our id attributes with "opfab".
|
In addition to Handlebars basic syntax and helpers, OperatorFabric defines the following helpers :
10.2.1. OperatorFabric specific handlebars helpers
10.2.1.1. arrayContains
Verify if an array contains a specified element. If the array does contain the element, it returns true. Otherwise, it returns false.
<p {{#if (arrayContains colors 'red')}}class="text-danger"{{/if}}>test</p>
If the colors array contains 'red', the output is:
<p class="text-danger">test</p>
10.2.1.2. arrayContainsOneOf
If the first array contains at least one element of the second array, return true. Otherwise, return false.
{{#if (arrayContainsOneOf arr1 arr2)}}
  <p>Arr1 contains at least one element of arr2</p>
{{/if}}
10.2.1.3. bool
returns a boolean result value on an arithmetical operation (including object equality) or boolean operation.
Arguments: - v1: left value operand - op: operator (string value) - v2: right value operand
arithmetical operators:
-
==
-
===
-
!=
-
!==
-
<
-
⇐
-
>
-
>=
boolean operators:
-
&&
-
||
examples:
{{#if (bool v1 '<' v2)}}
  v1 is strictly lower than v2
{{else}}
 V2 is lower or equal to v1
{{/if}}
10.2.1.4. conditionalAttribute
Adds the specified attribute to an HTML element if the given condition is truthy.
This is useful for attributes such as checked where it is the presence or absence of the attribute that matters (i.e.
an checkbox with checked=false will still be checked).
<input type="checkbox" id="optionA" {{conditionalAttribute card.data.optionA 'checked'}}></input>
10.2.1.5. replace
Replaces all the occurrences in a given string You should specify the substring to find, what to replace it with and the input string.
{{replace "<p>" "<p>" this.value}}
10.2.1.6. dateFormat
formats the submitted parameters (millisecond since epoch) using mement.format. The locale used is the current user selected one, the format is "format" hash parameter (see Handlebars doc Literals section).
{{dateFormat card.data.birthday format="MMMM Do YYYY, h:mm:ss a"}}
Note
You can also pass a milliseconds value as a string.
{{dateFormat card.data.birthdayAsString format="MMMM Do YYYY, h:mm:ss a"}}
10.2.1.7. i18n
outputs a i18n result from a key and some parameters. There are two ways of configuration :
-
Pass an object as sole argument. The object must contain a key field (string) and an optional parameter field (map of parameterKey ⇒ value)
{{i18n card.data.i18nTitle}} -
Pass a string key as sole argument and use hash parameters (see Handlebars doc Literals section) for i18n string parameters.
<!--
emergency.title=Emergency situation happened on {{date}}. Cause : {{cause}}.
-->
{{i18n "emergency.title" date="2018-06-14" cause="Broken Coffee Machine"}}
outputs
Emergency situation happened on 2018-06-14. Cause : Broken Cofee Machine
10.2.1.8. json
Convert the element in json, this can be useful to use the element as a javascript object in the template. For example :
var myAttribute = {{json data.myAttribute}};
10.2.1.9. keepSpacesAndEndOfLine
Convert a string to a light HTML by replacing :
-
each new line character with <br/>
-
spaces with when there is at least two consecutive spaces.
10.2.1.10. keyValue
This allows to traverse a map.
Notice that this should normally be feasible by using the built-in each helper, but a client was having some troubles using it so we added this custom helper.
{{#keyValue studentGrades}}
  <p>{{key}}: {{value}}</p>
{{/keyValue}}
If the value of the studentGrades map is:
{
  'student1': 15,
  'student2': 12,
  'student3': 9
}
The output will be:
<p>student1: 15</p>
<p>student2: 12</p>
<p>student3: 9</p>
10.2.1.11. math
returns the result of a mathematical operation.
arguments:
-
v1: left value operand
-
op: operator (string value)
-
v2: right value operand
arithmetical operators:
-
+
-
-
-
*
-
/
-
%
example:
{{math 1 '+' 2}}
10.2.1.12. mergeArrays
Return an array that is a merge of the two arrays.
{{#each (mergeArrays arr1 arr2)}}
  <p>{{@index}} element: {{this}}</p>
{{/each}}
10.2.1.13. now
outputs the current date in millisecond from epoch. The date is computed from application internal time service and thus may be different from the date that one can compute from javascript api which relies on the browsers' system time.
NB: Due to Handlebars limitation you must provide at least one argument to helpers otherwise, Handlebars will confuse a helper and a variable. In the bellow example, we simply pass an empty string.
example:
<div>{{now ""}}</div>
<br>
<div>{{dateFormat (now "") format="MMMM Do YYYY, h:mm:ss a"}}</div>
outputs
<div>1551454795179</div>
<br>
<div>mars 1er 2019, 4:39:55 pm</div>
for a local set to FR_fr
10.2.1.14. numberFormat
formats a number parameter using developer.mozilla.org/fr/docs/Web/JavaScript/Reference/Objets_globaux/Nu mberFormat[Intl.NumberFormat]. The locale used is the current user selected one, and options are passed as hash parameters (see Handlebars doc Literals section).
{{numberFormat card.data.price style="currency" currency="EUR"}}
10.2.1.15. preserveSpace
preserves space in parameter string to avoid html standard space trimming.
{{preserveSpace card.data.businessId}}
10.2.1.16. slice
extracts a sub array from ann array
example:
<!--
{"array": ["foo","bar","baz"]}
-->
<ul>
{{#each (slice array 0 2)}}
  <li>{{this}}</li>
{{/each}}
</ul>
outputs:
<ul>
  <li>foo</li>
  <li>bar</li>
</ul>
and
<!--
{"array": ["foo","bar","baz"]}
-->
<ul>
{{#each (slice array 1)}}
  <li>{{this}}</li>
{{/each}}
</ul>
outputs:
<ul>
  <li>bar</li>
  <li>baz</li>
</ul>
10.2.1.17. sort
sorts an array or some object’s properties (first argument) using an optional field name (second argument) to sort the collection on this fields natural order.
If there is no field argument provided :
-
for an array, the original order of the array is kept ;
-
for an object, the structure is sorted by the object field name.
<!--
users :

{"john": { "firstName": "John", "lastName": "Cleese"},
"graham": { "firstName": "Graham", "lastName": "Chapman"},
"terry": { "firstName": "Terry", "lastName": "Gilliam"},
"eric": { "firstName": "Eric", "lastName": "Idle"},
"terry": { "firstName": "Terry", "lastName": "Jones"},
"michael": { "firstName": "Michael", "lastName": "Palin"},
-->

<ul>
{{#each (sort users)}}
    <li>{{this.firstName}} {{this.lastName}}</li>
{{/each}}
</ul>
outputs :
<ul>
  <li>Eric Idle</li>
  <li>Graham Chapman</li>
  <li>John Cleese</li>
  <li>Michael Pallin</li>
  <li>Terry Gilliam</li>
  <li>Terry Jones</li>
</ul>
and
<ul>
{{#each (sort users "lastName")}}
    <li>{{this.firstName}} {{this.lastName</li>
{{/each}}
</ul>
outputs :
<ul>
  <li>Graham Chapman</li>
  <li>John Cleese</li>
  <li>Terry Gilliam</li>
  <li>Eric Idle</li>
  <li>Terry Jones</li>
  <li>Michael Pallin</li>
</ul>
10.2.1.18. split
splits a string into an array based on a split string.
example:
<ul>
{{#each (split 'my.example.string' '.')}}
  <li>{{this}}</li>
{{/each}}
</ul>
outputs
<ul>
  <li>my</li>
  <li>example</li>
  <li>string</li>
</ul>
10.2.1.19. svg
outputs a svg tag with lazy loading, and missing image replacement message. The image url is the concatenation of an arbitrary number of helper arguments
{{{svg baseUri scheduledOpId "/" substation "/before/"
computationPhaseOrdinal}}}
10.2.1.20. times
Allows to perform the same action a certain number of times. Internally, this uses a for loop.
{{#times 3}}
  <p>test</p>
{{/times}}
outputs :
<p>test</p>
<p>test</p>
<p>test</p>
10.2.2. OperatorFabric css styles
OperatorFabric defines several css classes that you should use so your templates don’t clash with the rest of the OperatorFabric look and feel:
-
opfab-input : input field
-
opfab-textarea : text area input field
-
opfab-select : select input field
-
opfab-radio-button : radio button input field
-
opfab-checkbox : checkbox input field
-
opfab-table : a HTML table
-
opfab-border-box : a box with a label
-
styles for text standard colors : opfab-color-danger , opfab-color-warning and opfab-color-success
These styles are especially useful for templates used in user card or card with responses.
Your can find example using these classes in the OperatorFabric core repository (src/test/resources/bundles).
10.2.3. Charts
The library charts.js is integrated in OperatorFabric, it means it’s possible to show charts in cards, you can find a bundle example in the operator fabric git (src/test/resources/bundle/defaultProcess_V1).
10.2.4. OperatorFabric specific functions
10.2.4.1. Set screen size
To adapt the template content on screen size it is possible to receive from OperatorFabric information on the size of the window where the template will be rendered. To receive screen size information you need to implement a javascript function in your template called templateGateway.setScreenSize(size) which receives as input a string parameter with one of the following values :
-
'md' : medium size window
-
'lg' : large size window
10.2.4.2. Get display context
To adapt the template content to the display context it is possible to get from OperatorFabric the page context where the template will be rendered by calling the javascript function templateGateway.getDisplayContext(). The function returns a string with one of the following values :
-
'realtime' : realtime page context (feed, monitoring)
-
'archive' : archive page context
-
'preview': preview context (user card)
An example of usage can be found in operator fabric git: (src/test/resources/bundles/userCardExamples2/template/question.handlebars).
10.2.4.3. Redirect to business application from a card
It’s possible to redirect from a card to a business application declared in ui-menu.json.
This can be done by calling the following function from the template :
templateGateway.redirectToBusinessMenu(idMenu,idEntry)
-
idMenu is the id of the menu defined in ui-menu.json
-
idEntry is the id of the entry defined in ui-menu.json
It is also possible to append url extension (sub paths and/or parameters) to the url that will be called:
templateGateway.redirectToBusinessMenu('myMenu','myEntry','/extension?param1=aParam¶m2=anotherParam')
For example:
<a href="javascript:templateGateway.redirectToBusinessMenu('menu1','uid_test_0','?search=chart&fulltext=1')"> Want more information about charts ? </a>This can be useful to pass context from the card to the business application.
10.2.4.4. Get list of all entities
To have the list of all entities in OperatorFabric, you can call the javascript function templateGateway.getAllEntities(). The function returns an array of entity object :
Entity object has the following fields :
-
'id' : id of the entity
-
'name' : name of the entity
-
'description' : description of the entity
-
'entityAllowedToSendCard' : boolean indicating whether the entity is allowed to send card or not
-
'parents' : list of parent entities
-
'labels' : list of labels associated to the entity
10.2.4.5. Get information about an entity
To have information about an entity in particular, you can call the javascript function templateGateway.getEntity(entityId). The function returns an entity object whose fields are mentioned above.
10.2.4.6. Method onTemplateRenderingComplete()
OpFab calls this method when it has finished all tasks regarding rendering template : it is called after applyChildCard(), lockAnswer(), setLttdExpired() and setScreenSize()
It can be used by a template to launch some processing when loading is complete
11. Card notification
When a user receives a card, he is notified via a resume of the card on the left panel of the UI, what is called the "feed".
11.1. Notification configuration
For each process/state, the user can choose to be notified or not when receiving a card. If he chooses not to be notified then the card will not be visible:
-
in the feed or the timeline
-
in the monitoring screen
-
in the calendar screen
However, it will be visible in the archives screen.
In order to have a better visual organization of the processes in the UI, you can define processes groups. You can find more information here
11.2. Sound notification
If the option is activated in the general configuration file web-ui.json, the user can choose to have a sound played when they receive a card (either by the browser or by an external device if configured). This can be managed by the user in the settings screen.
To customize the sounds played by the browser, see config/docker/custom-sounds/README.adoc.
|
11.3. Card read
When the user receives a new card, he can see it in the feed with a bold title and card resume. Once the card is opened, the text is not bold anymore and becomes grey.
11.4. Card acknowledgment
The user can set a card as "acknowledged" so he will not see it anymore by default in the feed. It is as well possible to cancel it and set a card to "unacknowledged" (a filter permit to see acknowledged cards).
To offer the possibility for the user to acknowledged card, it has to be configured in process definition. The configuration is done on a state by setting the acknowledgmentAllowed field. Allowed values are:
-
"Never": acknowledgement not allowed
-
"Always": acknowledgement allowed (default value)
-
"OnlyWhenResponseDisabledForUser": acknowledgement allowed only when the response is disabled for the user
You can see examples in src/test/resources/bundles/defaultProcess_V1/config.json
11.5. Card reminder
For certain process and state, it is possible to configure a reminder. The reminder "reactivate" the card in the feed at a certain time. "Reactivate" means setting the card to the status "unread" and "unacknowledged".
The time for "reactivation" is defined with the parameter "secondsBeforeTimeSpanForReminder" in the card.
The remind is done related to the timespans values :
-
the startDate
-
or recurrently if a recurrence objet is defined.
11.5.1. Simple reminder
If a timespan is present without a recurrence object, a reminder will arise at startDate - secondsBeforeTimeSpanForReminder.
11.5.2. Recurrent reminder
It is possible to set a recurrent reminder via the structure recurrence which define a regular event in the timespan structure. It is defined with the following fields :
-
HoursAndMinutes : hours and minutes of day when the event arise
-
DaysOfWeek : a list of day of the week when the event arise. The day of week is a number with 1 being Monday and 7 being Sunday as defined in the ISO Standard 8601 (weekday number)
-
TimeZone : the time zone of reference for the recurrence definition (default value is Europe/Paris)
-
DurationInMinutes : the duration in minutes of the event
The reminder will arise for each recurrent date of event - secondsBeforeTimeSpanForReminder starting from startDate.
11.5.2.1. Recurrent reminder example
If timespan is defined as follow :
startDate : 1231135161
recurrence : {
    hoursAndMinutes : { hours:10 ,minutes:30},
    daysOfWeek : [6,7],
    durationInMinutes : 15
}
If secondsBeforeTimeSpanForReminder is set to 600 seconds, the reminder will arise every saturday and sunday at 10:20 starting from startDate
11.5.3. Last time for reminding
If the user is not connected at the time of the remind, when he connects if current time is superior to 15 minutes from the event date, no remind will arise.
11.5.4. Debugging
When the user receives a card with a reminder to set, the log (console) of the browser contains a line with the date when the remind will arise . For example :
2020-11-22T21:00:36.011Z Reminder Will remind card userCardExamples.0cf5537b-f0df-4314-f17f-2797ccd8e4e9 at
                         Sun Nov 22 2020 22:55:00 GMT+0100 (heure normale d’Europe centrale)
12. Response cards
Within your template, you can allow the user to perform some actions (respond to a form, answer a question, …). The user fills these information and then clicks on a submit button. When he submits this action, a new card is created and emitted to a third-party tool.
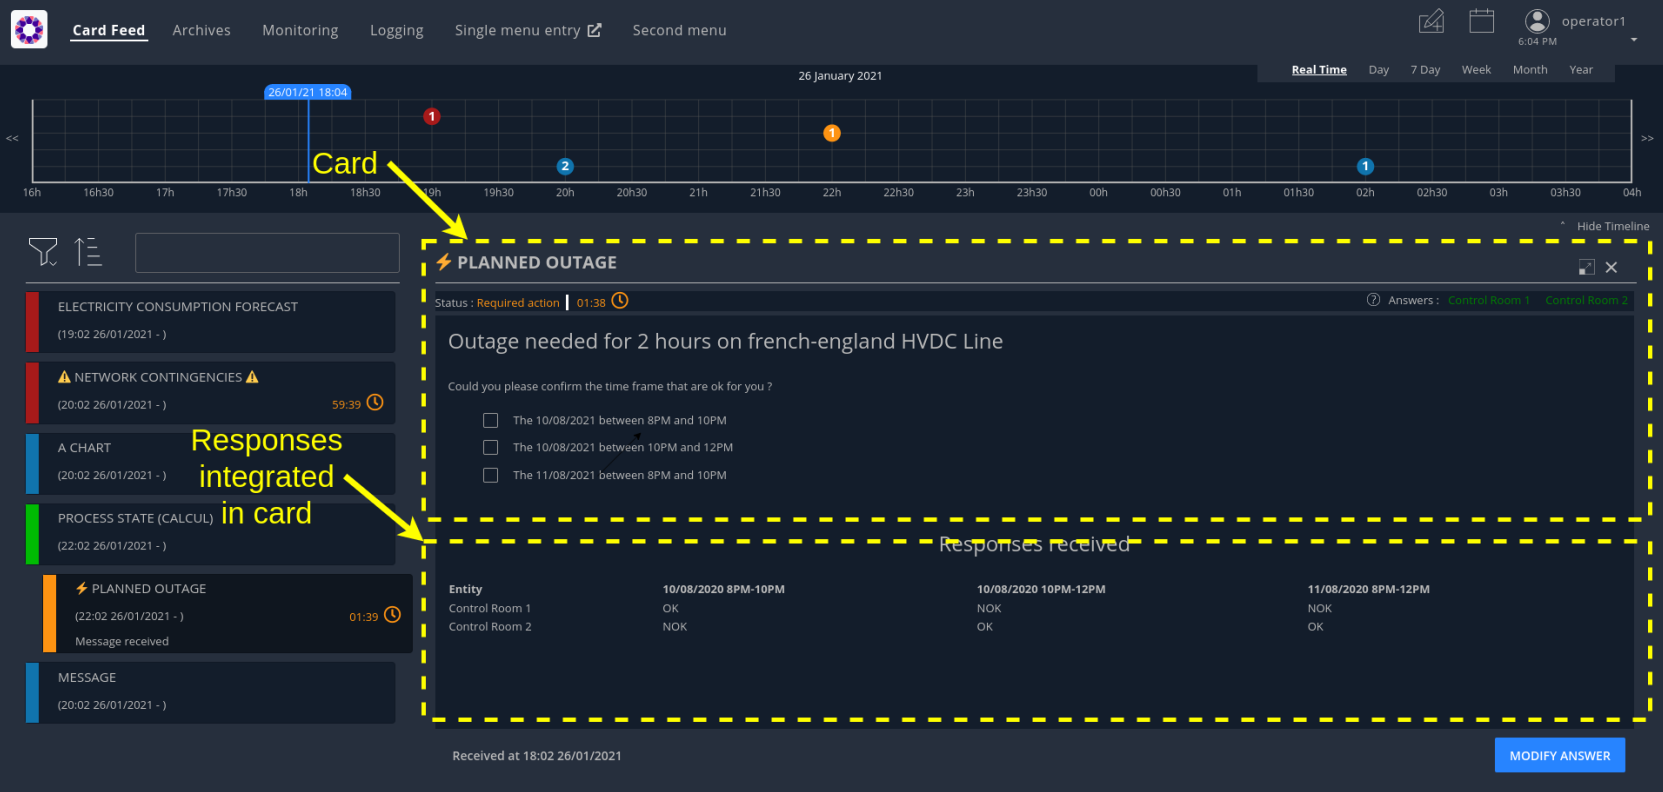
This card is called "a child card" as it is attached to the card where the question came from : "the parent card". This child card is also sent to the users that have received the parent card. From the ui point of view, the information of the child cards can be integrated in real time in the parent card if configured.
The process can be represented as follows :
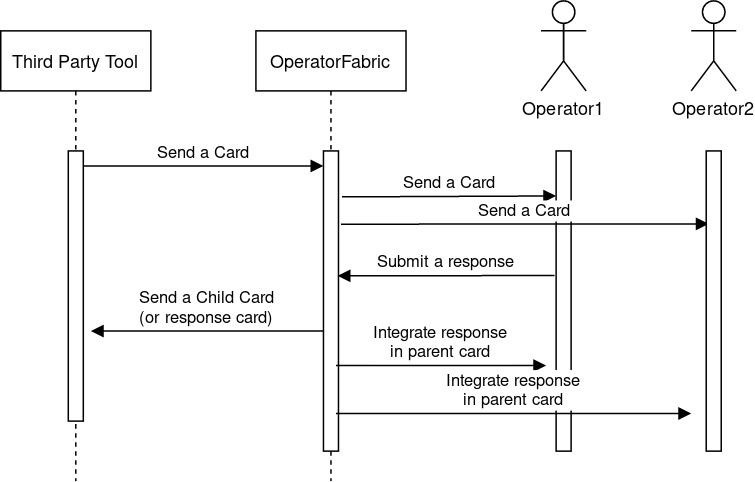
Notice that the response will be associated to the entity and not to the user, i.e the user responds on behalf of his entity. A user can respond more than one time to a card (a future evolution could add the possibility to limit to one response per entity).
You can view a screenshot of an example of card with responses :
12.1. Steps needed to use a response card
12.1.1. Define a third party tool
The response card is to be received by a third party application for business processing. The third-party application will receive the card as an HTTP POST request. The card is in json format (the same format as when we send a card). The field data in the json contains the user response.
The url of the third party receiving the response card is to be set in the .yml of the publication service. Here is an example with two third parties configured.
externalRecipients-url: "{\
           third-party1: \"http://thirdparty1/test1\", \
           third-party2: \"http://thirdparty2:8090/test2\", \
           }"
The name to use for the third-party is the publisherId of the parent card.
|
For the url, do not use localhost if you run OperatorFabric in a docker, as the publication-service will not be able to join your third party. |
12.1.2. Configure the response in config.json
A card can have a response only if it’s in a process/state that is configured for. To do that you need to define the appropriate configuration in the config.json of the concerned process. Here is an example of configuration:
{
  "id": "defaultProcess",
  "name": "Test",
  "version": "1",
  "states": {
    "questionState": {
      "name": "question.title",
      "color": "#8bcdcd",
      "response": {
        "state": "responseState",
        "externalRecipients":["externalRecipient1", "externalRecipient2"]
      },
      "templateName": "question",
      "styles": [
        "style"
      ],
      "acknowledgmentAllowed": "Never",
      "showDetailCardHeader" : true
    },
    "responseState": {
      "name" : "response.title",
      "isOnlyAChildState" : true
    }
  }
}
We define here a state name "questionState" with a response field. Now, if we send a card with process "defaultProcess" and state "questionState", the user will have the possibility to respond if he has the required privileges.
-
The field "state" in the response field is used to define the state to use for the response (the child card).
-
The field "externalRecipients" define the recipients of the response card. These recipients are keys referenced in the config file of cards-publication service, in "externalRecipients-url" element. This field is optional.
-
The field "emittingEntityAllowedToRespond" in the response field is used to allow the emitting entity to respond to a card. To be able to respond, however, the emitting entity has to be one of the recipients of the card. Default value is false.
-
The field "showDetailCardHeader" permits to display the card header or not. This header contains the list of entities that have already responded or not, and a countdown indicating the time remaining to respond, if necessary.
-
The field "isOnlyAChildState" indicates whether the state is only used for child cards or not. If yes, the state is displayed neither in the feed notification configuration screen nor in archives screen filters.
The state to be used for the response can also be set dynamically based on the contents of the card or the
response by returning it in the templateGateway.getUserResponse method (see below for details).
|
12.1.3. Design the question form in the template
For the user to response you need to define the response form in the template with standard HTML syntax
To enable operator fabric to send the response, you need to implement a javascript function in your template called
templateGateway.getUserResponse which returns an object containing four fields :
-
valid (boolean) : true if the user input is valid
-
errorMsg (string) : message in case of invalid user input. If valid is true this field is not necessary.
-
responseCardData (any) : the user input to send in the data field of the child card. If valid is false this field is not necessary.
-
responseState : name of the response state to use. This field is not mandatory, if it is not set the state defined in
config.jsonwill be used for the response.
This method will be called by OperatorFabric when the user clicks on the button to send the response.
In the example below, the getUserResponse creates a responseCardData object by retrieving the user’s inputs from the HTML.
In addition, if the user chose several options, it overrides the response state defined in the config.json with another
state.
  templateGateway.getUserResponse = function() {

    const responseCardData = {};
    const formElement = document.getElementById('question-form');
    for (const [key, value] of [... new FormData(formElement)]) {
        (key in responseCardData) ? responseCardData[key].push(value) : responseCardData[key] = [value];
    }

    const result = {
        valid: true,
        responseCardData: responseCardData
    };

      // If the user chose several options, we decide to move the process to a specific state, for example to ask a follow-up question (what's their preferred option).
    const choiceRequiresFollowUp = Object.entries(responseCardData).length>1;
    if(choiceRequiresFollowUp) result['responseState'] = 'multipleOptionsResponseState';

    return result;

    };
12.1.4. Define permissions
To respond to a card a user must have the right privileges, it is done using "perimeters". The user must be in a group that is attached to a perimeter with a right "ReceiveAndWrite" for the concerned process/state, the state being the response state defined in the config.json.
Here is an example of definition of a perimeter :
{
  "id" : "perimeterQuestion",
  "process" : "defaultProcess",
  "stateRights" : [
    {
      "state" : "responseState",
      "right" : "ReceiveAndWrite"
    }
  ]
}
To configure it in OperatorFabric , you need to make a POST of this json file to the end point /users/perimeters.
To add it to a group name for example "mygroup", you need to make a PATCH request to endpoint 'users/groups/mygroup/perimeters' with payload ["perimeterQuestion"]
| If you don’t want OperatorFabric to check for user perimeter when responding to a card, you can add the variable "checkPerimeterForResponseCard" and set it to false, in the config file of cards-publication and in web-ui.json. |
12.2. Send a question card
The question card is like a usual card except that you have the field "entitiesAllowedToRespond" to set with the entities allowed to respond to the card. If the user is not in the entity, he will not be able to respond.
...
"process"  :"defaultProcess",
"processInstanceId" : "process4",
"state": "questionState",
"entitiesAllowedToRespond": ["ENTITY1_FR","ENTITY2_FR"],
"severity" : "ACTION",
...
| By default, OperatorFabric considers that if the parent card (question card) is modified, then the child cards are deleted. If you want to keep the child cards when the parent card is changed, then you must add in the parent card the field "keepChildCards" and set it to true. |
The header in the card details will list the entities from which a response is expected, color-coding them depending on whether they’ve already responded (green) or not (orange).
You can also set the property entitiesRequiredToRespond to differentiate between entities can respond
(entitiesAllowedToRespond) and those who must respond (entitiesRequiredToRespond).
|
...
"process"  :"defaultProcess",
"processInstanceId" : "process4",
"state": "questionState",
"entitiesAllowedToRespond": ["ENTITY1_FR","ENTITY2_FR","ENTITY3_FR"],
"entitiesRequiredToRespond": ["ENTITY1_FR","ENTITY2_FR"],
"severity" : "ACTION",
...
If entitiesRequiredToRespond is set and not empty, the card detail header will use this list instead of
entitiesAllowedToRespond.
If set, entitiesRequiredToRespond does not have to be a subset of entitiesAllowedToRespond. To determine
if a user has the right to respond, OperatorFabric consider the union of the two lists.
|
| If several entities are allowed/required to respond and if the user is part of several of these entities, so the ability for the user to respond to this card is desactivated. |
12.3. Integrate child cards
For each user response, a child card containing the response is emitted and stored in OperatorFabric like a normal card. It is not directly visible on the ui but this child card can be integrated in real time to the parent card of all the users watching the card. To do that, you need some code in the template to process child data:
-
You can access child cards via the javascript method templateGateway.childCards() which returns an array of the child cards. The structure of a child card is the same as the structure of a classic card.
-
You need to define a method called templateGateway.applyChildCards() which implements the processing of child cards. This method will be called by OperatorFabric when loading the card and every time the list of child cards changes.
12.3.1. Entity name
If you want to show the name of an entity that send the response, you need to get the id of the entity via the publisher field of the child card and then you can get the name of the entity by calling templateGateway.getEntityName(entityId)
12.3.2. Example
You can find an example in the file src/test/resources/bundles/defaultProcess_V1/template/question.handlebars.
12.4. Lock mechanism
When a user has never answered to a response card, the button will be marked as "VALIDATE ANSWER" and the card will be unlocked. When the user responds for the first time (and the response succeeds), the button will then be marked as "MODIFY ANSWER" and the information that the card has been locked will be sent to the third template (by calling the templateGateway.lockAnswer() function).
Once a user has responded to a response card, its entity status will be considered as "already answered" for this card. Then all the users having the same entity will be in this status for this card.
From there, as soon as they will open this card the button will be marked as "MODIFY ANSWER" and this information (i.e. that this entity has already responded) will be send to the third template (via the templateGateway.isLocked variable).
The user can then click on "MODIFY ANSWER" and the button will come back to its initial state ("VALIDATE ANSWER") and the information that the user wants to modify its initial answer will be sent to the third template (by calling the templateGateway.unlockAnswer() function).
Once again, after validating its answer, the information will be sent to the third template that the card has been locked (by calling the templateGateway.lockAnswer() function).
12.5. Response enabled
The template can know if the current user has the permission to answer by calling the templateGateway.isUserAllowedToRespond() function. An example of templateGateway.isUserAllowedToRespond() usage can be found in the file src/test/resources/bundles/userCardExamples/template/incidentInProgress.handlebars.
12.6. Response required
The template can know if the current user is member of an Entity required to respond by calling the templateGateway.isUserMemberOfAnEntityRequiredToRespond() function. An example of templateGateway.isUserMemberOfAnEntityRequiredToRespond() usage can be found in the file src/test/resources/bundles/defaultProcess_V1/template/question.handlebars.
12.7. Last Time to Decide (lttd)
If the card has a last time to decide (lttd) configured, when the time is expired this information will be sent to the third template (by calling the templateGateway.setLttdExpired(true) function). An example of templateGateway.setLttdExpired(true) usage can be found in the file src/test/resources/bundles/defaultProcess_V1/template/question.handlebars.
12.8. Entities allowed to respond
If inside your template, you want to get the ids of the entities allowed to send a response, you can call the method templateGateway.getEntitiesAllowedToRespond() . This method returns an array containing the ids. An example of templateGateway.getEntitiesAllowedToRespond() usage can be found in the file src/test/resources/bundles/userCardExamples2/template/question.handlebars.
12.9. Entity used for user to respond
If inside your template, you want to get the id of the entity used by the user to send a response, you can call the method templateGateway.getEntityUsedForUserResponse() . An example of usage can be found in the file src/test/resources/bundles/userCardExamples2/template/question.handlebars.
13. User cards
Using the Create card menu, the user can send cards to entities. This feature needs to be configured.
13.1. Configure the bundle
A card is related to a process and a state, if you want users to be able to emit a card for a specific process and state, you need to define it in the bundle for this process.
For example :
"id": "userCardExamples",
"name": "userCardExamples.label",
"version": "1",
"states": {
  "messageState": {
    "name": "message.title",
    "userCard" : {
      "template" : "usercard_message",
      "severityVisible" : true,
      "startDateVisible" : true,
      "endDateVisible" : true,
      "lttdVisible" : false,
      "recipientList" : [{"id": "ENTITY_FR", "levels": [0,1]}, {"id": "IT_SUPERVISOR_ENTITY"}]
    },
    "templateName": "message",
    "styles": [],
    "acknowledgmentAllowed": "Always"
  }
}
In this example, the field userCard states that we have a template called usercard_message that defines how
the specific business input fields for this user card will be displayed in the card sending form that will be
presented to the user (through the Create Card menu).
This template works the same as templates for card presentation. Here is an example :
<div class="opfab-textarea">
    <label> MESSAGE </label>
    <textarea id="message" name="message" placeholder="Write something.."
        style="width:100%"> {{card.data.message}} </textarea>
</div>


<script>
    templateGateway.getSpecificCardInformation = function () {
        const message = document.getElementById('message').value;
        const card = {
          summary : {key : "message.summary"},
          title : {key : "message.title"},
          data : {message: message}
        };
        if (message.length<1) return { valid:false , errorMsg:'You must provide a message'}
        return {
            valid: true,
            card: card
        };

    }
</script>
The first part defines the HTML for the business-specific input fields. It should only include the form
fields specific to your process, because the generic fields (like startDate , endDate , severity … ) are presented
by default. It is possible to hide certain generic fields, by setting their visibility to false in the config.json
(for example field severityVisible).
Please note that you should use an OpFab css class so the "business-specific" part of the form has the same look and feel (See OperatorFabric Style for more information)
Once the card has been sent, users with the appropriate rights can edit it. If they choose to do so, they’re presented
with the same input form as for the card creation, but the fields are pre-filled with the current data of the card.
This way, they can only change what they need without having to re-create the card from scratch.
That’s what the reference to {{card.data.message}} is for. It means that this text-area input field should be filled
with the value of the field message from the card’s data.
The second part is a javascript method you need to implement to allow OperatorFabric to get your specific data .
To have a better understanding of this feature, we encourage you to have a look at the examples in the OperatorFabric core repository under (src/test/resources/bundles/userCardExamples).
13.2. Method getSpecificCardInformation
The following card fields can be set via the object card in the object returned by method getSpecificCardInformation:
-
title
-
summary
-
startDate (epoch date in ms)
-
endDate (epoch date in ms)
-
lttd (epoch date in ms)
-
keepChildCards
-
secondsBeforeTimeSpanForReminder
-
severity (in case it is not visible from the user , when
severityVisibleset to false inconfig.json) -
data
-
entitiesAllowedToEdit
-
entitiesAllowedToRespond
-
entitiesRequiredToRespond
-
externalRecipients (use to send cards to third party , see Define a third party tool for more information) .
If you send a card to an ExternalRecipient, when the user delete it, the external recipient will receive the information via an HTTP DELETE request with the id of the deleted card at the end of the request (example : myexternal_app/myendpoint/ID_CARD).
If you want the card to be visible in the agenda feature, you need to set 'viewCardInAgenda' to true in the object returned by the method.
If the form is not filled correctly by the user, you can provide an error message (see example above). Again, have a look to the examples provided.
13.3. Define permissions
To send a user card, the user must be member of a group that has a perimeter defining the right ReceiveAndWrite
or Write for the chosen process and state. For example:
{
  "id" : "perimeterUserCard",
  "process" : "userCardExamples",
  "stateRights" : [
    {
      "state" : "messageState",
      "right" : "ReceiveAndWrite"
    }
  ]
}
Using the ReceiveAndWrite right instead of the Write right allows the user to receive the card they sent and
edit or delete it.
|
13.4. Recipients
When sending a user card, by default it is possible to choose the recipients from all the available entities. To limit the list of available recipients it is possible to configure the field recipientList in config.json
For example :
"states": {
  "messageState": {
    "name": "message.title",
    "userCard" : {
      "template" : "usercard_message",
      "severityVisible" : true,
      "startDateVisible" : true,
      "endDateVisible" : true,
      "lttdVisible" : false,
      "recipientVisible": true,
      "recipientList" : [{"id": "ENTITY_FR", "levels": [0,1]}, {"id": "IT_SUPERVISOR_ENTITY"}]
    },
    "templateName": "message",
    "styles": [],
    "acknowledgmentAllowed": "Always"
  }
}
In this example the list of available recipients will contain: "ENTITY_FR" (level 0), all the first level children of "ENTITY_FR" (level 1) and "IT_SUPERVISOR_ENTITY".
The recipient field can be hidden using the attribute recipientVisible : if hidden, the card will be sent to all the recipients in recipientList and to the user.
13.5. Card editing
Once a user card has been sent it can be edited by a user member of the publisher entity. It is possible to allow other entities to edit the card by specifing the 'entitiesAllowedToEdit' card field.
13.6. Get edition mode
The template can know if the user is creating a new card or editing an existing card by calling the usercardTemplateGateway.getEditionMode() function. The function will return one of the following values:
-
'CREATE'
-
'EDITION'
An example of usercardTemplateGateway.getEditionMode() usage can be found in the file src/test/resources/bundles/userCardExamples2/template/usercard_question.handlebars.
13.7. Send response automatically (experimental feature)
It is possible to configure a template to automatically send a response when sending a user card expecting an answers from one of the entities of the emitting user. The response card will be sent only if the user is enabled to respond to the card.
To enable the automated response the template should add a childCard field to the object returned by
getSpecificCardInformation method. For example:
 <script>
    templateGateway.getSpecificCardInformation = function () {
        const card = {...}

        childCard : {
          summary : {key : "exampe.summary"},
          title : {key : "example.title"},
          state : "mystateForResponse"
          data : {
                  // specific child  card date
                  }
          };
        ...
        return {
            valid: true,
            card: card,
            childCard: childCard
        };

    }
  </script>
The card preview will display the card detail with the automated response as it will be displayed in Feed page.
When editing a user card, the template can get the response sent by current user by calling the usercardTemplateGateway.getUserEntityChildCardFromCurrentCard() function. The function will return the response child card sent by current user or null if there is no response from current user.
An example of usercardTemplateGateway.getUserEntityChildCardFromCurrentCard() usage can be found in the file src/test/resources/bundles/userCardExamples2/template/usercard_confirmation.handlebars.
14. Archived Cards
14.1. Key concepts
Every time a card is published, in addition to being delivered to the users and persisted as a "current" card in MongoDB, it is also immediately persisted in the archived cards.
Archived cards are similar in structure to current cards, but they are managed differently. Current cards are uniquely identified by their id (made up of the publisher and the process id). That is because if a new card is published with id as an existing card, it will replace it in the card collection. This way, the current card reflects the current state of a process instance. In the archived cards collection however, both cards will be kept, so that the archived cards show all the states that a given process instance went through.
14.2. Archives screen in the UI
The Archives screen in the UI allows the users to query these archives with different filters. The layout of this screen is very similar to the Feed screen: the results are displayed in a (paginated) card list, and the user can display the associated card details by clicking a card in the list.
The results of these queries are limited to cards that the user is allowed to see, either :
-
because this user is direct recipient of the card,
-
because he belongs to a group (or entity) that is a recipient,
-
or because he belongs to a group that has the right to receive the card (via definition of perimeters)
If a card is sent to an entity and a group, then this user must be part of both the group and the entity.
| Currently, child cards are not shown in the Archives, only the parent card is shown. |
15. Monitoring
| This feature is experimental |
The monitoring screen is a realtime view of processes based on current cards received by the user (i.e the last version of cards visible by the user). It can be seen as an another view of the feed.
Not all the cards are visible, it depends on the business process they are part of. For a card to be visible in this screen, the parameter uiVisibility.monitoring must be set to true in the config.json file of its process.
15.1. Export configuration
An Excel export function is available in the monitoring screen, the content of the export can be configured. To do so, a json file describing the expected output can be sent to the businessconfig service through the /businessconfig/monitoring endpoint.
In opfab git repository, you can find in directory src/test/resources/monitoringConfig :
-
a script to load a monitoring configuration
loadMonitoringConfig.sh -
an example of configuration in
monitoringConfig.json(for the response fields to be filled , you need to need to respond to a card question in process userCardExamples2 )
A description of the structure of the configuration can be found in the businessconfig api documentation
16. User management
The User service manages users, groups, entities and perimeters (linked to groups).
- Users
-
represent account information for a person destined to receive cards in the OperatorFabric instance.
- Entities
-
-
represent set of users destined to receive collectively some cards.
-
can be used to model organizations, for examples : control center, company , department…
-
can be used in a way to handle rights on card reception in OperatorFabric.
-
can be part of another entity (or even several entities). This relationship is modeled using the "parent entity" property
-
- Groups
-
-
represent set of users destined to receive collectively some cards.
-
has a set of perimeters to define rights for card reception in OperatorFabric.
-
can be used to model roles in organizations, for examples : supervisor, dispatcher …
-
The user define here is an internal representation of the individual card recipient in OperatorFabric the authentication is leave to specific OAuth2 external service.
|
In the following commands the $token is an authentication token currently valid for the OAuth2 service used by the current OperatorFabric system.
|
16.1. Users, groups, entities and perimeters
User service manages users, groups, entities and perimeters.
16.1.1. Users
Users are the individuals and mainly physical person who can log in OperatorFabric.
The access to this service has to be authorized, in the OAuth2 service used by the current OperatorFabric instance, at least to access User information and to manage Users. The membership of groups and entities are stored in the user information.
| User login must be lowercase. Otherwise, it will be converted to lowercase before saving to the database. |
| Resource identifiers such as login, group id, entity id and perimeter id must only contain the following characters: letters, _, - or digits. |
16.1.1.1. Automated user creation
In case of a user does exist in a provided authentication service but he does not exist in the OperatorFabric
instance, when he is authenticated and connected for the first time in the OperatorFabric instance, the user is
automatically created in the system without attached group or entity.
The administration of the groups, entities and perimeters is dealt by the administrator manually.
More details about automated user creation
here
16.1.2. Entities
The notion of entity is loose and can be used to model organizations structures(examples : control center, company , department… ).
Entities are used to send cards to several users without a name specifically. The information about membership to an
entity is stored in the user’s data (entities field of the user object). In Entity objects, the parents property (array) expresses the fact that this entity is a part of one or several other entities. This feature allows cards to be sent to a group of entities without having to repeat the detailed list of entities for each card.
The boolean property entityAllowedToSendCard (default value true) can be used to mark an Entity as not eligible as card publisher. This can be useful for a group of entities where only child entities should be used as card publishers while the parent is just a logical group usable as card recipient. The labels property (array) allows to associate string labels to an Entity object.
Examples using entities can be found here .
16.1.3. Groups
The notion of group is loose and can be used to simulate role in OperatorFabric (examples : supervisor, dispatcher … ).
Groups are used to send cards to several users without a name specifically. The information about membership to a
group is stored in the user information. A group contains a list of perimeters which define the rights of reception/writing for a couple process/state. The rules used to send cards are described in the
recipients section
.
.
16.1.4. Perimeters
Perimeters are used to define rights for reading/writing cards. A perimeter is composed of an identifier (unique), a process name and a list of state/rights couple. Possible rights for receiving/writing cards are :
-
Receive : the rights for receiving a card
-
Write : the rights for writing a card, that is to say respond to a card or create a new card
-
ReceiveAndWrite : the rights for receiving and writing a card
16.1.5. Alternative way to manage groups and entities
The standard way to handle groups and entities in OperatorFabric instance is dealt on the user information.
There is an alternative way to manage groups and entities through the authentication token, the groups and entities are defined by the administrator of the authentication service.
See
here
for more details to use this feature.
16.2. Currently connected users
The endPoint /cards/connections gives the list of connected user in real time. It is only accessible by users with administrator privileges.
16.3. Real time users
OperatorFabric allows you to see which entities/groups are logged in and not logged in. To have this information, you must upload a configuration file, using the endpoint /businessconfig/realtimescreens, via a POST request. In this file, you can configure several screens, each one containing the list of entities/groups you want to see.
This interface is accessible via the user menu (top right of the screen).
Here is an example of the configuration file :
{
  "realTimeScreens": [
    {
      "screenName": "All Control Centers",
      "screenColumns": [
        {
          "entitiesGroups": [
            {
              "name": "French Control Centers",
              "entities": [
                "ENTITY1_FR",
                "ENTITY2_FR",
                "ENTITY3_FR",
                "ENTITY4_FR"
              ],
              "groups": [
                "Dispatcher",
                "Planner"
              ]
            },
            {
              "name": "Italian Control Centers",
              "entities": [
                "ENTITY1_IT",
                "ENTITY2_IT",
                "ENTITY3_IT"
              ],
              "groups": [
                "Dispatcher",
                "Planner"
              ]
            },
            {
              "name": "Dutch Control Centers",
              "entities": [
                "ENTITY1_NL",
                "ENTITY2_NL"
              ],
              "groups": [
                "Dispatcher",
                "Planner"
              ]
            }
          ]
        },
        {
          "entitiesGroups": [
            {
              "name": "Central Supervision Centers",
              "entities": [
                "IT_SUPERVISOR_ENTITY"
              ],
              "groups": [
                "Supervisor"
              ]
            }
          ]
        }
      ]
    },
    {
      "screenName": "French Control Centers",
      "screenColumns": [
        {
          "entitiesGroups": [
            {
              "name": "French Control Centers",
              "entities": [
                "ENTITY1_FR",
                "ENTITY2_FR",
                "ENTITY3_FR",
                "ENTITY4_FR"
              ],
              "groups": [
                "Dispatcher",
                "Planner"
              ]
            }
          ]
        },
        {
          "entitiesGroups": [
            {
              "name": "Central Supervision Centers",
              "entities": [
                "IT_SUPERVISOR_ENTITY"
              ],
              "groups": [
                "Supervisor"
              ]
            }
          ]
        }
      ]
    },
    {
      "screenName": "Italian Control Centers",
      "screenColumns": [
        {
          "entitiesGroups": [
            {
              "name": "Italian Control Centers",
              "entities": [
                "ENTITY1_IT",
                "ENTITY2_IT",
                "ENTITY3_IT"
              ],
              "groups": [
                "Dispatcher",
                "Planner"
              ]
            }
          ]
        },
        {
          "entitiesGroups": [
            {
              "name": "Central Supervision Centers",
              "entities": [
                "IT_SUPERVISOR_ENTITY"
              ],
              "groups": [
                "Supervisor"
              ]
            }
          ]
        }
      ]
    },
    {
      "screenName": "Dutch Control Centers",
      "screenColumns": [
        {
          "entitiesGroups": [
            {
              "name": "Dutch Control Centers",
              "entities": [
                "ENTITY1_NL",
                "ENTITY2_NL"
              ],
              "groups": [
                "Dispatcher",
                "Planner"
              ]
            }
          ]
        },
        {
          "entitiesGroups": [
            {
              "name": "Central Supervision Centers",
              "entities": [
                "IT_SUPERVISOR_ENTITY"
              ],
              "groups": [
                "Supervisor"
              ]
            }
          ]
        }
      ]
    }
  ]
}
With this configuration file, 4 different screens will be available : "All Control Centers", "French Control Centers", "Italian Control Centers" and "Dutch Control Centers".
For example, in the UI, "All Control Centers" will look like :
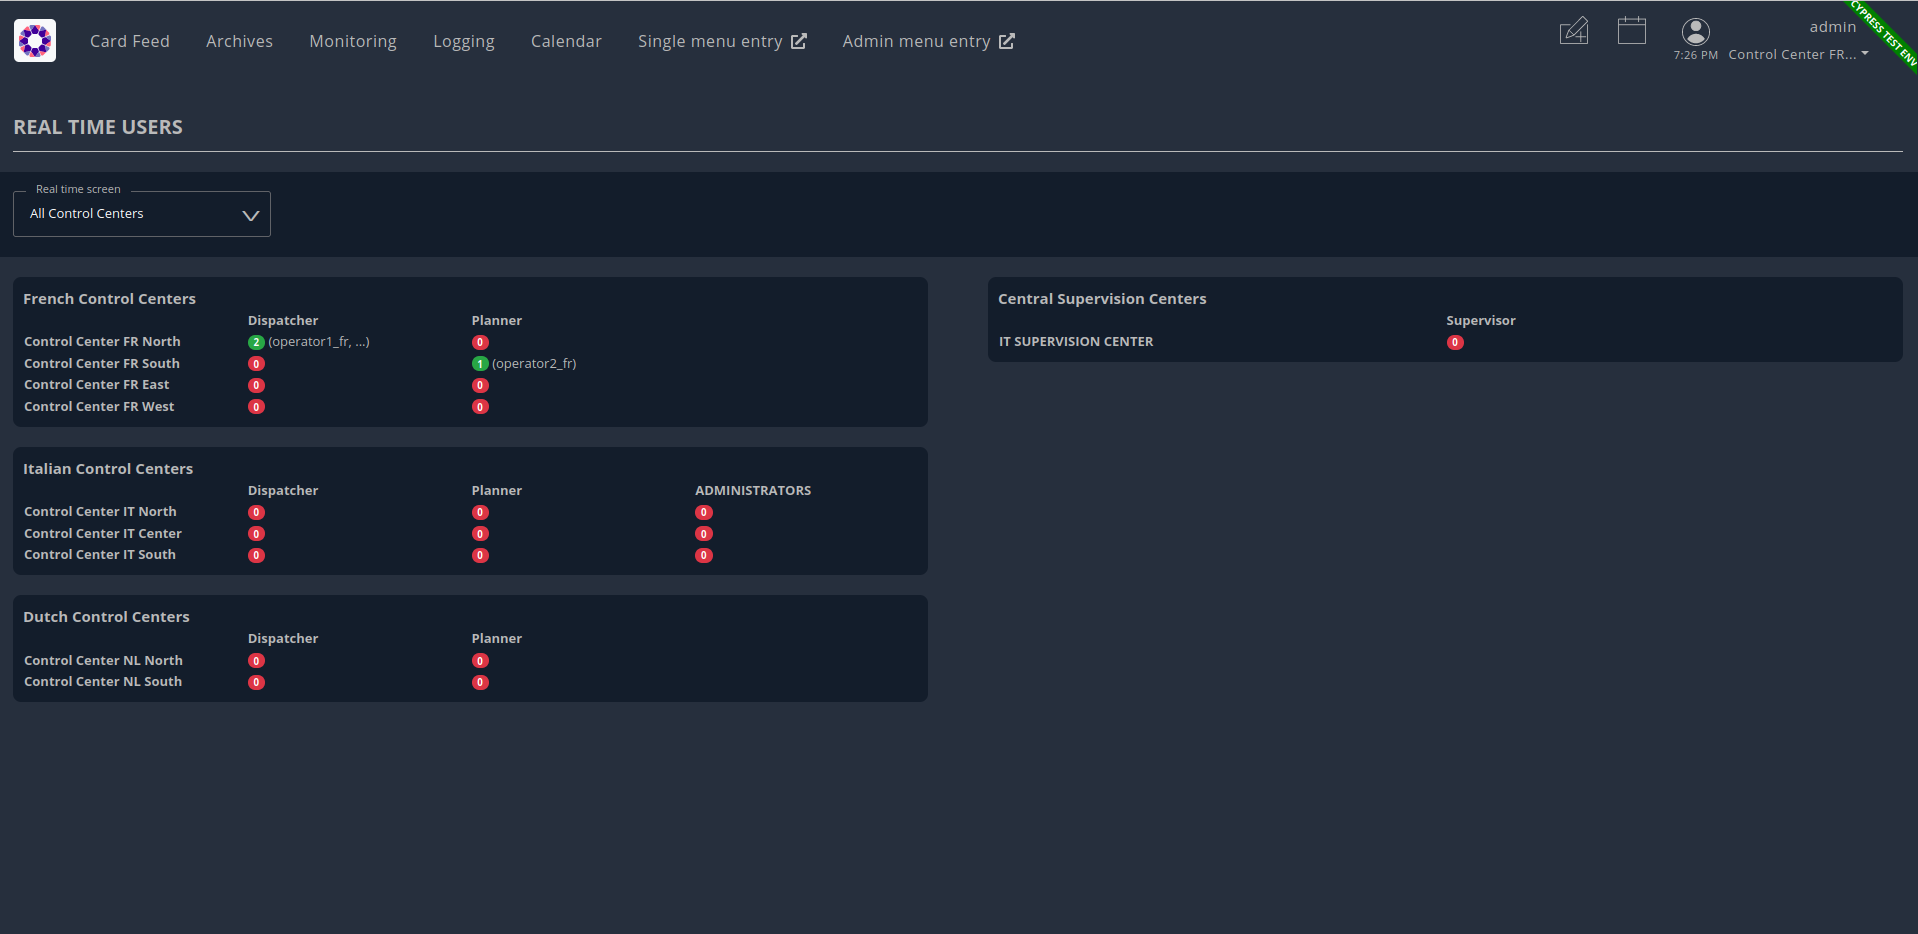
17. UI Customization
17.1. UI configuration
To customize the UI, declare specific parameters in the web-ui.json file as listed here
17.2. Menu Entries
The ui-menu.json file is used:
-
To manage the visibility of core OperatorFabric menus (feed, monitoring, etc.)
-
To declare specific business menus to be displayed in the navigation bar of OperatorFabric
17.2.1. Core menus
The coreMenusConfiguration property of the ui-menu.json files should contain one object with the following properties
for each core menu:
-
id: Id of the core menu (string) -
visible: Whether this menu should be visible for this OperatorFabric instance (boolean) -
showOnlyForGroups: List of groups for which this menu should be visible (array, optional)
-
If a core menu is not present in
coreMenusVisibility, it won’t be visible. -
If a core menu doesn’t have a
visibleproperty, or it is set to null or false, it won’t be visible. -
For a core menu with
"visible": true:-
If
showOnlyForGroupsis not present, null or an empty array : the menu is visible for all users. -
If
showOnlyForGroupsis present and with a non-empty array as a value: menu is visible only for users from the listed groups.
-
| Location of menu | Menu | Id |
|---|---|---|
Navigation bar |
Feed |
feed |
Archives |
archives |
|
Monitoring |
monitoring |
|
Logging |
logging |
|
Navigation bar (icon) |
User card |
usercard |
Calendar |
calendar |
|
Top-right menu |
Administration |
admin |
Settings |
settings |
|
Notification Reception Configuration |
feedconfiguration |
|
Real time users |
realtimeusers |
|
Night/Day toggle |
nightdaymode |
|
About |
about |
|
Change password |
changepassword |
|
Logout |
logout |
See /config/docker/ui-menu.json for an example containing all core menus.
This property only manages menu visibility, not resource access rights. For example, if visibility of the
Administration menu is granted to groups other than the ADMIN group, users will be able to see the administration
screen but not to perform administration tasks, as they require administrator privileges.
|
If you decide not to make the night/day toggle visible (globally or for certain users), you should consider
setting the settings.styleWhenNightDayModeDesactivated property in web-ui.json to specify which mode should be used.
|
17.2.2. Custom business menus
A menu can target directly a link or give access to several sub-menus when clicked. Those sub-menus can only target a link. A targeted link can be open in an iframe or in a new tab.
Menus support i18n following the i18n OperatorFabric rules. The ui-menu.json file contains directly the i18n dictionary for the menus.
In case of a single menu, the navigation bar displays the l10n of the label of the entry menu.
In this case, the label declared at the root level of the menu is useless and can be omitted (see example below).
A single menu or a menu with sub-menus has at least attributes named id and entries.
The entries attribute is an array of menu entry. It is possible to restrict the visibility of one menu entry the one
or more user groups by setting the showOnlyForGroups parameter.
Note that menus with sub-menus need a label declaring an i18n key.
Each menu entry declares the attributes listed below:
-
id: identifier of the entry menu in the UI; -
url: url opening a new page in a tab in the browser; -
label: it’s an i18n key used to l10n the entry in the UI. -
linkType: Defines how to display business menu links in the navigation bar and how to open them. Possible values:-
TAB: displays only a text link. Clicking it opens the link in a new tab. -
IFRAME: displays only a text link. Clicking it opens the link in an iframe in the main content zone below the navigation bar. -
BOTH: default value. Displays a text link plus a little arrow icon. Clicking the text link opens the link in an iframe while clicking the icon opens in a new tab. **
-
-
showOnlyForGroups: Defines the list of user groups entitled to see the menu entry, if not defined or empty it will be visible to every user.
In the following example, the configuration file declares two additional business menus. The first has only one entry, the second has two entries. The sample also contains the i18n translations in English and in French.
{
  "menus": [
    {
      "id": "menu1",
      "entries": [
        {
          "id": "uid_test_0",
          "url": "https://opfab.github.io/",
          "label": "entry.single",
          "linkType": "BOTH"
        }
      ]
    },
    {
      "id": "menu2",
      "label": "title.multi",
      "entries": [
        {
          "id": "uid_test_1",
          "url": "https://opfab.github.io/",
          "label": "entry.entry1",
          "linkType": "BOTH",
          "showOnlyForGroups": "ReadOnly,Dispatcher"
        },
        {
          "id": "uid_test_2",
          "url": "https://www.wikipedia.org/",
          "label": "entry.entry2",
          "linkType": "BOTH",
          "showOnlyForGroups": "Planner"
        }
      ]
    }
  ],
  "locales": [
    {
      "language": "en",
      "i18n": {
        "menu1": {
          "entry": {
            "single": "Single menu entry"
          }
        },
        "menu2": {
          "title": {
            "multi": "Second menu"
          },
          "entry": {
            "entry1": "First menu entry",
            "entry2": "Second menu entry"
          }
        }
      }
    },
    {
      "language": "fr",
      "i18n": {
        "menu1": {
          "entry": {
            "single": "Premier élément"
          }
        },
        "menu2": {
          "title": {
            "multi": "Deuxième menu"
          },
          "entry": {
            "entry1": "Premier élément",
            "entry2": "Deuxième élément"
          }
        }
      }
    }
  ]
}
For iframes opened from menu, the associated request uses an extra parameter containing the current theme information.
Named opfab_theme, this parameter has a value corresponding to the current theme: DAY or NIGHT. For example:
mysite.com/index.htm?opfab_theme=NIGHT. Switching theme will trigger reload of open iframes.
|
18. External Devices Service
The external devices service is an optional service allowing OperatorFabric to relay notifications to external physical devices.
18.1. Specification
The aim of this section is to describe the initial business need that led to the creation of this service and what use cases are currently supported.
OperatorFabric users already have the option to be notified of a card’s arrival by a sound played by their browser. There is a different sound for each severity, and they are configurable for a given instance. The users can decide to opt out of sound notifications for certain severities. We also added an option for the sounds to be repeated until the operator interacted with the application (i.e. clicked anywhere on the page) so as to make them harder to miss.
This can be enough for some use cases, but it was not ideal for operators working in control rooms. Indeed, control rooms each have an external sound system that is shared for the whole room, and existing applications currently trigger sound alerts on these sound systems rather than on each operator’s computer.
This has several advantages:
-
The sound can be heard by all operators
-
It can be heard even if the operator is not at their desk
-
The sound system can warn that the connexion with an application has been lost if it hasn’t received a "watchdog" signal for a given period of time.
As a result, external devices support in OperatorFabric aims to allow sound notifications to be passed on to external sound systems. The sound system on which the sound will be played can depend on the user receiving the notification. For example, all operators working in control room A will have their sounds played on the control room’s central sound system, while operators from control room B will use theirs. Only one external device can be configured for each user.
So far, only sound systems using the Modbus protocol are supported, but we would like to be able to support other protocols (and ultimately allow people to supply their own drivers) in the future.
18.2. Implementation
18.2.1. Architecture
Given the use case described above, a new service was necessary to act as a link between the OperatorFabric UI and the external devices. This service is in charge of:
-
Managing the configuration relative to external devices (see below for details)
-
Process requests from the UI (e.g. "play the sound for ALARM for user operator1_fr") and translate them as requests to the appropriate device in their supported protocol, based on the above configuration
-
Allow the pool of devices to be managed (connection, disconnection)
This translates as three APIs.
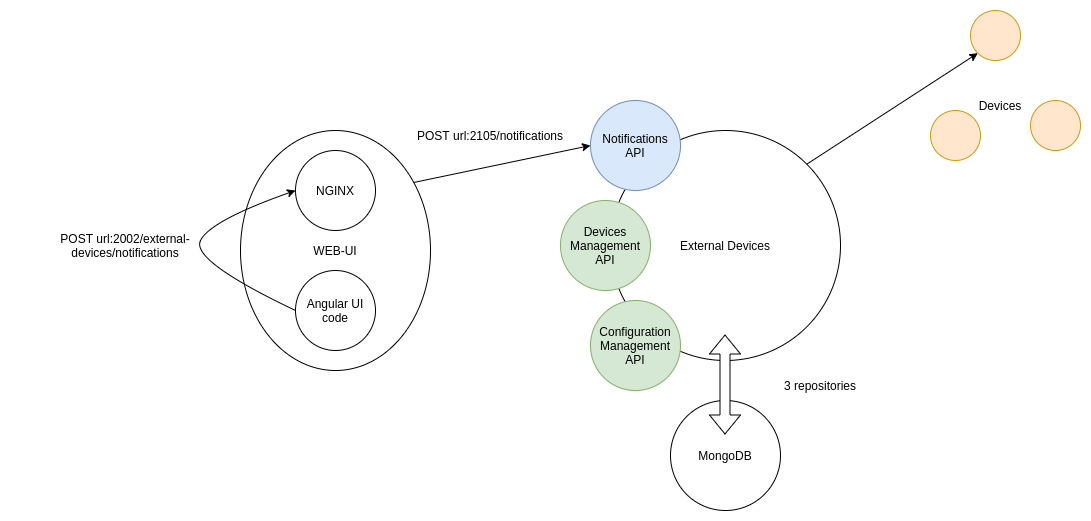
Here is what happens when user operator1_fr receives a card with severity ALARM:
-
In the Angular code, the reception of the card triggers a sound notification.
-
If the external devices feature is enabled and the user has chosen to play sounds on external devices (instead of the browser), the UI code sends a POST request on the
external-devices/notificationsendpoint on the NGINX gateway, with the following payload:{ "opfabSignalId": "ALARM" } -
The NGINX server, acting as a gateway, forwards it to the
/notificationsendpoint on the External Devices service. -
The External Devices service queries the configuration repositories to find out which external device is configured for operator1_fr, how to connect to it and what signal "ALARM" translates to on this particular device.
-
It then creates the appropriate connection if it doesn’t exist yet, and sends the signal.
18.2.2. Configuration
The following elements need to be configurable:
-
For each user, which device to use:
userConfiguration{ "userLogin": "operator1_fr", "externalDeviceId": "CDS_1" } -
How to connect to a given external device (host, port)
deviceConfiguration{ "id": "CDS_1", "host": "localhost", "port": 4300, "signalMappingId": "default_CDS_mapping" } -
How to map an OperatorFabric signal key [1] to a signal (sound, light) on the external system
signalMapping{ "id": "default_CDS_mapping", "supportedSignals": { "ALARM": 1, "ACTION": 2, "COMPLIANT": 3, "INFORMATION": 4 } }
This means that a single physical device allowing 2 different sets of sounds to be played (for example one set for desk A and another set for desk B) would be represented as two different device configurations, with different ids.
[{
  "id": "CDS_A",
  "host": "localhost",
  "port": 4300,
  "signalMappingId": "mapping_A"
},
{
  "id": "CDS_B",
  "host": "localhost",
  "port": 4300,
  "signalMappingId": "mapping_B"
}][{
"id": "mapping_A",
"supportedSignals": {
"ALARM": 1,
"ACTION": 2,
"COMPLIANT": 3,
"INFORMATION": 4
}
},
{
"id": "mapping_B",
"supportedSignals": {
"ALARM": 5,
"ACTION": 6,
"COMPLIANT": 7,
"INFORMATION": 8
}
}]| The signalMapping object is built as a Map with String keys (rather than the Severity enum or any otherwise constrained type) because there is a strong possibility that in the future we might want to map something other than severities. |
Please see the API documentation for details.
There is a Device object distinct from DeviceConfiguration because the latter represents static information
about how to reach a device, while the former contains information about the actual connexion and its status.
For example, this is why the device configuration contains a host (which can be a hostname) while the device
has a resolvedAddress.
As a result, they are managed through separate endpoints, which might also make things easier if we need to secure
them differently (some people might be allowed to connect/disconnect devices but not change their configuration).
|
18.4. Connexion Management
OperatorFabric doesn’t automatically attempt to connect to configured external devices on start up as they might not be available when the OperatorFabric instance starts. Similarly, posting a new device configuration to the external devices service doesn’t cause it to attempt to connect immediately, as the configuration setup might be done in advance of the actual activation.
However, if a notification is received by the external devices service that needs to be passed on to a device that is configured but not connected yet, the connection will be performed automatically.
18.5. Configuration Management
In coherence with the way Entities, Perimeters, Users and Groups are managed, SignalMapping, UserConfiguration and
DeviceConfiguration resources can be deleted even if other resources link to them.
For example, if a device configuration lists someMapping as its signalMappingId and a DELETE request is sent
on someMapping, the deletion will be performed and return a 200 Success, and the device will have a null
signalMappingId.
18.6. Drivers
This section contains information that is specific to each type of driver. Currently, the only supported driver uses the Modbus protocol.
18.6.1. Modbus Driver
The Modbus driver is based on the jlibmodbus library to create a
ModbusMaster for each device and then send requests through it using the
WriteSingleRegisterRequest
object.
We are currently using the "BROADCAST" mode, which (at least in the jlibmodbus implementation) means that the Modbus master doesn’t expect any response to its requests (which makes sense because if there really are several clients responding to the broadcast, ) This is mitigated by the fact that if watchdog signals are enabled, the external devices will be able to detect that they are not receiving signals correctly. In the future, it could be interesting to switch to the TCP default so OperatorFabric can be informed of any exception in the processing of the request, allowing for example to give a more meaningful connection status (see #2294)
18.6.2. Adding new drivers
New drivers should implement the ExternalDeviceDriver interface, and a corresponding factory implementing the
ExternalDeviceDriverFactory interface should be created with it.
The idea is that in the future, using dependency injection, Spring should be able to pick up any factory on the classpath implementing the correct interface.
ExternalDeviceDriver, ExternalDeviceDriverFactory and the accompanying custom exceptions should be made
available as a jar on Maven Central if we want to allow project users to provide their own drivers.
|
| If several drivers need to be used on a given OperatorFabric instance at the same time, we will need to introduce a device type in the deviceConfiguration object. |
Deployment and Administration of OperatorFabric
19. Deployment
For now OperatorFabric consist of Docker images available either by compiling the project or by using images releases from Dockerhub
Service images are all based on openjdk:8-jre-alpine.
For simple one instance per service deployment, you can find a sample deployment as a docker-compose file here
To run OperatorFabric in development mode, see the development environment documentation .
20. Configuration
OperatorFabric has multiple services to configure.
See the architecture documentation for more information on the different services.
All services are SpringBoot applications and use jetty as an embedded servlet container. As such, they share some common configuration which is described in the following documentation:
Configuration is centralized in the config directory, the dev sub-directory is specific to development environments while the docker sub-directory is a specific configuration meant for use in a full docker environment.
20.1. Business service configuration
20.1.1. Specify an external configuration
When starting docker in the full docker environment an external environment file could be provided like:
cd ./config/docker
./docker-compose.sh ~/config/local.env
In the provided environment file the Spring active profiles can be set.
SPRING_PROFILES_ACTIVE=docker,local
This way the configuration file 'cards-publication-local.yml' can be provided in the same configuration directory and can be read by SpringBoot
20.1.2. Shared business service configuration
The configuration shared by all business services is in a yaml file, you can find an example with the file /config/docker/common-docker.yml. In this file you will find, among others, the parameters below :
| name | default | mandatory? | Description |
|---|---|---|---|
operatorfabric.businessLogActivated |
false |
no |
Indicates whether or not operatorfabric should record business logs |
operatorfabric.servicesUrls.users |
yes |
Indicates where the Users service can we reached (to get information about the current user). |
20.1.3. Business service specific configurations
Each business service has a specific yaml configuration file. It should a least contain the name of the service:
spring:
  application:
    name: businessconfig
Examples of configuration of each business service can be found either under config/docker or config/dev depending on the type of deployment you’re looking for.
20.1.3.1. Businessconfig service
The businessconfig service has this specific property :
| name | default | mandatory? | Description |
|---|---|---|---|
operatorfabric.businessconfig.storage.path |
null |
no |
File path to data storage folder |
20.1.3.2. Users service
The user service has these specific properties :
| name | default | mandatory? | Description |
|---|---|---|---|
operatorfabric.users.default.users |
null |
no |
Array of user objects to create upon startup if they don’t exist |
operatorfabric.users.default.user-settings |
null |
no |
Array of user settings objects to create upon startup if they don’t exist |
operatorfabric.users.default.groups |
null |
no |
Array of group objects to create upon startup if they don’t exist |
operatorfabric.users.default.entities |
null |
no |
Array of entity objects to create upon startup if they don’t exist |
20.1.3.3. Cards-publication service
The cards-publication service has these specific properties :
| name | default | mandatory? | Description |
|---|---|---|---|
checkPerimeterForResponseCard |
true |
no |
If false, OperatorFabric will not check that a user has write rights on a process/state to respond to a card |
checkAuthenticationForCardSending |
true |
no |
If false, OperatorFabric will not require user authentication to send or delete a card via endpoint /cards (it does not concern user cards which always need authentication). Be careful when setting the value to false, nginx conf must be adapted for security reasons (see security warning in the reference nginx.conf) |
spring.kafka.consumer.group-id |
null |
no |
If set, support for receiving cards via Kafka is enabled |
spring.deserializer.value.delegate.class |
io.confluent.kafka.serializers. KafkaAvroDeserializer |
yes |
Deserializer used to convert the received bytes into objects |
spring.serializer.value.delegate.class |
io.confluent.kafka.serializers. KafkaAvroSerializer |
yes |
Serializer used to convert cards to bytes |
spring.kafka.producer.bootstrap-servers |
no |
comma separated list of URL(s) of the broker(s) / bootstrap server(s) |
|
opfab.kafka.topics.card.topicname |
opfab |
no |
Name of the topic to read the messages from |
opfab.kafka.topics.response-card.topicname |
opfab |
no |
Name of the topic to place the response cards to |
opfab.kafka.schema.registry.url |
yes |
URL of the schema registry. Can be set to the empty string "" is no registry is used |
20.2. Web UI Configuration
OperatorFabric Web UI service is built on top of a NGINX server. It serves the Angular SPA to browsers and act as a reverse proxy for other services.
20.2.1. NGINX configuration
An external nginx.conf file configures the OperatorFabric Nginx instance named web-ui service.
Those files are mounted as docker volumes. There are two of them in OperatorFabric, one in config/dev and one in config/docker.
The one in config/dev is set with
permissive CORS rules to enable web development using ng serve within the ui/main project.It’s possible to use ng serve with the one in config/docker version also. To do so use the conf file named
nginx-cors-permissive.conf by configuring the /docker-compose.yml with the following line:
- "./nginx-cors-permissive.conf:/etc/nginx/conf.d/default.conf"
instead of:
- "./nginx.conf:/etc/nginx/conf.d/default.conf"
|
The line customized in the nginx configuration file must end with à semi-colon (';') otherwise the Nginx server will stop immediately |
20.2.2. UI properties
The properties lie in the web-ui.json.The following table describes their meaning and how to use them. An example file can be found in the config/docker directory.
| name | default | mandatory? | Description |
|---|---|---|---|
security.provider-realm |
yes |
The realm name in keycloak server settings page. This is used for the log out process to know which realm should be affected. |
|
security.provider-url |
yes |
The keycloak server instance |
|
security.logout-url |
yes |
The keycloak logout URL. Is a composition of: - Your keycloak instance and the auth keyword (ex: www.keycloakurl.com/auth), but we also support domains without auth (ex: www.keycloakurl.com/customPath) - The realm name (Ex: dev) - The redirect URL (redirect_uri): The redirect URL after success authentication |
|
security.changePasswordUrl |
no |
URL to change the user password (if the top-right menu item "Change password" is visible) |
|
security.oauth2.flow.mode |
PASSWORD |
no |
authentication mode, available options:
|
security.oauth2.flow.provider |
null |
no |
provider name to display on log in button |
security.oauth2.flow.delegate-url |
null |
no |
Url to redirect the browser to for authentication. Mandatory with:
|
feed.card.time.display |
BUSINESS |
no |
card time display mode in the feed. Values :
|
feed.card.hideTimeFilter |
false |
no |
Control if you want to show or hide the time filter in the feed page |
feed.card.hideAckFilter |
false |
no |
Control if you want to show or hide the acknowledgement filter in the feed page |
feed.card.hideResponseFilter |
false |
no |
Control if you want to show or hide the response filter in the feed page |
feed.card.hideApplyFiltersToTimeLineChoice |
false |
no |
Control if you want to show or hide the option of applying filters or not to timeline in the feed page |
feed.card.hideReadSort |
false |
no |
Control if you want to show or hide the option to sort cards by read status in the feed page |
feed.card.hideSeveritySort |
false |
no |
Control if you want to show or hide the option to sort cards by severity in the feed page |
feed.card.hideAckAllCardsFeature |
true |
no |
Control if you want to show or hide the option for acknowledging all the visible cards of the feed |
feed.card.secondsBeforeLttdForClockDisplay |
180 |
no |
Number of seconds before lttd when a clock is activated in cards on the feed |
feed.card.maxNbOfCardsToDisplay |
100 |
no |
Max number of card visible in feed (This limit is used for performance reasons, setting the value too high can have consequences on browser response times) |
feed.timeline.domains |
["TR", "J", "7D", "W", "M", "Y"] |
no |
List of domains to show on the timeline, possible domains are : "TR", "J", "7D", "W", "M", "Y". |
i18n.supported.locales |
no |
List of supported locales (Only fr and en so far) Values should be taken from the TZ database. |
|
archive.filters.page.size |
10 |
no |
The page size of archive filters |
archive.history.size |
100 |
no |
The maximum size of card history visible |
archive.filters.tags.list |
no |
List of tags to choose from in the corresponding filter in archives page |
|
archive.filters.publishDate.days |
10 |
no |
The default search period (days) for publish date filter in archives page |
logging.filters.tags.list |
no |
List of tags to choose from in the corresponding filter in logging page |
|
logging.filters.publishDate.days |
10 |
no |
The default search period (days) for publish date filter in logging page |
settings.styleWhenNightDayModeDesactivated |
no |
style to apply if not using day night mode, possible value are DAY or NIGHT |
|
settings.dateFormat |
Value from the browser configuration |
no |
Format for date rendering (example : DD/MM/YYYY ) |
settings.timeFormat |
Value from the browser configuration |
no |
Format for time rendering (example : HH:mm ) |
settings.dateTimeFormat |
Value from the browser configuration |
no |
Format for date and time rendering (example : HH:mm DD/MM/YYYY ) |
settings.infos.hide.description |
false |
no |
Control if we want to hide(true) or display(false or not specified) the user description in the settings page |
settings.infos.hide.language |
false |
no |
Control if we want to hide(true) or display(false or not specified) the language in the settings page |
settings.infos.hide.sounds |
false |
no |
Control if we want to hide(true) or display(false or not specified) the checkboxes for sound notifications in the settings page |
settings.playSoundForAlarm |
false |
no |
If set to true, a sound is played when Alarm cards are added or updated in the feed |
settings.playSoundForAction |
false |
no |
If set to true, a sound is played when Action cards are added or updated in the feed |
settings.playSoundForCompliant |
false |
no |
If set to true, a sound is played when Compliant cards are added or updated in the feed |
settings.playSoundForInformation |
false |
no |
If set to true, a sound is played when Information cards are added or updated in the feed |
settings.playSoundOnExternalDevice |
false |
no |
If set to true (and |
settings.replayEnabled |
false |
no |
If set to true, sounds are replayed every |
settings.replayInterval |
5 |
no |
Interval between sound replays (see |
settings.about |
none |
no |
Declares application names and their version into web-ui about section. |
logo.base64 |
medium OperatorFabric icon |
no |
The encoding result of converting the svg logo to Base64, use this online tool to encode your svg. If it is not set, a medium (32px) OperatorFabric icon is displayed. |
logo.height |
32 |
no |
The height of the logo (in px) (only taken into account if logo.base64 is set). |
logo.width |
150 |
no |
The width of the logo (in px) (only taken into account if logo.base64 is set). |
logo.limitSize |
true |
no |
If it is true, the height limit is 32(px) and the width limit is 200(px), it means that if the height is over than 32, it will be set to 32, if the width is over than 200, it is set to 200. If it is false, no limit restriction for the height and the width. |
title |
OperatorFabric |
no |
Title of the application, displayed on the browser |
environmentName |
no |
Name of the environment to display in the top-right corner (examples: PROD , TEST .. ), if the value not set the environment name is not shown . |
|
environmentColor |
blue |
no |
Color of the background of the environment name. The format of color is css, for example : |
showUserEntitiesOnTopRightOfTheScreen |
false |
no |
if set to true the users entities will be displayed under the login on top right of the screen |
checkPerimeterForResponseCard |
true |
no |
If false, OperatorFabric will not check that a user has write rights on a process/state to respond to a card. |
usercard.useDescriptionFieldForEntityList |
false |
no |
If true, show entity |
externalDevicesEnabled |
false |
no |
If true, users have the opportunity to play sounds on external devices rather than in the browser. See |
secondsToCloseSession |
60 |
no |
Number of seconds between logout and token expiration |
User Settings default values
name |
default |
mandatory? |
Description |
settings.locale |
en |
no |
Default user locale (use en if not set) |
20.2.2.1. External Devices Service
The external devices service can be configured with the following properties:
| name | default | mandatory? | Description |
|---|---|---|---|
operatorfabric.externaldevices.watchdog.enabled |
false |
no |
If true, watchdog signals will be sent to external devices to show that the OperatorFabric is running and connected. |
operatorfabric.externaldevices.watchdog.cron |
|
no |
CRON expression determining when watchdog signals should be sent to external devices. |
operatorfabric.externaldevices.watchdog.signalId |
0 |
no |
Id the signal the external devices are expecting as watchdog |
20.3. Security Configuration
Configure the security concern throughout several files:
-
nginx.confof the nginx server -
config/dev/common-dev.ymlorconfig/docker/common-docker.yml, called common.yml in the following chapters -
web-ui.jsonserved by theweb-uiservice;
For each user it is possible to configure a list of authorized source ip addresses by setting the authorizedIPAddresses field in User object.
20.3.1. Authentication configuration
There are 3 OAuth2 Authentication flows available into OperatorFabric UI:
-
password grant: referred as
PASSWORDmode flow; -
code flow : referred as
CODEmode flow; -
implicit flow: referred as
IMPLICITmode flow.
Alternatively there is also another flow available:
-
none flow: referred as
NONEmode flow.
The NONE flow assumes that the application is behind a secured proxy wich handles login and token generation.
Calls to backend services will get a valid token added to the headers and the token will not be visible for the (web)client.
20.3.1.1. Nginx Configuration
The UI calls need some mapping to reach the Authentication Provider. In the default OperatorFabric configuration it’s a
docker keycloak instance, called keycloak in the project docker-compose.yml files.
There are 3 properties to configure within nginx.conf file:
-
$KeycloakBaseUrl: the base url of keycloak; -
$OperatorFabricRealm: the realm configure within keycloak instance to provide authentication to OperatorFabric; -
$ClientPairOFAuthentication: base64 encoded string of the pair of client authentication used by OperatorFabric to log to the Authentication Provider (keycloak). The cient-id and the client-secret are separated by a colon(':').
|
Example of the # Url of the Authentication provider
set $KeycloakBaseUrl "http://keycloak:8080";
# Realm associated to OperatorFabric within the Authentication provider
set $OperatorFabricRealm "dev";
# base64 encoded pair of authentication in the form of 'client-id:secret-id'
set $ClientPairOFAuthentication "b3BmYWItY2xpZW50Om9wZmFiLWtleWNsb2FrLXNlY3JldA==" ;
where |
20.3.1.2. Configuration file common.yml
| name | default | mandatory? | Description |
|---|---|---|---|
spring.security.provider-url |
null |
no |
The keycloak instance url. |
spring.security.provider-realm |
null |
no |
The realm name within the keycloak instance. |
spring.security.oauth2.resourceserver.jwt.jwk-set-uri |
null |
yes |
The url providing the certificat used to verify the jwt signature |
|
example of where |
20.3.1.3. Configuration file web-ui.json
Nginx web server serves this file. OperatorFabric creates and uses a custom Docker image containing an Nginx server with a docker volume containing this file. The two docker-compose environments contain an example of it. The path in the image to it is /usr/share/nginx/html/opfab/web-ui.json.
For OAuth2 security concerns into this file, there are two ways to configure it, based on the Oauth2 chosen flow. There are several common properties:
-
security.provider-realm: OAuth2 provider realm under which the OpertaroFabric client is declared; -
security.provider-url: url of the keycloak server instance. -
security.logout-url: url used when a user is logged out of the UI; -
security.oauth2.flow.provider: name of the OAuth2 provider; -
security.oauth2.flow.delegate-url: url used to connect to the Authentication provider; -
security.oauth2.flow.mode: technical way to be authenticated by the Autentication provider.
20.3.1.4. OAuth2 PASSWORD or CODE Flows
These two modes share the same way of declaring the delegate URL.
CODE is the default mode of authentication for deploy docker-compose environment.
-
security.oauth2.flow.modetoPASSWORDorCODE; -
security.oauth2.flow.delegate-urlwith the URL of the OAuth2 leading to the protocol used for authentication.
Example of Configuration For CODE Flow
{
    "security": {
      "oauth2": {
        "flow": {
          "mode": "CODE",
          "provider": "Opfab Keycloak",
          "delegate-url": "http://localhost:89/auth/realms/dev/protocol/openid-connect/auth?response_type=code&client_id=opfab-client"
      },
      "logout-url":"http://localhost:89/auth/realms/dev/protocol/openid-connect/logout?redirect_uri=http://localhost:2002/",
    "provider-realm": "dev",
    "provider-url": "http://localhost:89"
    }
  }
}
Within the delegate-url property dev is the keycloak client realm of OperatorFabric.
For keycloak instance used for development purposes, this delegate-url correspond to the realm under which the client opfab-client is registred.
Here, the client-id value is opfab-client which is define as client under the realm named dev on the dev keycloak instance.
20.3.1.5. OAuth2 IMPLICIT Flow
It had its own way of configuration. To enable IMPLICIT Flow authentication the following properties need to be set:
-
security.oauth2.flow.modetoIMPLICIT; -
security.oauth2.flow.delegate-urlwith the URL of the OAuth2 leading to the.well-known/openid-configurationend-point used for authentication configuration.
Example of configuration for IMPLICIT Flow
{
  "operatorfabric": {
    "security": {
      "oauth2": {
        "flow": {
          "mode": "IMPLICIT",
          "provider": "Opfab Keycloak",
          "delegate-url": "http://localhost:89/auth/realms/dev"
      },
      "logout-url":"http://localhost:89/auth/realms/dev/protocol/openid-connect/logout?redirect_uri=http://localhost:2002/",
    "provider-realm": "dev",
    "provider-url": "http://localhost:89"
      }
    }
  }
}
Within the delegate-url property dev is the keycloak client realm of OperatorFabric.
For keycloak instance used for development purposes, this delegate-url correspond to the realm under which the client opfab-client is registred.
The url look up by the implicit ui mechanism is localhost:89/auth/realms/dev/.well-known/openid-configuration.
20.3.1.6. NONE Flow
The configuration for the NONE flow is a bit different because the token isn’t handled/visible in the front-end.
Nginx
The following variables can be removed:
-
$KeycloakBaseUrl -
$OperatorFabricRealm -
$ClientPairOFAuthentication
The locations for handling tokens can be edited to return a 401 by default. If one of these locations is called, the token generated by the secured proxy has expired.
location /auth/check_token {
  return 401;
}
location /auth/token {
  return 401;
}
location /auth/code/ {
  return 401;
}
Web-ui.json
Set the security.oauth2.flow.mode to NONE;
Set the security.oauth2.client-id to Your Oauth client ID;
Use the security.jwt.login-claim to select value from the token will be used to identify your account. In this example preferred_username is used;
Settings that are not required are:
-
delegate-url
-
provider-realm
Example of configuration
{
  "operatorfabric": {
    "security": {
      "jwt": {
        "expire-claim": "exp",
        "login-claim": "preferred_username"
      },
      "oauth2": {
        "client-id": "OAUTHCLIENTID",
        "flow": {
          "mode": "NONE",
          "provider": "My Secured Proxy"
      },
      "logout-url":"http://my-secured-proxy/OAUTHTENANTID/oauth2/logout?client_id=OAUTHCLIENTID&post_logout_redirect_uri=https%3A%2F%2Flocalhost:2002%2Fui%2Fui/",
      "provider-url": "http://my-secured-proxy/"
      }
    }
  }
}
20.3.2. User creation
Setting automated user creation==. Creation user requires a user id. Given name and family name are optional.
| name | default | mandatory? | Description |
|---|---|---|---|
operatorfabric.security.jwt.login-claim |
sub |
no |
Jwt claim is used as a user login or id |
operatorfabric.security.jwt.given-name-claim |
given-name |
no |
Jwt claim is used to set the user’s given name |
operatorfabric.security.jwt.family-name-claim |
family-name |
no |
Jwt claim is used to set the user’s family name |
20.3.3. Alternative way to manage groups (and/or entities)
By default, OperatorFabric manages groups (and/or entities) through the user's collection in the database.
Another mode can be defined, the JWT mode. The groups (and/or entities) come from the authentication token.
The administrator of the authentication service has to set what claims define a group (and/or entity).
In the Operator-Fabric configuration, the opfab administrator has to set properties to retrieve those groups (and/or entities).
| name | default | mandatory? | Description |
|---|---|---|---|
operatorfabric.security.jwt.groups.mode |
OPERATOR_FABRIC |
no |
Set the group mode, possible values JWT or OPERATOR_FABRIC |
operatorfabric.security.jwt.groups.rolesClaim.rolesClaimStandard.path |
no |
path in the JWT to retrieve the claim that defines a group |
|
operatorfabric.security.jwt.groups.rolesClaim.rolesClaimStandardArray.path |
no |
path in the JWT to retrieve the claim that defines an array of groups |
|
operatorfabric.security.jwt.groups.rolesClaim.rolesClaimStandardList.path |
no |
path in the JWT to retrieve the claim that defines a list of group |
|
operatorfabric.security.jwt.groups.rolesClaim.rolesClaimStandardList.separator |
no |
set the separator value of the list of group |
|
operatorfabric.security.jwt.groups.rolesClaim.rolesClaimCheckExistPath.path |
no |
path in the JWT to check if that path does exist, if it does, use the roleValue as a group |
|
operatorfabric.security.jwt.groups.rolesClaim.rolesClaimCheckExistPath.roleValue |
no |
set the value of the group if the path exists |
|
operatorfabric.security.jwt.entitiesIdClaim |
no |
set the name of the field in the token |
|
operatorfabric.security.jwt.gettingEntitiesFromToken |
no |
boolean indicating if you want the entities of the user to come from the token and not mongoDB (possible values : true/false) |
application.yml
operatorfabric:
  security:
    jwt:
      entitiesIdClaim: entitiesId
      gettingEntitiesFromToken: true
      groups:
        mode: JWT # value possible JWT | OPERATOR_FABRIC
        rolesClaim:
          rolesClaimStandard:
            - path: "ATTR1"
            - path: "ATTR2"
          rolesClaimStandardArray:
            - path: "resource_access/opfab-client/roles"
          rolesClaimStandardList:
            - path: "roleFieldList"
              separator: ";"
          rolesClaimCheckExistPath:
            - path: "resource_access/AAA"
              roleValue: "roleAAA"
            - path: "resource_access/BBB"
              roleValue: "roleBBB"
JWT example
{
  "jti": "5ff87583-10bd-4946-8753-9d58171c8b7f",
  "exp": 1572979628,
  "nbf": 0,
  "iat": 1572961628,
  "iss": "http://localhost:89/auth/realms/dev",
  "aud": [
    "AAA",
    "BBB",
    "account"
  ],
  "sub": "example_user",
  "typ": "Bearer",
  "azp": "opfab-client",
  "auth_time": 0,
  "session_state": "960cbec4-fcb2-47f2-a155-975832e61300",
  "acr": "1",
  "realm_access": {
    "roles": [
      "offline_access",
      "uma_authorization"
    ]
  },
  "resource_access": {
    "AAA": {
      "roles": [
        "role_AAA"
      ]
    },
    "BBB": {
      "roles": [
        "role_BBB"
      ]
    },
    "opfab-client": {
      "roles": [
        "USER"
      ]
    },
    "account": {
      "roles": [
        "manage-account",
        "manage-account-links",
        "view-profile"
      ]
    }
  },
  "scope": "openid ATTR2 email ATTR1 profile roleFieldList",
  "email_verified": false,
  "name": "example_firtstname example_lastname",
  "ATTR2": "roleATTR2",
  "ATTR1": "roleATTR1",
  "preferred_username": "example_user",
  "given_name": "example_firtstname",
  "entitiesId": "ENTITY1",
  "family_name": "example_lastname",
  "email": "example_user@mail.com",
  "roleFieldList": "roleA;roleB;roleC"
}
As the result, the group will be [ATTR1, ATTR2, roleA, roleB, roleC, USER, roleBBB, roleAAA]
20.3.4. Adding certification authorities or certificates to the Java keystore
If you’re using certificates (for example for Keycloak) that are not from a certification authority trusted by the JVM, this will cause errors such as this one:
Caused by: sun.security.validator. ValidatorException: PKIX path building failed: sun.security.provider.certpath.SunCertPathBuilderException: unable to find valid certification path to
requested target
at sun.security.validator.PKIXValidator.doBuild(PKIXValidator.java:397)
at sun.security.validator.PKIXValidator.engineValidate(PKIXValidator.java:302)
at sun.security.validator.Validator.validate(Validator.java:262)
at sun.security.ssl.X509TrustManager Impl.validate(x509TrustManagerImpl.java:330)
at sun.security.ssl.X509TrustManagerImpl.checkTrusted(x509TrustManagerImpl.java:237)
at sun.security.ssl.X509TrustManager Impl.checkServerTrusted(x509TrustManager Impl.java:132)
at sun.security.ssl.clientHandshaker.serverCertificate(ClientHandshaker.java:1621)
94 common frames omitted
Caused by: sun.security.provider.certpath. SunCertPathBuilderException: unable to find valid certification path to requested target
at sun.security.provider.certpath. SunCertPathBuilder.build(SunCertPathBuilder.java:141)
at sun.security.provider.certpath.SunCertPathBuilder.engineBuild(SunCertPathBuilder.java:126)
at java.security.cert.CertPathBuilder.build(CertPathBuilder.java:280)
at sun.security.validator.PKIXValidator.doBuild(PKIXValidator.java:392)
... 100 common frames omitted
If that is the case, you can pass the additional authorities or certificates that you use to the containers at runtime.
To do so, put the relevant files (*.der files for example) under src/main/docker/certificates.
-
This directory should only contain the files to be added to the keystore.
-
The files can be nested inside directories.
-
Each certificate will be added with its filename as alias. For example, the certificate in file mycertificate.der will be added under alias mycertificate. As a consequence, filenames should be unique or it will cause an error.
-
If you need to add or remove certificates while the container is already running, the container will have to be restarted for the changes to be taken into account.
If you would like certificates to be sourced from a different location, replace the volumes declarations in the deploy docker-compose.yml file with the selected location:
volumes:
 - "path/to/my/selected/location:/certificates_to_add"
instead of
volumes:
 - "../../../../src/main/docker/certificates:/certificates_to_add"
| The steps described here assume you’re running OperatorFabric in docker mode using the deploy docker-compose, but they can be adapted for single container deployments and development mode. |
If you want to check that the certificates were correctly added, you can do so with the following steps:
-
Open a bash shell in the container you want to check
docker exec -it deploy_businessconfig_1 bash
-
Run the following command
$JAVA_HOME/bin/keytool -list -v -keystore /tmp/cacerts -storepass changeit
You can also look at the default list of authorities and certificates trusted by the JVM with this command:
$JAVA_HOME/bin/keytool -list -v -keystore $JAVA_HOME/jre/lib/security/cacerts -storepass changeit
20.4. OperatorFabric Mongo configuration
We only use URI configuration for mongo through the usage of the spring.data.mongodb.uris
20.4.1. Define time to live for archived cards
By default, archived cards will remain stored in the database forever. It is possible to have them automatically removed after a specified duration by using the TTL index feature of mongoDB on their publishDate field.
For example, to have cards expire after 10 days (864000s), enter the following commands in the mongo shell:
use operator-fabric
db.archivedCards.createIndex( { "publishDate": 1 }, { expireAfterSeconds: 864000 } )| You cannot use createIndex() to change the value of expireAfterSeconds of an existing index. Instead use the collMod database command in conjunction with the index collection flag. Otherwise, to change the value of the option of an existing index, you must drop the index first and recreate. |
20.5. OperatorFabric Kafka configuration
Next to publishing cards to OperatorFabric using the REST API, OperatorFabric also supports publishing cards via a Kafka Topic. In the default configuration Kafka is disabled. To enable Kafka you need to set the consumer group to the consumer group you assign to the OpFab Kafka consumer. This can be any group-id, as long as it isn’t used by other consumers (unless you explicitly want multiple consumers for the same group).
You can set the group_id by uncommenting the kafka.consumer.group_id in the cards-publication.yml
  kafka:
    consumer:
      group-id: opfab-command
By default, the consumer will consume messages from the opfab topic.
See Spring for Apache Kafka for more information on the Spring Kafka implementation.
With the default settings, the Kafka consumer expects a broker running on http//127.0.0.1:9092 and a schema registry on 127.0.0.1:8081.
Operator Fabric is also able to publish response cards to a Kafka topic. The default topic name opfab-response. You can specify which response cards
are to be returned via Kafka by setting the externalRecipients-url in the cards-publication yaml file. Instead of setting http:// URL you should set it to kafka:
externalRecipients-url: "{\
           processAction: \"http://localhost:8090/test\", \
           mykafka: \"kafka:topicname\"
           }"
Note that topicname is a placeholder for now. All response cards are returned via the same Kafka response topic, as specified in the opfab.kafka.topics.response-card field.
Also note enabling Kafka does not disable the REST interface.
Example Kafka configuration plain:
spring:
  application:
    name: cards-publication
  deserializer:
    value:
      delegate:
        class: org.opfab.cards.publication.kafka.consumer.KafkaAvroWithoutRegistryDeserializer
  serializer:
    value:
      delegate:
        class: org.opfab.cards.publication.kafka.producer.KafkaAvroWithoutRegistrySerializer
  kafka:
    consumer:
      group-id: OPFAB
      properties:
        specific:
          avro:
            reader: true
    producer:
      client-id: operatorfabric-producer
    bootstrap-servers: kafka-server:9092
opfab:
  kafka:
    topics:
      card:
        topicname: m_opfab-card-commands_dev
      response-card:
        topicname: m_opfab-card-response_dev
Example Kafka configuration SASL:
spring:
  application:
    name: cards-publication
  deserializer:
    value:
      delegate:
        class: org.opfab.cards.publication.kafka.consumer.KafkaAvroWithoutRegistryDeserializer
  serializer:
    value:
      delegate:
        class: org.opfab.cards.publication.kafka.producer.KafkaAvroWithoutRegistrySerializer
  kafka:
    consumer:
      group-id: OPFAB
      security:
        protocol: SASL_SSL
      properties:
        specific:
          avro:
            reader: true
        sasl:
          mechanism: SCRAM-SHA-256
          jaas:
            config: org.apache.kafka.common.security.scram.ScramLoginModule required username="kafkaUsername" password="kafkaPassword";
    producer:
      client-id: operatorfabric-producer
      security:
        protocol: SASL_SSL
      properties:
        sasl:
          mechanism: SCRAM-SHA-256
          jaas:
            config: org.apache.kafka.common.security.scram.ScramLoginModule required username="kafkaUsername" password="kafkaPassword";
    bootstrap-servers: kafka-server:9094
    ssl:
      trust-store-type: PKCS12
      trust-store-password: truststorePassword
      trust-store-location: file:///etc/truststore.pkcs
    properties:
      ssl:
        endpoint:
          identification:
            algorithm: ""
opfab:
  kafka:
    topics:
      card:
        topicname: opfab-card-commands
      response-card:
        topicname: opfab-card-response
Example Kafka configuration Kerberos:
spring:
  application:
    name: cards-publication
  deserializer:
    key:
      delegate:
        class: org.apache.kafka.common.serialization.StringDeserializer
    value:
      delegate:
        class: org.opfab.cards.publication.kafka.consumer.KafkaAvroWithoutRegistryDeserializer
  serializer:
    value:
      delegate:
        class: org.opfab.cards.publication.kafka.producer.KafkaAvroWithoutRegistrySerializer
  kafka:
    security:
      protocol: SASL_SSL
    properties:
      sasl.mechanism: GSSAPI
      sasl:
        jaas:
          config: com.sun.security.auth.module.Krb5LoginModule required useKeyTab=true keyTab="/etc/kafkaUsername.keytab" storeKey=true useTicketCache=false serviceName="kafka" principal="kafkaUsername@DOMAIN";
    bootstrap-servers: kafka-server:9094
    ssl:
      trust-store-type: pkcs12
      trust-store-password: truststorePassword
      trust-store-location: file:///etc/truststore.pkcs12
    consumer:
      group-id: OPFAB
      key-deserializer: org.springframework.kafka.support.serializer.ErrorHandlingDeserializer
      value-deserializer: org.springframework.kafka.support.serializer.ErrorHandlingDeserializer
      properties:
        spring:
          deserializer:
            key:
              delegate:
                class: org.apache.kafka.common.serialization.StringDeserializer
            value:
              delegate:
                class: org.opfab.cards.publication.kafka.consumer.KafkaAvroWithoutRegistryDeserializer
    producer:
      client-id: OPFAB
      value-serializer: org.opfab.cards.publication.kafka.producer.KafkaAvroWithoutRegistrySerializer
opfab:
  kafka:
    topics:
      card:
        topicname: opfab-card-commands
      response-card:
        topicname: opfab-card-response
21. RabbitMQ
21.1. Docker container
In development mode, the simplest way to deploy a RabbitMQ server is to create a RabbitMQ docker container. A docker-compose file is provided to allow quick setup of a convenient RabbitMQ server.
21.2. Server installation
This section is dedicated to production deployment of RabbitMQ. It is not complete and needs to be tailored to any specific production environment.
21.2.1. Download & Installation
Download and install RabbitMQ following the official procedure for the target environment
21.2.2. Used ports
If RabbitMQ may not bind to the following ports, it won’t start :
-
4369: epmd, a peer discovery service used by RabbitMQ nodes and CLI tools
-
5672, 5671: used by AMQP 0-9-1 and 1.0 clients without and with TLS
-
25672: used for inter-node and CLI tools communication (Erlang distribution server port) and is allocated from a dynamic range (limited to a single port by default, computed as AMQP port + 20000). Unless external connections on these ports are really necessary (e.g. the cluster uses federation or CLI tools are used on machines outside the subnet), these ports should not be publicly exposed. See networking guide for details.
-
35672-35682: used by CLI tools (Erlang distribution client ports) for communication with nodes and is allocated from a dynamic range (computed as server distribution port + 10000 through server distribution port + 10010). See networking guide for details.
-
15672: HTTP API clients, management UI and rabbitmqadmin (only if the management plugin is enabled)
-
61613, 61614: STOMP clients without and with TLS (only if the STOMP plugin is enabled)
-
1883, 8883: (MQTT clients without and with TLS, if the MQTT plugin is enabled)
-
15674: STOMP-over-WebSockets clients (only if the Web STOMP plugin is enabled)
-
15675: MQTT-over-WebSockets clients (only if the Web MQTT plugin is enabled)
21.2.3. Production configuration
See the guide for production configuration guidelines
22. Monitoring
Operator Fabric provides end points for monitoring via prometheus. The monitoring is available for the four following services: user, businessconfig, cards-consultation, cards-publication. You can start a test prometheus instance via config/monitoring/startPrometheus.sh , the monitoring will be accessible on localhost:9090/
23. Logging Administration
Operator Fabric includes the ability to view and configure the log levels at runtime through APIs. It is possible to configure and view an individual logger configuration, which is made up of both the explicitly configured logging level as well as the effective logging level given to it by the logging framework. These levels can be one of:
-
TRACE
-
DEBUG
-
INFO
-
WARN
-
ERROR
-
FATAL
-
OFF
-
null
null indicates that there is no explicit configuration.
Querying and setting logging levels is restricted to administrators.
To view the configured logging level for a given logger it is possible to send a GET request to the '/actuator/logger' URI as follows:
curl http://<server>:<port>/actuator/loggers/${logger} -H "Authorization: Bearer ${token}" -H "Content-type:application/json"
where ${token} is a valid OAuth2 JWT for a user with administration privileges
and ${logger} is the logger (ex: org.opfab)
The response will be a json object like the following:
{
  "configuredLevel" : "INFO",
  "effectiveLevel" : "INFO"
}
To configure a given logger, POST a json entity to the '/actuator/logger' URI, as follows:
curl -i -X POST http://<server>:<port>/actuator/loggers/${logger} -H "Authorization: Bearer ${token}" -H 'Content-Type: application/json' -d '{"configuredLevel": "DEBUG"}'
To “reset” the specific level of the logger (and use the default configuration instead) it is possible to pass a value of null as the configuredLevel.
24. Users, Groups and Entities Administration
A new operator call John Doe, who has OAuth granted right to connect ot current OperatorFabric instance, need to receive cards within current OperatorFabric instance.
As a user of OperatorFabric, he needs to be added to the system with a login (john-doe-operator), his firstName (John) and his lastName (Doe).
As there is no Administration GUI for the moment, it must be performed through command line, as detailed in the Users API.
24.1. Users
24.1.1. List all users
First of all, list the users (who are the recipients in OperatorFabric) of the system with the following commands:
Httpie
http http://localhost:2103/users "Authorization:Bearer $token" "Content-Type:application/type"
cURL
curl -v http://localhost:2103/users -H "Authorization:Bearer $token" -H "Content-Type:application/type"
response
HTTP/1.1 200 OK

[
    {
        "firstName": null,
        "groups": [
            "ADMIN"
        ],
        "entities": [
            "ENTITY1_FR",
            "ENTITY2_FR"
        ],
        "lastName": null,
        "login": "admin"
    },
    {
        "firstName": null,
        "groups": [
            "RTE",
            "ADMIN",
            "CORESO",
            "ReadOnly",
            "TEST"
        ],
        "lastName": null,
        "login": "operator3_fr"
    },
    {
        "firstName": null,
        "groups": [
            "ELIA"
        ],
        "lastName": null,
        "login": "elia-operator"
    },
    {
        "firstName": null,
        "groups": [
            "CORESO"
        ],
        "lastName": null,
        "login": "coreso-operator"
    },
    {
        "firstName": null,
        "groups": [
            "Dispatcher",
            "ReadOnly",
            "TEST"
        ],
        "entities": [
            "ENTITY1_FR"
        ],
        "lastName": null,
        "login": "operator1_fr"
    },
    {
        "firstName": null,
        "groups": [
            "Planner",
            "ReadOnly"
        ],
        "entities": [
            "ENTITY2_FR"
        ],
        "lastName": null,
        "login": "operator2_fr"
    },
]
24.1.2. Create a new User
We are sure that no John-doe-operator exists in our OperatorFabric instance. We can add him in our OperatorFabric instance using the following command use httpie:
echo '{"login":"john-doe-operator","firstName":"Jahne","lastName":"Doe"}' | http POST http://localhost:2103/users "Authorization:Bearer $token" "Content-Type:application/json"
Or here cURL:
curl -X POST http://localhost:2103/users -H "Authorization:Bearer $token" -H "Content-Type:application/json" --data '{"login":"john-doe-operator","firstName":"Jahne","lastName":"Doe"}'
response
HTTP/1.1 200 OK

{
    "firstName": "Jahne",
    "lastName": "Doe",
    "login": "john-doe-operator"
}
24.1.3. Fetch user details
It’s always a good thing to verify if all the information has been correctly recorded in the system:
with httpie:
http -b http://localhost:2103/users/john-doe-operator "Authorization:Bearer $token" "Content-Type:application/json"
or with cURL:
curl http://localhost:2103/users/john-doe-operator -H "Authorization:Bearer $token" -H "Content-Type:application/json"
response
HTTP/1.1 200 OK

{
    "firstName": "Jahne",
    "groups": [],
    "entities": [],
    "lastName": "Doe",
    "login": "john-doe-operator"
}
24.1.4. Update user details
As shown by this result, the firstName of the new operator has been misspelled.
We need
to update the existing user
with john-doe-operator login.
To correct this mistake, the following commands can be used:
with httpie:
echo '{"login":"john-doe-operator","lastName":"Doe","firstName":"John"}' | http PUT http://localhost:2103/users/john-doe-operator "Authorization:Bearer $token" "Content-Type:application/json"
or with cURL:
curl -X PUT http://localhost:2103/users/john-doe-operator -H "Authorization:Bearer $token" -H "Content-Type:application/json" --data '{"login":"john-doe-operator","firstName":"John","lastName":"Doe"}'
response
HTTP/1.1 200 OK

{
    "firstName": "John",
    "lastName": "Doe",
    "login": "john-doe-operator"
}
24.2. Groups/Entities
All the commands below :
-
List groups
-
Create a new group
-
Fetch details of a given group
-
Update details of a group
-
Add a user to a group
-
Remove a user from a group
are available for both groups and entities. In order not to overload the documentation, we will only detail group endpoints.
24.2.1. List groups (or entities)
This operator is the first member of a new group operator called the OPERATORS, which doesn’t exist for the moment in
the system. As shown when we
list the groups
existing in the server.
Httpie
http http://localhost:2103/groups "Authorization:Bearer $token" "Content-Type:application/type"
cURL
curl http://localhost:2103/groups -H "Authorization:Bearer $token" -H "Content-Type:application/json"
response
HTTP/1.1 200 OK

[
    {
        "description": "The admin group",
        "name": "ADMIN group",
        "id": "ADMIN"
    },
    {
        "description": "RTE TSO Group",
        "name": "RTE group",
        "id": "RTE"
    },
    {
        "description": "ELIA TSO group",
        "name": "ELIA group",
        "id": "ELIA"
    },
    {
        "description": "CORESO Group",
        "name": "CORESO group",
        "id": "CORESO"
    },
    {
        "description": "Dispatcher Group",
        "name": "Dispatcher",
        "id": "Dispatcher"
    },
    {
        "description": "Planner Group",
        "name": "Planner",
        "id": "Planner"
    },
    {
        "description": "ReadOnly Group",
        "name": "ReadOnly",
        "id": "ReadOnly"
    }
]
24.2.2. Create a new group (or entity)
Firstly, the group called OPERATORS has to be
added to the system
using the following command:
using httpie:
echo '{"id":"OPERATORS","decription":"This is the brand new group of operator"}' | http POST http://localhost:2103/groups "Authorization:Bearer $token" "Content-Type:application/json"
using cURL:
curl -X POST http://localhost:2103/groups -H "Authorization:Bearer $token" -H "Content-Type:application/json" --data '{"id":"OPERATORS","decription":"This is the brand new group of operator"}'
response
HTTP/1.1 200 OK

{
    "perimeters": [],
    "description": null,
    "name": null,
    "id": "OPERATORS"
}
24.2.3. Fetch details of a given group (or entity)
The result returned seems strange, to verify if it’s the correct answer by
displaying the details of the group
called OPERATORS, use the following command:
using httpie:
http http://localhost:2103/groups/OPERATORS "Authorization:Bearer $token" "Content-Type:application/json"
using cURL:
curl http://localhost:2103/groups/OPERATORS -H "Authorization:Bearer $token" -H "Content-Type:application/json"
response
HTTP/1.1 200 OK

{
    "perimeters": [],
    "description": null,
    "name": null,
    "id": "OPERATORS"
}
24.2.4. Update details of a group (or entity)
The description is really null. After verification, in our first command used to create the group, the attribute for the description is misspelled. Using the following command to update the group with the correct spelling, the new group of operator gets a proper description:
with httpie:
echo '{"id":"OPERATORS","description":"This is the brand-new group of operator"}' | http -b PUT http://localhost:2103/groups/OPERATORS "Authorization:Bearer $token" "Content-Type:application/json"
with cURL:
curl -X PUT http://localhost:2103/groups/OPERATORS -H "Authorization:Bearer $token" -H "Content-Type:application/json" --data '{"id":"OPERATORS","description":"This is the brand-new group of operator"}'
response
{
    "perimeters": []
    "description": "This is the brand-new group of operator",
    "name": null,
    "id": "OPERATORS"
}
24.2.5. Add a user to a group (or entity)
As both new group and new user are correct it’s time to make the user a member of the group . To achieve this, use the following command:
with httpie:
echo '["john-doe-operator"]' | http PATCH http://localhost:2103/groups/OPERATORS/users "Authorization:Bearer $token" "Content-Type:application/json"
with cURL:
curl -X PATCH http://localhost:2103/groups/OPERATORS/users -H "Authorization:Bearer $token" -H "Content-Type:application/json" --data '["john-doe-operator"]'
response
HTTP/1.1 200 OK
Let’s verify that the changes are correctly recorded by fetching the :
http http://localhost:2103/users/john-doe-operator "Authorization:Bearer $token" "Content-Type:application/json"
with cURL
curl http://localhost:2103/users/john-doe-operator -H "Authorization:Bearer $token" -H "Content-Type:application/json"
response
HTTP/1.1 200 OK

{
    "firstName": "John",
    "groups": ["OPERATORS"],
    "entities": [],
    "lastName": "Doe",
    "login": "john-doe-operator"
}
It’s now possible to send cards either specifically to john-doe-operator or more generally to the OPERATORS group.
24.2.6. Remove a user from a group (or entity)
When John Doe is no longer in charge of hypervising cards for OPERATORS group, this group has to be removed from his login by using the following command:
with httpie:
http DELETE http://localhost:2103/groups/OPERATORS/users/john-doe-operator "Authorization:Bearer $token"
with cURL:
curl -X DELETE -H "Authorization:Bearer $token" http://localhost:2103/groups/OPERATORS/users/john-doe-operator
response
HTTP/1.1 200 OK

{
	"login":"john-doe-operator","
	firstName":"John",
	"lastName":"Doe",
	"groups":[],
    "entities":[]
}
A last command to verify that OPERATORS is no longer linked to john-doe-operator:
with httpie:
http http://localhost:2103/users/john-doe-operator "Authorization:Bearer $token" "Content-Type:application/json"
with cURL:
curl http://localhost:2103/users/john-doe-operator -H "Authorization:Bearer $token" -H "Content-Type:application/json"
response
HTTP/1.1 200 OK

{
    "firstName": "John",
    "groups": [],
    "entities": [],
    "lastName": "Doe",
    "login": "john-doe-operator"

}
24.2.7. Entity parents
Entities have a 'parents' attribute instead of a 'perimeters' one. This attribute is a string array. Each element of the array is the id of another Entity. When adding or patching an Entity into the system, operatorFabric performs a cycle detection. On a positive cycle detection cancels the addition or the patch.
24.2.7.1. Add a new Entity without a cycle in the parent declaration
using httpie:
echo '{"id":"NEW_ENTITY","name":"Last New Entity","description":"This is the last new entity","parents": ["ENTITY1_FR"]}' \
| http POST http://localhost:2103/entities "Authorization:Bearer $token" "Content-Type:application/json"
using cURL:
curl http://localhost:2103/entities -H "Authorization:Bearer $token" -H "Content-Type:application/json" \
--data '{"id":"NEW_ENTITY","name":"Last New Entity","description":"This is the last new entity","parents": ["ENTITY1_FR"]}'
response
HTTP/1.1 200 OK

{
    "id": "NEW_ENTITY",
    "parents": ["ENTITY1_FR"],
    "name": "Last New Entity",
    "description":"This is the last new entity",
    "labels":[]
}
24.2.7.2. Add a new Entity with a cycle
For simplicity, in this example the new entity will declare itself as a parent. This auto-referencing triggers a cycle detection.
using httpie:
echo '{"id":"NEW_ENTITY","name":"Last New Entity","description":"This is the last new entity","parents": ["NEW_ENTITY"]}' | http POST http://localhost:2103/entities "Authorization:Bearer $token" "Content-Type:application/json"
using cURL:
curl http://localhost:2103/entities -H "Authorization:Bearer $token" -H "Content-Type:application/json" --data '{"id":"NEW_ENTITY","name":"Last New Entity","description":"This is the last new entity","parents": ["NEW_ENTITY"]}'
response
{
    "status":"BAD_REQUEST",
    "message":"A cycle has been detected: NEW_ENTITY->NEW_ENTITY"
}
with a 400 as http status return.
25. Service port table
By default all service built artifacts are configured with server.port set to 8080
If you run the services using bootRun Gradle task, the run_all.sh script or the full docker docker-compose
(found under config/docker),
the used ports are:
| Port | Service | Forwards to | Description |
|---|---|---|---|
89 |
KeyCloak |
89 |
KeyCloak api port |
2002 |
web-ui |
8080 |
Web ui and gateway (Nginx server) |
2100 |
businessconfig |
8080 |
Businessconfig management service http (REST) |
2102 |
cards-publication |
8080 |
Cards publication service http (REST) |
2103 |
users |
8080 |
Users management service http (REST) |
2104 |
cards-consultation |
8080 |
Cards consultation service http (REST) |
2105 |
external-devices |
8080 |
External devices management service http (REST) |
4100 |
businessconfig |
5005 |
java debug port |
4102 |
cards-publication |
5005 |
java debug port |
4103 |
users |
5005 |
java debug port |
4104 |
cards-consultation |
5005 |
java debug port |
4105 |
external-devices |
5005 |
java debug port |
27017 |
mongo |
27017 |
mongo api port |
5672 |
rabbitmq |
5672 |
amqp api port |
15672 |
rabbitmq |
15672 |
rabbitmq api port |
26. Restricted operations (administration)
Some operations are restricted to users with the ADMIN role, either because they are administration operations with the potential to impact the OperatorFabric instance as a whole, or because they give access to information that should be private to a user.
Below is a quick recap of these restricted operations.
Any action (read, create/update or delete) regarding a single user’s data (their personal info such as their first and last name, as well as their settings) can be performed either by the user in question or by a user with the ADMIN role.
Any action on a list of users or on the groups (or entities) (if authorization is managed in OperatorFabric) can only be performed by a user with the ADMIN role.
Any write (create, update or delete) action on bundles can only be performed by a user with the ADMIN role. As such, administrators are responsible for the quality and security of the provided bundles. In particular, as it is possible to use scripts in templates, they should perform a security check to make sure that there is no XSS risk.
| The ADMIN role doesn’t grant any special privileges when it comes to card consultation (be they current or archived), so a user with the ADMIN role will only see cards that have been addressed to them (or to one of their groups (or entities)), just like any other user. |
Development environment
27. Requirements
This section describes the projects requirements regardless of installation options. Please see Setting up your environment below for details on:
-
setting up a development environment with these prerequisites
-
building and running OperatorFabric
27.1. Tools and libraries
-
Gradle 7
-
Java 11.0
-
Docker
-
Docker Compose with 2.1+ file format support
-
Chrome (needed for UI tests in build)
-
Angular CLI
| the current Jdk used for the project is Java 11.0.14-zulu. |
| It is highly recommended to use sdkman and nvm to manage tools versions. The following steps rely on these tools. |
Once you have installed sdkman and nvm, you can source the following script to set up your development environment (appropriate versions of Gradle, Java, Maven and project variables set):
source bin/load_environment_light.sh27.2. Software
-
RabbitMQ 3.7.6 +: AMQP messaging layer allows inter service communication
-
MongoDB 4.4 +: Card persistent storage
RabbitMQ is required for :
-
Card AMQP push
-
Multiple service sync
MongoDB is required for :
-
Current Card storage
-
Archived Card storage
-
User Storage
| Installing MongoDB and RabbitMQ is not necessary as preconfigured MongoDB and RabbitMQ are available in the form of docker-compose configuration files at src/main/docker |
28. Setting up your development environment
| The steps below assume that you have installed and are using sdkman and nvm to manage tool versions ( for java, gradle, node and npm). |
There are several ways to get started with OperatorFabric. Please look into
the section that best fits your needs.
| If you encounter any issue, see Troubleshooting below. In particular, a command that hangs then fails is often a proxy issue. |
The following steps describe how to launch MongoDB, RabbitMQ and Keycloak
using Docker, build OperatorFabric using gradle and run it using the
run_all.sh script.
28.1. Clone repository
git clone https://github.com/opfab/operatorfabric-core.git
cd operatorfabric-core
28.2. Set up your environment (environment variables & appropriate versions of gradle, maven, etc…)
source bin/load_environment_light.sh
From now on, you can use environment variable ${OF_HOME} to go back to
the home repository of OperatorFabric.
|
28.3. Deploy needed docker containers
28.3.1. A Minimal Configuration for gradle Build
The gradle build of OperatorFabric requires (for the unit tests) two docker containers running:
-
RabbitMQ;
-
MongoDB.
Launch them using the ${OF_HOME}/src/main/docker/test-environment/docker-compose.yml.
28.3.2. Enabling local quality report generation
Sonarqube reporting, in addition to the two previously listed docker containers, needs a SonarQube docker container.
Use the ${OF_HOME}/src/main/docker/test-quality-environment/docker-compose.yml to get them all running.
To generate the quality report, run the following commands:
cd ${OF_HOME}
./gradlew jacocoTestReport
To export the reports into the SonarQube docker instance, install and use SonarScanner.
28.3.3. Development environment
OperatorFabric development needs docker images of MongoDB, RabbitMQ, web-ui and Keycloak running.
The web-ui configuration needs a nginx.conf.
The ${OF_HOME}/config/dev/$docker-compose.sh creates the nginx.conf file and then runs docker-compose in detached mode.
For this, use:
cd ${OF_HOME}/config/dev
./docker-compose.sh
Once the nginx.conf created, run docker-compose independently is possible using:
cd ${OF_HOME}/config/dev
docker-compose up -d
The configuration of the web-ui embeds a grayscale favicon which can be useful to spot the OperatorFabric dev tab in the browser.
To refresh the favicon, hit CTRL+F5 on the page.
28.4. Build OperatorFabric with Gradle
Using the wrapper in order to ensure building the project the same way from one machine to another.
To only compile and package the jars:
cd ${OF_HOME}
./gradlew assemble
To launch the Unit Test, compile and package the jars:
cd ${OF_HOME}
docker-compose -f ${OF_HOME}/src/main/docker/test-environment/docker-compose.yml up -d
./gradlew build
28.5. Run OperatorFabric Services using the run_all.sh script
cd ${OF_HOME}
docker-compose -f ${OF_HOME}/config/dev/docker-compose.yml up -d
bin/run_all.sh start
See bin/run_all.sh -h for details.
|
28.7. Log into the UI
URL: localhost:2002/
login: operator1_fr
password: test
The other users available in development mode are operator3_fr and admin, both with test as password.
| It might take a little while for the UI to load even after all services are running. |
Don’t forget the final slash in the URL or you will get an error, a 404 page.
|
29. User Interface
The Angular CLI version 6.0.8 has been used to generate this project.
In the following document the variable declared as OF_HOME is the root folder of the operatorfabric-core project.
|
| CLI |
stands for Command Line Interface |
| SPA |
stands for Single Page Application |
29.1. Run
29.1.1. Front End development
OperatorFabric uses 4 external services to run properly :
-
an event queue: RabbitMQ;
-
a no SQL database: MongoDB;
-
an authentication provider: Keycloak;
-
a web server: Nginx.
Those instances are available as docker images in the project.
se docker-compose and the ${OF_HOME}/config/dev/docker-compose.yml to run them.
After launching docker containers, use the following command line $OF_HOME/bin/run_all.sh start to run the application.
Once the whole application is ready, you should have the following output in your terminal:
##########################################################
Starting users-business-service, debug port: 5009
##########################################################
pid file: $OF_HOME/services/users/build/PIDFILE
Started with pid: 7483

##########################################################
Starting cards-consultation-business-service, debug port: 5011
##########################################################
pid file: $OF_HOME/services/cards-consultation/build/PIDFILE
Started with pid: 7493

##########################################################
Starting cards-publication-business-service, debug port: 5012
##########################################################
pid file: $OF_HOME/services/cards-publication/build/PIDFILE
Started with pid: 7500

##########################################################
Starting businessconfig-business-service, debug port: 5008
##########################################################
pid file: $OF_HOME//services/businessconfig/build/PIDFILE
Started with pid: 7501
Wait a moment before trying to connect to the`SPA`, leaving time for the OperatorFabricServices to boot up completely.
The SPA, on a local machine, is available at the following Url: localhost:2002/.
To log in you need to use a valid user among the following: operator1_fr, operator3_fr or admin.
The common password is test for them all.
To test the reception of cards, you can use the following scripts to push basic configuration and example cards:
${OF_HOME}/src/test/resources/loadTestConf.sh
${OF_HOME}/src/test/resources/send6TestCards.sh
Once logged in with operator1_fr, after those scripts have been running, you should be able to see some cards displayed in localhost:2002/.
29.2. Build
Within the folder ${OF_HOME}/ui/main, run ng build to build the project.
The build artifacts will be stored in:
${OF_HOME}/ui/main/build/distributionThe previous command could lead to the following error:
Generating ES5 bundles for differential loading...
An unhandled exception occurred: Call retries were exceeded
See "/tmp/ng-<random-string>/angular-errors.log" for further details.
where ng-<random-string> is a temporary folder created by Angular to build the front-end.
Use node --max_old_space_size=4096 node_modules/@angular/cli/bin/ng build instead to solve this problem.
29.3. Test
29.3.2. Test during UI development
-
if the RabbitMQ, MongoDB and Keycloak docker containers are not running, launch them;
-
set your environment variables with
source ${OF_HOME}/bin/load_environment_light.sh; -
run the micro services using the same command as earlier:
${OF_HOME}/bin/run_all.sh start; -
launch an angular server with the command:
ng serve; -
test your changes in your browser using this url:
localhost:4200which leads tolocalhost:4200/#/feed.
29.3.2.1. Troubleshooting :
If ng serve returns the error Command 'ng' not found, install the Angular CLI globally with the following
command.
npm install -g @angular/cli
This will install the latest version of the Angular command line, which might not be in line with the one used by the
project, but it’s not an issue as when you run ng serve the local version of the Angular CLI
(as defined in the package.json file) will be used.
If it is still not running , launch in the ui/main directory
npm link @angular/cli
30. Environment variables
These variables are loaded by bin/load_environment_light.sh
-
OF_HOME: OperatorFabric root dir
-
OF_VERSION : OperatorFabric version, as defined in the
$OF_HOME/VERSIONfile -
OF_CLIENT_REL_COMPONENTS : List of modules for the client libraries
Additionally, you may want to configure the following variables
-
Docker build proxy configuration (used to configure alpine apk proxy settings)
-
APK_PROXY_URI
-
APK_PROXY_HTTPS_URI
-
APK_PROXY_USER
-
APK_PROXY_PASSWORD
-
31. Project Structure
-
bin: contains useful scripts for dev purposes
-
github: scripts used by Github for the build process
-
-
client: contains REST APIs simple beans definition, may be used by external projects
-
cards (cards-client-data): simple beans regarding cards
-
users (users-client-data): simple beans regarding users
-
-
config: contains external configurations for all services , keycloak and docker-compose files to help with tests and demonstrations
-
services: contains the microservices that make up OperatorFabric
-
cards-consultation (cards-consultation-business-service): Card consultation service
-
cards-publication (cards-publication-business-service): Card publication service
-
external-devices (external-devices-service): External Devices service
-
src: contains swagger templates for services
-
businessconfig (businessconfig-business-service): Businessconfig-party information management service
-
users (users-business-service): Users management service
-
-
web-ui: project based on Nginx server to serve the OperatorFabric UI
-
-
-
asciidoc: General documentation (Architecture, Getting Started Guide, etc.)
-
-
-
api : karate code for automatic api testing (non-regression tests)
-
cypress : cypress code for automatic ui testing
-
dummyModbusDevice : application emulating a Modbus device for test purposes
-
resources : scripts and data for manual testing
-
-
-
-
generic: Generic (as opposed to Spring-related) utility code
-
test-utilities: Test-specific utility code
-
utilities: Utility code
-
-
spring: Spring-related utility code
-
spring-mongo-utilities : Utility code with Spring-specific dependencies, used to share common features across MongoDB-dependent services
-
spring-oauth2-utilities : Utility code with Spring-specific dependencies, used to share common features across OAuth2-dependent services
-
spring-test-utilities : Utility code with Spring-specific dependencies for testing purposes
-
spring-utilities : Utility code with Spring-specific dependencies
-
-
swagger-spring-generators : Spring Boot generator for swagger, tailored for OperatorFabric needs
-
-
ui: Angular sources for the UI
31.1. Conventions regarding project structure and configuration
Sub-projects must conform to a few rules in order for the configured Gradle tasks to work:
31.1.1. Java
| [sub-project]/src/main/java |
contains java source code |
| [sub-project]/src/test/java |
contains java tests source code |
| [sub-project]/src/main/resources |
contains resource files |
| [sub-project]/src/test/resources |
contains test resource files |
31.1.2. Modeling
Core services projects declaring REST APIS that use Swagger for their definition must declare two files:
| [sub-project]/src/main/modeling/swagger.yaml |
Swagger API definition |
| [sub-project]/src/main/modeling/config.json |
Swagger generator configuration |
31.1.3. Docker
Services project all have docker image generated in their build cycle. See Gradle Tasks for details.
Per project configuration :
-
docker file : [sub-project]/src/main/docker/Dockerfile
-
docker-compose file : [sub-project]/src/main/docker/docker-compose.yml
-
runtime data : [sub-project]/src/main/docker/volume is copied to [sub-project]/build/docker-volume/ by task copyWorkingDir. The latest can then be mounted as volume in docker containers.
32. Development tools
32.1. Scripts (bin and CICD)
| bin/load_environment_light.sh |
sets up environment when sourced (java version, gradle version, maven version, node version) |
| bin/run_all.sh |
runs all all services (see below) |
| bin/setup_dockerized_environment.sh |
generate docker images for all services |
32.1.1. run_all.sh
Please see run_all.sh -h usage before running.
Prerequisites
-
mongo running on port 27017 with user "root" and password "password" (See src/main/docker/mongodb/docker-compose.yml for a pre configured instance).
-
rabbitmq running on port 5672 with user "guest" and password "guest" (See src/main/docker/rabbitmq/docker-compose.yml for a pre configured instance).
2002 web-ui Web ui and gateway (Nginx server) 2100 businessconfig Businessconfig service http (REST) 2102 cards-publication card publication service http (REST) 2103 users Users management service http (REST) 2104 cards-consultation card consultation service http (REST) 4100 businessconfig java debug port 4102 cards-publication java debug port 4103 users java debug port 4103 cards-consultation java debug port
Ports configuration
Port
32.2. Gradle Tasks
In this section only custom tasks are described. For more information on tasks, refer to the output of the "tasks" gradle task and to gradle and plugins official documentation.
32.2.1. Services
32.2.1.1. Common tasks for all sub-projects
-
Test tasks
-
Other:
-
copyWorkingDir: copies [sub-project]/src/main/docker/volume to [sub-project]/build/
-
copyDependencies: copy dependencies to build/support_libs (for Sonar)
-
32.2.1.2. Businessconfig Service
-
Test tasks
-
prepareTestDataDir: prepare directory (build/test-data) for test data
-
compressBundle1Data, compressBundle2Data: generate tar.gz businessconfig party configuration data for tests in build/test-data
-
prepareDevDataDir: prepare directory (build/dev-data) for bootRun task
-
createDevData: prepare data in build/test-data for running bootRun task during development
-
-
Other tasks
-
copyCompileClasspathDependencies: copy compile classpath dependencies, catching lombok that must be sent for sonarqube
-
32.2.2. Client Library
The jars produced by the projects under "client" will now be published to Maven Central after each release to make integration in client applications more manageable (see the official Sonatype documentation) for more information about the requirements and publishing process.
To that end, we are using:
-
the Maven Publish Gradle plugin to take care of the metadata (producing the required pom.xml for example) and publishing the artifacts to a staging repository
-
the Signing Gradle plugin to sign the produced artifacts using a GPG key.
32.2.2.1. Configuration
For the signing task to work, you need to :
Set the signing configuration in your gradle.properties file
Add to your gradle.properties :
signing.gnupg.keyName=ID_OF_THE_GPG_KEY_TO_USE
signing.secretKeyRingFile=LOCATION_OF_THE_KEYRING_HOLDING_THE_GPG_KEY
To get the keyName (ID_OF_THE_GPG_KEY_TO_USE) use :
gpg2 --list-secret-keys
LOCATION_OF_THE_KEYRING_HOLDING_THE_GPG_KEY is usually /YOUR_HOME_DIRECTORY/.gnupg/pubring.kbx
Set the credential for the publication
For the publication to the staging repository (OSSRH) to work, you need to set the credentials in your gradle.properties file:
ossrhUsername=SONATYPE_JIRA_USERNAME
ossrhPassword=SONATYPE_JIRA_PASSWORD
| The credentials need to belong to an account that has been granted the required privileges on the project (this is done by Sonatype on request via the same JIRA). |
More information
See this link for more information about importing a GPG key to your machine and getting its id.
32.2.2.2. Relevant tasks
These plugins and the associated configuration in the client.gradle file make the following tasks available:
-
publishClientLibraryMavenPublicationToOssrhRepository: this will publish the client jars to the OSSRH repository (in the case of a X.X.X.RELEASE version) or to areposdirectory in the build directory (in the case of aSNAPSHOTversion). -
publishClientLibraryMavenPublicationToMavenLocal: this will publish the client jars to the local Maven repository
The publication tasks will call the signing task automatically.
See the plugins documentations for more details on the other tasks available and the dependencies between them.
As the client library publication is currently the only configured publication in our build, it is also possible
to use the corresponding aggregate tasks as shortcuts: publish instead of
publishClientLibraryMavenPublicationToOssrhRepository and publishToMavenLocal instead of
publishClientLibraryMavenPublicationToMavenLocal.
|
32.3. Cypress Tests
Automatic UI testing
All paths for cd are given assuming you’re starting from $OF_HOME.
|
32.3.1. Installation
Before running Cypress tests for the first time you need to install it using NPM.
cd src/test/cypress
npm install
32.3.2. Cypress file structure
By default, all test files are located in cypress/cypress/integration but it is possible to put it on another directory
The commands.js file under cypress/cypress/support is used to create custom commands and overwrite existing commands.
32.3.3. Launching the OpFab instance to test
32.3.3.1. Commands
You can launch the OpFab instance for Cypress tests either in dev or docker mode. The following commands launch the
instance in docker mode, just substitute dev for docker to launch it in dev mode.
cd config/docker
docker-compose down (1)
./docker-compose-cypress.sh (2)| 1 | Remove existing config/docker containers to avoid conflicts |
| 2 | Start "Cypress-flavoured" containers |
After you’re done with your tests, you can stop and destroy containers (as it is better to start with fresh containers to avoid side-effects from previous tests) with the following commands:
cd config/docker
docker-compose down
32.3.3.2. Explanation
The Cypress tests rely on a running OpFab instance that is an adaptation from the config/docker docker-compose file (environment name, shorter time before lttd clock display, etc.).
The generateUIConfigForCypress.sh script performs this adaptation to create this base Cypress configuration.
This will create the following files under config/cypress/ui-config:
-
ui-menu.json
-
ui-menu-base.json
-
web-ui.json
-
web-ui-base.json
Where XXX-base.json and XXX.json are created by copying the corresponding XXX.json file for standard docker
configuration (found under config/docker/ui-config) and making the necessary adaptations needed for the cypress instance to
work well for the tests (changing the authentication mode, making all features visible, etc.).
Then, during the course of the cypress tests, the XXX.json files will be modified to test specific features
(for example, hiding a feature, defining a new menu, etc.). They are reset with the content of XXX-base.json
before each test or series of test.
The docker container relies on the XXX.json files under config/cypress/ui-config.
For convenience, the generateUIConfigForCypress.sh is launched as part of the docker-compose-cypress.sh scripts.
32.3.4. Running existing tests
To launch the Cypress test runner:
cd src/test/cypress
./node_modules/.bin/cypress open
This will open the Cypress test runner. Either click on the test you want to run or run all X tests on the right to
run all existing tests.
| You can select the browser (and version) that you want to use from a dropdown list on the right. The list will display the browsers that are currently installed on your computer (and supported by Cypress). |
32.3.5. Running tests on 4200 (ng serve)
Follow the steps described above in "Dev mode" to start a Cypress-flavoured OpFab instance in development mode, then run ng serve to start a dynamically generated ui on port 4200:
cd ui/main
ng serve
Then launch the Cypress test runner as follows:
To launch the Cypress test runner:
cd src/test/cypress
./node_modules/.bin/cypress open --config baseUrl=http://localhost:4200
32.3.6. Running tests with Gradle
The tests can also be run in command line mode using a Gradle task :
./gradlew runCypressTests32.3.7. Clearing MongoDB
If you want to start with a clean database (from the cards and archived cards point of view), you can purge the associated collections through the MongoDB shell with the following commands:
docker exec -it docker_mongodb_1 bash
mongo "mongodb://root:password@localhost:27017/?authSource=admin&authMode=scram-sha1"
use operator-fabric
db.cards.remove({})
db.archivedCards.remove({})
32.3.8. Current status of tests
All tests should be passing when run alone (i.e. not with run all specs) against empty card/archived cards collections. However, tests in the "Flaky" folder can sometimes fail because they involve dates (round up errors for example).
32.3.9. Creating new tests
Create a new XXXX.spec.js file under cypress/cypress/integration
| We will need to define a convention for naming and organizing tests. |
32.3.9.2. Guidelines and tips
-
Use the find or within commands rather than complex CSS selectors to target descendants elements.
-
If you want to access aliases using the
thiskeyword, make sure you are using anonymous functions rather than fat arrow functions, otherwise use cy.get('@myAlias') to access it asynchronously (the documentation has recently been updated on this topic). -
When running tests, make sure that you are not connected to OpFab as it can cause unexpected behaviour with read cards for example.
-
When chaining a
shouldassertion to acy.getcommand that returns several elements, it will pass if it is true for ANY of these elements. Use each + callback to check that an assertion is true on every element. -
cy.containsis a command, not an assertion. If you want to test the attribute, classes, content etc. of an element, it’s better to target the element by id or data attribute using acy.get()command for example and then chain an assertion withshould(). This way, you will get an expected/actual error message if the assertion fails, you will avoid false positives (text is found in another sibling element) and hard to debug behaviour with retries. -
Be careful with
find()(see #1751 for an example of issue that it can cause). See the Cypress documentation for an explanation and a less flaky alternative.
32.3.10. Configuration
In cypress.json:
-
baseUrl: The base url of the OperatorFabric instance you’re testing against. It will be appended in front of anyvisitcall. -
env.host: The host corresponding to the OperatorFabric instance you’re testing against. It will be used for API calls. -
env.defaultWaitTime: Using the custom-defined command cy.waitDefaultTime() instead of cy.wait(XXX) allows the wait time to be changed globally for all steps to the value defined by this property.
33. Useful recipes
33.1. Running sub-project from jar file
-
gradle :[sub-projectPath]:bootJar
-
or java -jar [sub-projectPath]/build/libs/[sub-project].jar
33.2. Overriding properties when running from jar file
-
java -jar [sub-projectPath]/build/libs/[sub-project].jar –spring.config.additional-location=file:[filepath] NB : properties may be set using ".properties" file or ".yml" file. See Spring Boot configuration for more info.
-
Generic property list extract :
-
server.port (defaults to 8080) : embedded server port
-
-
:services:core:businessconfig-party-service properties list extract :
-
operatorfabric.businessconfig.storage.path (defaults to "") : where to save/load OperatorFabric Businessconfig data
-
33.3. Generating docker images
To Generate all docker images run bin/setup_dockerized_environment.sh.
INFORMATION: If you work behind a proxy you need to specify the following properties to configure alpine apk package manager:
-
apk.proxy.uri: proxy http uri ex: "http://somewhere:3128[somewhere:3128]" (defaults to blank)
-
apk.proxy.httpsuri: proxy http uri ex: "http://somewhere:3128[somewhere:3128]" (defaults to apk.proxy.uri value)
-
apk.proxy.user: proxy user
-
apk.proxy.password: proxy unescaped password
Alternatively, you may configure the following environment variables :
-
APK_PROXY_URI
-
APK_PROXY_HTTPS_URI
-
APK_PROXY_USER
-
APK_PROXY_PASSWORD
33.4. Generating documentation (from AsciiDoc sources)
The sources for the documentation are located under src/docs/asciidoc. To generate HTML pages from these sources,
use the asciidoctor gradle task from the project root:
cd $OF_HOME
./gradlew asciidoctor
The task output can be found under $OF_HOME/build/docs/asciidoc
33.5. Generating API documentation
The documentation for the API is generated from the swagger.yaml definitions using SwaggerUI. To generate the
API documentation, use the generateSwaggerUI gradle task, either from the project root or from one of the services:
cd $OF_HOME
./gradlew generateSwaggerUI
The task output can be found for each service under [service-path]/build/docs/api
(for example services/businessconfig/build/docs/api). Open the index.html file in a browser to have a look at
the generated SwaggerUI.
34. Troubleshooting
When running docker-compose files using businessconfig-party images(such as rabbitmq,
mongodb etc.) the first time, docker will need to pull these images from
their repositories.
If the docker proxy isn’t set properly, you will see the above message. To set the proxy, follow these
steps from the docker documentation. If your proxy needs authentication, add your user and password as follows:
Proxy error when running businessconfig-party docker-compose
Pulling rabbitmq (rabbitmq:3-management)...
ERROR: Get https://registry-1.docker.io/v2/: Proxy Authentication RequiredHTTP_PROXY=http://user:password@proxy.example.com:80/
The password should be URL-encoded.
Gradle task (for example gradle build) fails with the following error: Issue with the Gradle daemon. Stopping the daemon using
Gradle Metaspace error
* What went wrong:
Metaspacegradle --stop
and re-launching the build should solve this issue.
Select the next available version and update
load_environment_light accordingly before
sourcing it again. The java version currently listed in the script might have been deprecated
(for security reasons) or might not be available for your operating system
(for example, 8.0.192-zulu wasn’t available for Ubuntu). Run
Java version not available when setting up environment
Stop! java 8.0.192-zulu is not available. Possible causes:
 * 8.0.192-zulu is an invalid version
 * java binaries are incompatible with Linux64
* java has not been released yetsdk list java to find out which versions are available. You will get
this kind of output:================================================================================
Available Java Versions
================================================================================
13.ea.16-open 9.0.4-open 1.0.0-rc-11-grl
12.0.0-zulu 8.0.202-zulu 1.0.0-rc-10-grl
12.0.0-open 8.0.202-amzn 1.0.0-rc-9-grl
12.0.0-librca 8.0.202.j9-adpt 1.0.0-rc-8-grl
11.0.2-zulu 8.0.202.hs-adpt
11.0.2-open 8.0.202-zulufx
11.0.2-amzn 8.0.202-librca
11.0.2.j9-adpt 8.0.201-oracle
11.0.2.hs-adpt > + 8.0.192-zulu
11.0.2-zulufx 7.0.211-zulu
11.0.2-librca 6.0.119-zulu
11.0.2-sapmchn 1.0.0-rc-15-grl
10.0.2-zulu 1.0.0-rc-14-grl
10.0.2-open 1.0.0-rc-13-grl
9.0.7-zulu 1.0.0-rc-12-grl
================================================================================
+ - local version
* - installed
> - currently in use
================================================================================
A
BUILD FAILED with message
Execution failed for task ':ui:main-user-interface:npmInstall'.
FAILURE: Build failed with an exception.

    What went wrong:
Execution failed for task ':ui:main-user-interface:npmInstall'.sudo has been used before the ./gradlew assemble.
Don’t use sudo to build OperatorFabric otherwise unexpected problems could arise.
When using the following command line: The
curl get Failed to connect to localhost:2002: Connection refused
curl http://localhost:2002/curl: (7) Failed to connect to localhost port 2002: Connexion refusedweb-ui docker container stops running. Check its configuration.
When using the following command line: The following error appears: The requested page is not or no more mapped by the For this example,
curl 404 status return by ngnix
curl http://localhost:2002/thirds/<html>
<head><title>404 Not Found</title></head>
<body>
<center><h1>404 Not Found</h1></center>
<hr><center>nginx/1.17.10</center>
</body>
</html>nginx.conf of web-ui.
Update it or check for the new end point of the desired page.businessconfig replaces now the former thirds end-point.
When using the following command line: where The following error appears: where The requested end-point is not or no more valid in For this example,
curl 404 status return by OperatorFabric
curl http://localhost:2002/businessconfig/ -H "Authorization: Bearer ${token}"${token} is a valid OAuth2 JWT.{"timestamp":"XXXX-XX-XXTXX:XX:XX.XXX+00:00","status":404,"error":"Not Found","message":"","path":"/businessconfig"}XXXX-XX-XXTXX:XX:XX.XXX+00:00 is a time stamp corresponding to the moment when the request has been sent.OperatorFabric.
Check the API documentation for correct path.businessconfig/processes is a correct end-point whereas businessconfig alone is not.
When using the following commands: The following error appears: where There is no A first run of OperatorFabric If docker-compose has created a Once this
ERROR: for web-ui when running docker-compose in ${OF_HOME}/config/dev
cd ${OF_HOME}/config/dev
docker-compose up -dERROR: for web-ui Cannot start service web-ui: OCI runtime create failed: container_linux.go:345: starting container process caused "process_linux.go:430: container init caused \"rootfs_linux.go:58: mounting \\\"/home/legallron/projects/operatorfabric-core/config/dev/nginx.conf\\\" to rootfs …… is specific to the runtime environment.nginx.conf file in the ${OF_HOME}/conf/dev directory.docker-compose in dev config needs a nginx.conf file.
To create it, and run a docker-compose environment use:cd ${OF_HOME}/config/dev
./docker-compose.shnginx.conf directory, delete it before running the previous commands.nginx.conf file created a simple docker-compose up -d is enough to run a dev docker-compose environment.
Sometimes a nginx.conf has been created as an attempt to launch the web-ui docker.
See the following section to resolve this.
When using the following commands: The following error appears: A You have rights to delete the folder: You don’t have the rights to delete the folder:
/docker-compose.sh: ligne 7: ./nginx.conf: is a folder when running ${OF_HOME}/config/dev/docker-compose.sh
cd ${OF_HOME}/config/dev
./docker-compose.sh./docker-compose.sh: ligne 7: ./nginx.conf: is a folderdocker-compose up has been run previously without nginx.conf.
A folder named nginx.conf has been created by docker-compose.cd ${OF_HOME}/config/dev
rm -rf nginx.conf
./docker-compose.sh # if you want to run OperatorFabric directly after.
cd ${OF_HOME}
bin/run_all.sh startcd ${OF_HOME}/config/dev
docker run -ti --rm -v $(pwd):/current alpine # if there is no `alpine` docker available it will pull it from dockerHub
# your are now in the alpine docker container
cd /current
rm -rf nginxconf
<ctrl-d> # to exit the `alpine` container bash environement
./docker-compose.sh # if you want to run OperatorFabric directly after.
cd ${OF_HOME}
bin/run_all.sh start
When using the following command line: The following error appears: where There is not enough allocated memory space to build the front-end. Use the following command to solve the problem:
An unhandled exception occurred: Call retries were exceeded occurs when using ng build
cd ${OF_HOME}/ui/main
ng buildGenerating ES5 bundles for differential loading...
An unhandled exception occurred: Call retries were exceeded
See "/tmp/ng-<random-string>/angular-errors.log" for further details.ng-<random-string> is a temporary folder created by Angular to build the front-end.node --max_old_space_size=4096 node_modules/@angular/cli/bin/ng build
35. Keycloak Configuration
The configuration needed for development purposes is automatically loaded from the dev-realms.json file. However, the steps below describe how they can be reproduced from scratch on a blank Keycloak instance in case you want to add to it.
The Keycloak Management interface is available here: [host]:89/auth/admin Default credentials are admin/admin.
35.2. Setup at least one client (or best one per service)
35.2.1. Create client
-
Click Clients in left menu
-
Click Create Button
-
Set client ID to "opfab-client" (or whatever)
-
Select Openid-Connect Protocol
-
Enable Authorization
-
Access Type to Confidential
-
save
35.2.2. Add a Role to Client
-
In client view, click Roles tab
-
Click Add button
-
create a USER role (or whatever)
-
save == create a Mapper
Used to map the user name to a field that suits services
-
name it sub
-
set mapper type to User Property
-
set Property to username
-
set Token claim name to sub
-
enable add to access token
-
save
35.3. Create Users
-
Click Users in left menu
-
Click Add User button
-
Set username to admin
-
Save
-
Select Role Mappings tab
-
Select "opfab-client" in client roles combo (or whatever id you formerly chose)
-
Select USER as assigned role (or whatever role you formerly created)
-
Select Credentials tab
-
set password and confirmation to "test" *
repeat process for other users: operator3_fr, operator1_fr, operator2_fr
35.3.1. Development-specific configuration
To facilitate development, in the configuration file provided in the git (dev-realms.json) ,session are set to have a duration of 10 hours (36000 seconds) and SSL is not required. These parameters should not be used in production.
The following parameters are set : accessTokenLifespan : 36000 ssoSessionMaxLifespan : 36000 accessCodeLifespan" : 36000 accessCodeLifespanUserAction : 36000 sslRequired : none
36. Using OAuth2 token with the CLI
36.1. Get a token
End point: localhost:2002/auth/token
Method: POST
Body arguments:
-
client_id:
stringconstant=clientIdPassword; -
grant_type:
stringconstant=password;-
username:
stringany value, must match an OperatorFabric registered user name;
-
-
password:
stringany value;
The following examples will be for admin user.
36.1.1. Curl
command:
curl -s -X POST -d
"username=admin&password=test&grant_type=password&client_id=clientIdPassword"
http://localhost:2002/auth/token
example of expected result:
{"access_token":"eyJhbGciOiJSUzI1NiIsInR5cCI6IkpXVCJ9.eyJzdWIiOiJhZG1pbiIsImV4cC
I6MTU1MjY1OTczOCwiYXV0aG9yaXRpZXMiOlsiUk9MRV9BRE1JTiIsIlJPTEVfVVNFUiJdLCJqdGkiOi
IwMmQ4MmU4NS0xM2YwLTQ2NzgtOTc0ZC0xOGViMDYyMTVhNjUiLCJjbGllbnRfaWQiOiJjbGllbnRJZF
Bhc3N3b3JkIiwic2NvcGUiOlsicmVhZCIsInVzZXJfaW5mbyJdfQ.SDg-BEzzonIVXfVBnnfq0oMbs_0
rWVtFGAZzRHj7KPgaOXT3bUhQwPOgggZDO0lv2U1klwB94c8Cb6rErzd3yjJ8wcVcnFLO4KxrjYZZxdK
VAz0CkMKqng4kQeQm_1UShsQXGLl48ezbjXyJn6mAl0oS4ExeiVsx_kYGEdqjyb5CiNaAzyx0J-J5jVD
SJew1rj5EiSybuy83PZwhluhxq0D2zPK1OSzqiezsd5kX5V8XI4MipDhaAbPYroL94banZTn9RmmAKZC
AYVM-mmHbjk8mF89fL9rKf9EUNhxOG6GE0MDqB3LLLcyQ6sYUmpqdP5Z94IkAN-FpC7k93_-RDw","to
ken_type":"bearer","refresh_token":"eyJhbGciOiJSUzI1NiIsInR5cCI6IkpXVCJ9.eyJzdWI
iOiJhZG1pbiIsInNjb3BlIjpbInJlYWQiLCJ1c2VyX2luZm8iXSwiYXRpIjoiMDJkODJlODUtMTNmMC0
0Njc4LTk3NGQtMThlYjA2MjE1YTY1IiwiZXhwIjoxNTUyNzAxMTM4LCJhdXRob3JpdGllcyI6WyJST0x
FX0FETUlOIiwiUk9MRV9VU0VSIl0sImp0aSI6IjMwOWY2ZDllLWNmOGEtNDg0YS05ZjMxLWViOTAxYzk
4YTFkYSIsImNsaWVudF9pZCI6ImNsaWVudElkUGFzc3dvcmQifQ.jnZDt6TX2BvlmdT5JV-A7eHTJz_s
lC5fHrJFVI58ly6N7AUUfxebG_52pmuVHYULSKqTJXaLR866r-EnD4BJlzhk476FtgtVx1nazTpLFRLb
8qDCxeLrzClQBkzcxOt6VPxB3CD9QImx3bcsDwjkPxofUDmdg8AxZfGTu0PNbvO8TKLXEkeCztLFvSJM
GlN9zDzWhKxr49I-zPZg0XecgE9j4WITkFoDVwI-AfDJ3sGXDi5AN55Sz1j633QoqVjhtc0lO50WPVk5
YT7gU8HLj27EfX-6vjnGfNb8oeq189-NX100QHZM9Wgm79mIm4sRgwhpv-zzdDAkeb3uwIpb8g","exp
ires_in":1799,"scope":"read
user_info","jti":"02d82e85-13f0-4678-974d-18eb06215a65"}
36.1.2. Httpie
http --form POST http://localhost:2002/auth/token username=admin password=test
grant_type=password client_id=clientIdPassword
example of expected result:
.HTTP/1.1 200 OK
Cache-Control: no-store
Content-Type: application/json;charset=utf-8
Date: Fri, 15 Mar 2019 13:57:19 GMT
Pragma: no-cache
X-Content-Type-Options: nosniff
X-Frame-Options: DENY
X-XSS-Protection: 1; mode=block
transfer-encoding: chunked

{
    "access_token":
"eyJhbGciOiJSUzI1NiIsInR5cCI6IkpXVCJ9.eyJzdWIiOiJhZG1pbiIsImV4cCI6MTU1MjY2MDAzOS
wiYXV0aG9yaXRpZXMiOlsiUk9MRV9BRE1JTiIsIlJPTEVfVVNFUiJdLCJqdGkiOiI2MjQzMDliMS03Yz
g3LTRjZGMtODQ0My0wMTI0NTE1Zjg3ZjgiLCJjbGllbnRfaWQiOiJjbGllbnRJZFBhc3N3b3JkIiwic2
NvcGUiOlsicmVhZCIsInVzZXJfaW5mbyJdfQ.VO4OZL7ycqNez0cHzM5WPuklr0r6SAOkUdUV2qFa5Bd
3PWx3DFHAHUxkfSX0-R4OO6iG2Zu7abzToAZNVLwk107LH_lWXOMQBriGx3d2aSgCf1yx_wI3lHDd8ST
8fxV7uNeolzywYavSpMGfgz9GXLzmnyeuPH4oy7eyPk9BwWVi0d7a_0d-EfhE1T8eaiDfymzzNXJ4Bge
8scPy-93HmWpqORtJaFq1qy4QgU28N2LgHFEEEWCSzfhYXH-LngTCP3-JSNcox1hI51XBWEqoeApKdfD
J6o4szR71SIFCBERxCH9TyUxsFywWL3e-YnXMiP2J08eB8O4YwhYQEFqB8Q",
    "expires_in": 1799,
    "jti": "624309b1-7c87-4cdc-8443-0124515f87f8",
    "refresh_token":
"eyJhbGciOiJSUzI1NiIsInR5cCI6IkpXVCJ9.eyJzdWIiOiJhZG1pbiIsInNjb3BlIjpbInJlYWQiLC
J1c2VyX2luZm8iXSwiYXRpIjoiNjI0MzA5YjEtN2M4Ny00Y2RjLTg0NDMtMDEyNDUxNWY4N2Y4IiwiZX
hwIjoxNTUyNzAxNDM5LCJhdXRob3JpdGllcyI6WyJST0xFX0FETUlOIiwiUk9MRV9VU0VSIl0sImp0aS
I6ImRiYzMxNTJiLTM4YTUtNGFmZC1hY2VmLWVkZTI4MjJkOTE3YyIsImNsaWVudF9pZCI6ImNsaWVudE
lkUGFzc3dvcmQifQ.Ezd8kbfNQHOOvUCNNN4UmOOkncHiT9QVEM63FiW1rq0uXDa3xfBGil8geM5MsP0
7Q2He-mynkFb8sGNDrAXTdO-8r5o4a60zWrktrMg2QH4icC1lyeZpiwZxe6675QpLpSeMlXt9PdYj-pb
14lrRookxXP5xMQuIMteZpbtby7LuuNAbNrjveZ1bZ4WMi7zltUzcYUuqHlP1AYPteGRrJVKXiuPpoDv
gwMsEk2SkgyyACI7SdZZs8IT9IGgSsIjjgTMQKzj8P6yYxNLUynEW4o5y1s2aAOV0xKrzkln9PchH9zN
qO-fkjTVRjy_LBXGq9zkn0ZeQ3BUe1GuthvGjaA",
    "scope": "read user_info",
    "token_type": "bearer"
}
36.2. Extract token
From the previous results, the data need to be considered to be authenticated by OperatorFabric services is the content of the "access_token" attribute of the body response.
Once this value extracted, it need to be passed at the end of the value of the http HEADER of type Authorization:Bearer. Note that a space is needed between Bearer and token actual value.
example from previous results:
36.2.1. Curl
Authorization:Bearer
eyJhbGciOiJSUzI1NiIsInR5cCI6IkpXVCJ9.eyJzdWIiOiJhZG1pbiIsImV4cCI6MTU1MjY1OTczOCw
iYXV0aG9yaXRpZXMiOlsiUk9MRV9BRE1JTiIsIlJPTEVfVVNFUiJdLCJqdGkiOiIwMmQ4MmU4NS0xM2Y
wLTQ2NzgtOTc0ZC0xOGViMDYyMTVhNjUiLCJjbGllbnRfaWQiOiJjbGllbnRJZFBhc3N3b3JkIiwic2N
vcGUiOlsicmVhZCIsInVzZXJfaW5mbyJdfQ.SDg-BEzzonIVXfVBnnfq0oMbs_0rWVtFGAZzRHj7KPga
OXT3bUhQwPOgggZDO0lv2U1klwB94c8Cb6rErzd3yjJ8wcVcnFLO4KxrjYZZxdKVAz0CkMKqng4kQeQm
_1UShsQXGLl48ezbjXyJn6mAl0oS4ExeiVsx_kYGEdqjyb5CiNaAzyx0J-J5jVDSJew1rj5EiSybuy83
PZwhluhxq0D2zPK1OSzqiezsd5kX5V8XI4MipDhaAbPYroL94banZTn9RmmAKZCAYVM-mmHbjk8mF89f
L9rKf9EUNhxOG6GE0MDqB3LLLcyQ6sYUmpqdP5Z94IkAN-FpC7k93_-RDw
36.2.2. Httpie
Authorization:Bearer
eyJhbGciOiJSUzI1NiIsInR5cCI6IkpXVCJ9.eyJzdWIiOiJhZG1pbiIsImV4cCI6MTU1MjY2MDAzOSw
iYXV0aG9yaXRpZXMiOlsiUk9MRV9BRE1JTiIsIlJPTEVfVVNFUiJdLCJqdGkiOiI2MjQzMDliMS03Yzg
3LTRjZGMtODQ0My0wMTI0NTE1Zjg3ZjgiLCJjbGllbnRfaWQiOiJjbGllbnRJZFBhc3N3b3JkIiwic2N
vcGUiOlsicmVhZCIsInVzZXJfaW5mbyJdfQ.VO4OZL7ycqNez0cHzM5WPuklr0r6SAOkUdUV2qFa5Bd3
PWx3DFHAHUxkfSX0-R4OO6iG2Zu7abzToAZNVLwk107LH_lWXOMQBriGx3d2aSgCf1yx_wI3lHDd8ST8
fxV7uNeolzywYavSpMGfgz9GXLzmnyeuPH4oy7eyPk9BwWVi0d7a_0d-EfhE1T8eaiDfymzzNXJ4Bge8
scPy-93HmWpqORtJaFq1qy4QgU28N2LgHFEEEWCSzfhYXH-LngTCP3-JSNcox1hI51XBWEqoeApKdfDJ
6o4szR71SIFCBERxCH9TyUxsFywWL3e-YnXMiP2J08eB8O4YwhYQEFqB8Q
36.3. Check a token
36.3.1. Curl
from previous example
curl -s -X POST -d
"token=eyJhbGciOiJSUzI1NiIsInR5cCI6IkpXVCJ9.eyJzdWIiOiJhZG1pbiIsImV4cCI6MTU1MjY1
OTczOCwiYXV0aG9yaXRpZXMiOlsiUk9MRV9BRE1JTiIsIlJPTEVfVVNFUiJdLCJqdGkiOiIwMmQ4MmU4
NS0xM2YwLTQ2NzgtOTc0ZC0xOGViMDYyMTVhNjUiLCJjbGllbnRfaWQiOiJjbGllbnRJZFBhc3N3b3Jk
Iiwic2NvcGUiOlsicmVhZCIsInVzZXJfaW5mbyJdfQ.SDg-BEzzonIVXfVBnnfq0oMbs_0rWVtFGAZzR
Hj7KPgaOXT3bUhQwPOgggZDO0lv2U1klwB94c8Cb6rErzd3yjJ8wcVcnFLO4KxrjYZZxdKVAz0CkMKqn
g4kQeQm_1UShsQXGLl48ezbjXyJn6mAl0oS4ExeiVsx_kYGEdqjyb5CiNaAzyx0J-J5jVDSJew1rj5Ei
Sybuy83PZwhluhxq0D2zPK1OSzqiezsd5kX5V8XI4MipDhaAbPYroL94banZTn9RmmAKZCAYVM-mmHbj
k8mF89fL9rKf9EUNhxOG6GE0MDqB3LLLcyQ6sYUmpqdP5Z94IkAN-FpC7k93_-RDw"
http://localhost:2002/auth/check_token
which gives the following example of result:
{
    "sub":"admin",
    "scope":["read","user_info"],
    "active":true,"exp":1552659738,
    "authorities":["ROLE_ADMIN","ROLE_USER"],
    "jti":"02d82e85-13f0-4678-974d-18eb06215a65",
    "client_id":"clientIdPassword"
}
36.3.2. Httpie
from previous example:
http --form POST http://localhost:2002/auth/check_token
token=eyJhbGciOiJSUzI1NiIsInR5cCI6IkpXVCJ9.eyJzdWIiOiJhZG1pbiIsImV4cCI6MTU1MjY2M
DAzOSwiYXV0aG9yaXRpZXMiOlsiUk9MRV9BRE1JTiIsIlJPTEVfVVNFUiJdLCJqdGkiOiI2MjQzMDliM
S03Yzg3LTRjZGMtODQ0My0wMTI0NTE1Zjg3ZjgiLCJjbGllbnRfaWQiOiJjbGllbnRJZFBhc3N3b3JkI
iwic2NvcGUiOlsicmVhZCIsInVzZXJfaW5mbyJdfQ.VO4OZL7ycqNez0cHzM5WPuklr0r6SAOkUdUV2q
Fa5Bd3PWx3DFHAHUxkfSX0-R4OO6iG2Zu7abzToAZNVLwk107LH_lWXOMQBriGx3d2aSgCf1yx_wI3lH
Dd8ST8fxV7uNeolzywYavSpMGfgz9GXLzmnyeuPH4oy7eyPk9BwWVi0d7a_0d-EfhE1T8eaiDfymzzNX
J4Bge8scPy-93HmWpqORtJaFq1qy4QgU28N2LgHFEEEWCSzfhYXH-LngTCP3-JSNcox1hI51XBWEqoeA
pKdfDJ6o4szR71SIFCBERxCH9TyUxsFywWL3e-YnXMiP2J08eB8O4YwhYQEFqB8Q
which gives the following example of result:
HTTP/1.1 200 OK
Cache-Control: no-cache, no-store, max-age=0, must-revalidate
Content-Type: application/json;charset=utf-8
Date: Fri, 15 Mar 2019 14:19:31 GMT
Expires: 0
Pragma: no-cache
X-Content-Type-Options: nosniff
X-Frame-Options: DENY
X-XSS-Protection: 1; mode=block
transfer-encoding: chunked

{
    "active": true,
    "authorities": [
        "ROLE_ADMIN",
        "ROLE_USER"
    ],
    "client_id": "clientIdPassword",
    "exp": 1552660039,
    "jti": "624309b1-7c87-4cdc-8443-0124515f87f8",
    "scope": [
        "read",
        "user_info"
    ],
    "sub": "admin"
}
36.4. Extract token
The utility jq, sadly not always available on some Linux distro, parses json input and extracts requested json path value(access_token here).
Here is a way to do so.
curl -d "username=${user}&password=${password}&grant_type=password&client_id=opfab-client" "http://localhost:2002/auth/token" | jq -r .access_tokenwhere:
-
${user}: login existing on keycloak for operatorfabric; -
${password}: password for the previous login in keycloak; -
opfab-client: is the id of the client for OperatorFabric associated to thedevrealm in Keycloak in adev(${OF_HOME/config/dev) ordocker(${OF_HOME/config/docker) configuration of operatorFabric.
The -r option, for raw, leaves the output without any quotes.
37. Kafka Implementation
Next to publishing cards to OperatorFabric using the REST API, OperatorFabric also supports publishing cards via a Kafka Topic. In the default configuration Kafka is disabled.
37.1. Setup Kafka enviroment
If you do not have a Kafka environment running you need to set one up so the Kafka consumers and producers can find each other.
You can for example download lenses.io for an easy-to-use broker with a graphical interface. Another option is to add
a free broker like a bitnami Kafka image to docker compose. To do so, add the following lines to config/dev/docker-compose.yml or
config/docker/docker-compose.yml for the zookeeper and bitnami images:
services:
  zookeeper:
    image: bitnami/zookeeper:3
    ports:
      - "2181:2181"
    environment:
      ALLOW_ANONYMOUS_LOGIN: "yes"
  kafka:
    image: bitnami/kafka:2
    ports:
      - "9092:9092"
    environment:
      KAFKA_BROKER_ID: "1"
      KAFKA_LISTENERS: "PLAINTEXT://:9092"
      KAFKA_ADVERTISED_LISTENERS: "PLAINTEXT://172.17.0.1:9092"
      KAFKA_ZOOKEEPER_CONNECT: "zookeeper:2181"
      ALLOW_PLAINTEXT_LISTENER: "yes"
  rabbitmq:
37.2. Enabling Kafka
To enable Kafka support you need to set the kafka.consumer.group_id property in the cards-publication.yml file:
  spring:
    kafka:
      consumer:
        group-id: opfab-command
The default topic from which the messages are consumed is called opfab. This setting can be modified by setting opfab.kafka.card.topics.topicname. Messages are encoded in the CardCommand.card field.
The default topic to which messages are produced is called opfab-response. This setting can be modified by setting the opfab.kafka.topics.response-card, see below. Messages produced by Operator Fabric are encoded in the CardCommand.responseCard field
The default Kafka Avro serializers and deserializers need a registry service. Make sure the registry service setting is provided in
the card-publication.yml file. When you use the provided KafkaAvroWithoutRegistrySerializer and
KafkaAvroWithoutRegistryDeserializer no schema registry setting is needed.
With the default settings, the Kafka consumer expects a broker running on http//127.0.0.1:9092 and a schema registry on 127.0.0.1:8081.
Example settings for the cards-publication.yml file:
opfab:
  kafka:
    topics:
      card:
        topicname: opfab
      response-card:
        topicname: opfab-response
    schema:
      registry:
        url: http://localhost:8081
Cards-publication service for more settings.
See Schema management for detailed information on using and benefits of a schema registry.
37.4. Listener / deserializer
Most of the OperatorFabric Kafka implementation can be found at
org.opfab.cards.publication.kafka-
for the implementation of the deserializers and mapping of Kafka topics to OperatorFabric cards and
org.opfab.autoconfigure.kafka-
for the various Kafka configuration options.
37.4.1. Kafka OperatorFabric AVRO schema
The AVRO schema, the byte format in which messages are transferred using Kafka topics, can be found at client/src/main/avro.
Message are wrapped in a CardCommand object before being sent to a Kafka topic. The CardCommand consists of some additional information and the
OperatorFabric card itself, see also Card Structure. The additional information, for example CommandType, consists mostly of the information
present in a REST operation but not in Kafka. For example the http method (POST, DELETE, UPDATE) used.
37.5. Configure Kafka
37.5.1. Setting a new deserializer
By default, OperatorFabric uses the io.confluent.kafka.serializers.KafkaAvroDeserializer from Confluent. However, you can write your own
deserializer. To use your own deserializer, make sure
spring.deserializer.value.delegate.class points to your deserializer.
37.5.2. Configuring a broker
When you have a broker running on localhost port 9092, you do not need to set the bootstrap severs. If this is not the case, you need tell
Operator Fabric where the broker can be found. You can do so by setting the bootstrap-servers property in the cards-publication.yml file:
spring:
  kafka:
    bootstrap-servers: 172.17.0.1:9092
37.6. Kafka card producer
To send a CardCommand to OperatorFabric, start by implementing a simple Kafka producer by following for example Spring for Apache Kafka. Note that some properties of CardCommand or its embedded Card are required. If not set, the card will be rejected by OperatorFabric.
When you dump the card (which is about to be put on a topic) to stdout, you should see something like the line below. Do ignore the actual values from the dump below.
{
  "command": "CREATE_CARD",
  "process": "integrationTest",
  "processInstanceId": "fa6ce61f-192f-11eb-a6e3-eea952defe56",
  "card": {
    "parentCardUid": null,
    "publisher": "myFirstPublisher",
    "processVersion": "2",
    "state": "FirstUserTask",
    "publishDate": null,
    "lttd": null,
    "startDate": 1603897942000,
    "endDate": 1604070742000,
    "severity": "ALARM",
    "tags": null,
    "timeSpans": null,
    "details": null,
    "title": {
      "key": "FirstUserTask.title",
      "parameters": null
    },
    "summary": {
      "key": "FirstUserTask.summary",
      "parameters": null
    },
    "userRecipients": [
      "tso1-operator",
      "tso2-operator"
    ],
    "groupRecipients": null,
    "entitiesAllowedToRespond": [
      "ENTITY1_FR"
    ],
    "entityRecipients": null,
    "hasBeenAcknowledged": null,
    "data": "{\"action\":\"Just do something\"}"
  }
}
37.7. Response Cards
OperatorFabric
response cards
can be sent by REST of put on a Kafka topic. The Kafka response card configuration follows the
convention to configure a REST endpoint. Instead of setting the 'http://host/api' URL, you set it to 'kafka:response-topic' in the externalRecipients-url:
section from the cards-publication.yml file:
externalRecipients-url: "{\
           processAction: \"http://localhost:8090/test\", \
           mykafka: \"kafka:topicname\"
           }"
Note that topicname is a placeholder for now. All response cards are returned via the same Kafka response topic, as specified in the opfab.kafka.topics.response-card field.
OperatorFabric Community
The aim of this document is to present the OperatorFabric community, its code of conduct and to welcome contributors!
First of all, thank you for your interest !
We can’t stress enough that feedback, discussions, questions and contributions on OperatorFabric are very much appreciated. However, because the project is still in its early stages, we’re not fully equipped for any of it yet, so please bear with us while the contribution process and tooling are sorted out.
This project is governed by the OperatorFabric Technical Charter.
This project applies the LF Energy Code of Conduct. By participating, you are expected to uphold this code. Please report unacceptable behavior to opfab_AT_lists.lfenergy.org.
38. License and Developer Certificate of Origin
OperatorFabric is an open source project licensed under the Mozilla Public License 2.0. By contributing to OperatorFabric, you accept and agree to the terms and conditions for your present and future contributions submitted to OperatorFabric.
The project also uses a mechanism known as a Developer Certificate of Origin (DCO) to ensure that we are legally allowed to distribute all the code and assets for the project. A DCO is a legally binding statement that asserts that you are the author of your contribution, and that you wish to allow OperatorFabric to use your work.
Contributors sign-off that they adhere to these requirements by adding a Signed-off-by line to commit messages. All
commits to any repository of the OperatorFabric organization have to be signed-off like this:
This is my commit message.

Signed-off-by: John Doe <john.doe@email-provider.com>
You can write it manually but Git has a -s command line option to append it automatically to your commit message:
$ git commit -s -m 'This is my commit message'
Most IDEs can also take care of this for you.
A check will be performed during the integration, making sure all commits in the Pull Request
contain a valid Signed-off-by line.
These processes and templates have been adapted from the ones defined by the PowSyBl project.
39. Reporting Bugs or Vulnerabilities and Suggesting Enhancements
Anyone is welcome to report bugs and suggest enhancements or new features by opening a GitHub issue on this repository. Vulnerabilities can be reported publicly in the same way.
40. Contributing Code or Documentation
40.1. Contribution Workflow
The project started out using a Feature Branch workflow, but as the project team grew and we needed to manage support to previous releases we decided to switch to a workflow based on the Git Flow workflow, starting after version 1.3.0.RELEASE.
The principles for this workflow were first described in the blog post linked above, and this document attempts to summarize how we adapted it to our project. Statements in quotes are from the original blog post.
| In this document, "repository version" refers to the version defined in the VERSION file at the root of the project, which is a parameter for certain build tasks and for our CICD pipeline. |
40.1.1. Principles
40.1.1.1. develop branch
The role of the develop branch is quite similar to that of the master branch in our previous "Feature Branch"
workflow.
The develop branch is where feature branches are branched off from, and where they’re merged back to. This way,
the HEAD of the develop branch "always reflects a state with the latest delivered development changes for the next
release".
The repository version on the develop branch should always be SNAPSHOT.
The daily CRON GitHub Action generating the documentation and docker images for the SNAPSHOT version are run from
this branch (see our
CICD documentation
for details).
40.1.1.2. master branch
"When the source code in the develop branch reaches a stable point and is ready to be released, all the changes should be merged back into master somehow and then tagged with a release number."
This means that any commit on master is a production-ready release, be it a minor or a major version.
Any commit on master triggers a GitHub Action build generating and pushing documentation and docker images for the
corresponding release version. As a version released from master is also by design the latest version, it will also
update the latest docker images and the current documentation folder on the website.
40.1.1.3. Hotfix branches
While minor and major versions are tagged in increasing and linear order on the master branch, it might be necessary
to create patches on previous releases.
To do so, we create hotfix branches branching off version commits on the master branch.
For example, the 1.8.hotfixes branch branches off the commit tagged 1.8.0.RELEASE on the master branch, and will
contain tags for 1.8.1.RELEASE, 1.8.2.RELEASE and so on.
Naming convention: Hotfix branches names should always start with the two digits representing the minor version they’re patching, followed by ".hotfixes".
-
1.8.hotfixes
-
2.0.hotfixes
40.1.1.4. Feature branches
Feature branches are used to develop new features or fix bugs described in GitHub issues. They have two distinct use cases with similar workflows.
Feature branches for the next release
These feature branches are used to develop new features or fix bugs for the next release.
Their lifecycle is as follows:
-
A new feature branch is branched off
developbefore starting work on a feature or bug. -
Once the developments are deemed ready by the developer(s) working on the feature, a pull request should be created for this branch.
-
New pull requests are discussed during daily meetings to assign someone from the Reviewers group to the issue.
-
The pull request author and reviewer(s) then make use of the Git Hub pull requests features (comments, proposed changes, etc.) to make changes to the PR until it meets the project requirements.
-
Once it is ready to be included in the next version, the pull request is then merged back into
develop.
Feature branches for hotfixes
These feature branches fix bugs in existing releases and give rise to new patches.
Their lifecycle is similar to regular feature branches, except they should be branched off (and merged back to) the
X.X.hotfixes branch corresponding to the release they are fixing.
Example: A feature branch working on bug 1234 affecting version 1.8.0.RELEASE should be branched off
branch 1.8.hotfixes.
Common conventions
Naming convention: Feature branches names should always start with "FE-" followed by the reference of the GitHub issue they’re addressing, optionally followed by additional information if several branches are associated with a given issue.
-
FE-123
-
FE-123_Documentation
-
FE-123_1
-
123
-
FE123
-
SomeTextDescribingTheBranch
Commit messages should also start with the GitHub issue reference: #123 My commit message
This allows the branch, PR and commits to be directly accessible from the GitHub issue.
| The deprecated OC-XXX notation (from when we tracked issues in JIRA) is no longer accepted by the CI/CD pipeline. |
40.1.1.5. Release branches
Once developments are in a release-ready state and have been tested on the develop branch, a release branch should
be created off develop to prepare the merge into master.
| "All features that are targeted for the release-to-be-built must be merged in to develop at this point in time. All features targeted at future releases may not—they must wait until after the release branch is branched off." |
By contrast to what is described in the original blog post, for now we have chosen to
only create the release branch once the developments are completely ready and tested on the develop branch, so that no
fixes should be made on the release branch. This simplifies things because it means that release branches don’t have to
be merged back into develop.
|
Once the X.X.X.release branch has been created, a new commit should be made on this branch to change the repository
version from SNAPSHOT to X.X.X.RELEASE.
Then, pushing the branch will trigger a build and a "dry-run" generation of docker images. The aim
is to detect any issue with this generation before moving to master.
Finally, the X.X.X.release can be merged into master, triggering
The resulting merge commit on master should then be tagged with X.X.X.RELEASE.
All commits on master should be merged commits from release branches, direct pushes on master will be disabled in
the future.
Naming convention: The name of a release branch should match the repository version it is meant to merge into
master but in lower case to avoid confusion with release tags on master.
Example: The valid branch name for the branch bringing 1.3.0.RELEASE into master is 1.3.0.release
40.1.2. Examples and commands
The aim of this section is to illustrate how our workflow works on a concrete example, complete with the required
git commands.
40.1.2.1. Initial state
In the initial state of our example, only develop and master exist.
The repository version in master is 1.3.0.RELEASE, and the develop branch has just been branched off it. Commits
have been added to develop to change the repository version to SNAPSHOT and implement the changes necessary for
Git flow.
40.1.2.2. Starting work on a new feature for the next version
Let’s say we want to start working on a feature described in GitHub issue #123.
git checkout develop (1)
git pull (2)
git checkout -b FE-123 (3)
| 1 | Check out the develop branch |
| 2 | Make sure it is up to date with the remote (=GitHub repository) |
| 3 | Create a FE-123 off the develop branch |
Then, you can start working on the feature and commit your work to the branch. Referencing the issue you’re working on at the end of the commit message allows the commit to be listed on the issue’s page for future reference.
git commit -s -m "Short message describing content of commit (#123)"
| The -s flag is to automatically add a sign-off to your commit message, which is our way to implement the Developer Certificate of Origin . |
At any point during your work you can push your feature branch to the GitHub repository, to back your work up, let others look at your work or contribute to the feature.
To do this, just run:
git push
|
If it’s your first push to this branch, Git will prompt you to define the remote branch to be associated with your local branch with the following command: git push --set-upstream origin FE-123 |
You can re-work, squash your commits and push as many times as you want on a feature branch. Force pushes are allowed on feature branches.
To see your branch:
-
Go to the operatorfabric-core repository on GitHub
-
Click the
branchestab
|
Feel free to add or update a copyright header (on top of the existing ones) to files you create or amend. See src/main/headers for examples. |
40.1.2.3. Submitting a pull request to develop
Once you are satisfied with the state of your developments, you can submit it as a pull request.
|
Before submitting your branch as a pull request, please squash/fix your commits to reduce the number of commits and comment them accordingly. In the end, the division of changes into commits should make the PR easier to understand and review. |
You should also take a look at the review checklist below to make sure your branch meets its criteria.
Once you feel your branch is ready, submit a pull request. Open pull requests are then reviewed by the core maintainers to assign a reviewer to each of them.
To do so, go to the branches tab of the repository as described above.
Click the "New Pull Request" button for your branch.
Add a comment containing a short summary of the PR goal and any information that should go into the release notes. It’s especially important for PRs that have a direct impact on existing OperatorFabric deployments, to alert administrators of the impacts of deploying a new version and help them with the migration. Whenever possible/relevant, a link to the corresponding documentation is appreciated.
You need to link your PR to the issue it is fixing so merging the PR will automatically close the corresponding issue. You can do so either manually or by adding "Fix #XXX" to the PR’s description.
|
Make sure that the base branch for the PR is |
At this point, GitHub will tell you whether your branch could be automatically merged into develop or whether
there are conflicts to be fixed.
Case 1: GitHub is able to automatically merge your branch
This means that either your branch was up to date with develop or there were no conflicts. In this case, just go ahead and fill in the PR title and message, then click "Create pull request".
Case 2: GitHub can’t merge your branch automatically
This means that there are conflicts with the current state of the develop branch on GitHub.
To fix these conflicts, you need to update your local copy of the develop branch and merge it into your feature branch.
git checkout develop (1)
git pull (2)
git checkout FE-123 (3)
git merge develop (4)
| 1 | Check out the develop branch |
| 2 | Make sure it is up to date with the remote (=GitHub repository) |
| 3 | Check out the FR-123 branch |
| 4 | Merge the new commits from develop into the feature branch |
Then, handle any conflicts from the merge. For example, let’s say there is a conflict on file dummy1.txt:
Auto-merging dummy1.txt
CONFLICT (add/add): Merge conflict in dummy1.txt
Automatic merge failed; fix conflicts and then commit the result.
Open file dummy1.txt:
 <<<<<<< HEAD
 Some content from FE-123.
 =======
 Some content that has been changed on develop since FE-123 branched off.
 >>>>>>> develop
Update the content to reflect the changes that you want to keep:
Some content from FE-123 and some content that has been changed on develop since FE-123 branched off.
git add dummy1.txt (1)
git commit (2)
git push (3)
| 1 | Add the manually merged file to the changes to be committed |
| 2 | Commit the changes to finish the merge |
| 3 | Push the changes to GitHub |
Now, if you go back to GitHub and try to create a pull request again, GitHub should indicate that it is able to merge automatically.
40.1.2.4. Working on a fix for a previous version
To work on a fix for an existing version, the steps are similar to those described above, substituting X.X.hotfix for
develop.
40.1.2.5. Reviewing a Pull Request
Only developers from the reviewers group can merge pull requests into develop, but this shouldn’t
stop anyone interested in the topic of a PR to comment and review it.
Review checklist
-
The PR comment contains the text to insert in release note. Otherwise, it should say why this development doesn’t need to be on the release notes.
-
If necessary, the PR should create or add content to a migration guide for the next version, under
src/docs/asciidoc/resources -
Check that GitHub Action build is passing for the PR
-
The SonarCloud analysis should report no new bug or code smells, and should pass the quality gate
-
Check that the base branch (i.e. the branch into which we want to merge changes) is correct: for feature branches pull requests, this branch should be
develop. -
Look through changed files to make sure everything is relevant to the PR (no mistakenly added changes, no secret information, no malicious changes) and to see if you have remarks on the way things are implemented
-
Check that the commit(s) message(s) is(are) relevant and follow conventions
-
If there is more than one commit, is it meaningful or do we need to squash ?
-
Meaningful and sufficient unit tests for the backend (we aim for 80% coverage)
-
Meaningful unit tests for the frontend (Angular tests can be complex to implement, we should focus on testing complex logic and not the framework itself)
-
API testing via Karate has been updated
-
Documentation has been updated (especially if configuration is needed)
-
Configuration examples have been updated
-
Build and run OpFab locally to see the new feature or bug fix at work. In the case of a new feature, it’s also a way of making sure that the configuration documentation is correct and easily understandable.
-
Check for error messages in the browser console.
-
Depending on the scope of the PR , build docker images and test in docker mode
-
Check that the copyright header has been updated on the changed files if need be, and in the case of a first-time contributor, make sure they’re added to the AUTHORS.txt file.
-
Check new dependencies added to the project to see if they are compatible with the OperatorFabric license , see the following table
License usage restrictions
License Name |
SPX Identifier |
Type |
Usage, Restrictions |
Academic Free License v1.1, v1.2, v2.0, v2.1, v3.0 |
AFL-1.1, AFL-1.2, AFL-2.0, AFL-2.1, AFL-3.0 |
Permissive |
None , Be careful of incompatibility with GPL license. |
Apache License 2.0 |
Apache-2.0 |
Permissive |
None |
BSD 2-Clause "Simplified" License |
BSD-2-Clause |
Permissive |
None |
BSD 3-Clause "New" or "Revised" License |
BSD-3-Clause |
Permissive |
None |
BSD 4-Clause "Original" or "Old" License |
BSD-4-Clause |
Permissive |
Usage prohibited due to advertising clause. |
Common Development and Distribution License 1.0 |
CDDL-1.0 Moderate |
copyleft |
Only as a distinct library. Be careful of incompatibility with GPL license. |
Common Development and Distribution License 1.1 |
CDDL-1.1 |
Moderate copyleft |
Only as a distinct library.Be careful of incompatibility with GPL license. |
Creative Commons Attribution 3.0 |
CC-BY-3.0 |
Permissive |
None. Suitable for documentation material. |
Creative Commons Attribution 4.0 |
CC-BY-4.0 |
Permissive |
None. Suitable for documentation material. |
Creative Commons Attribution Non Commercial (any version) |
CC-BY-NC-… |
Non commercial |
Usage prohibited due to non commercial restriction. |
Creative Commons Zero v1.0 Universal |
CC0-1.0 |
Free usage (public domain) |
None. Suitable for documentation material. |
Eclipse Public License 1.0 |
EPL-1.0 |
Moderate copyleft |
Only as a distinct library.Be careful of incompatibility with GPL license. |
Eclipse Public License 2.0 |
EPL-2.0 Moderate |
copyleft |
Only as a distinct library GNU General Public License v2.0 only GPL-2.0-only Strong copyleft Usage prohibited. Exemptions on a case by case basis. |
GNU General Public License v2.0 or later |
GPL-2.0-or-later |
Strong copyleft |
Usage prohibited. Exemptions on a case by case basis. |
GNU General Public License v3.0 only |
GPL-3.0-only |
Strong copyleft |
Usage prohibited. Exemptions on a case by case basis. |
GNU General Public License v3.0 or later |
GPL-3.0-or-later |
Strong copyleft |
Usage prohibited. Exemptions on a case by case basis. |
GNU Lesser General Public License v2.1 only |
LGPL-2.1-only |
Moderate copyleft |
Only as a distinct library |
GNU Lesser General Public License v2.1 or later |
LGPL-2.1-or-later |
Moderate copyleft |
Only as a distinct library |
GNU Lesser General Public License v3.0 only |
LGPL-3.0-only |
Moderate copyleft |
Only as a distinct library |
GNU Lesser General Public License v3.0 or later |
LGPL-3.0-or-later |
Moderate copyleft |
Only as a distinct library |
ISC License |
ISC |
Permissive |
None |
MIT License |
MIT |
Permissive |
None |
Mozilla Public License 2.0 |
MPL-2.0 Moderate (weak) |
copyleft |
Only as a distinct library |
Public domain |
- |
Free usage |
None |
SIL Open Font License 1.1 |
OFL-1.1 |
Permissive in relation to combination with non-font code (strong copyleft for font code) |
Only for font components |
zlib License |
Zlib |
Permissive |
None |
Testing environment for reviewer
Compile and run OperatorFabric docker images is the most effective way to check any regression.
-
Pull the submitted branch on a testing machine;
-
Run a
docker-composewith the${OF_HOME}/src/main/docker/test-environment/docker-compose.ymlfile; -
Create
SNAPSHOTdocker images, from the${OF_HOME}directory with the following command:./gradlew clean dockerTagSNAPSHOT; -
Stop the
test-environmentdocker-compose; -
Go to
${OF_HOME}/config/docker; -
Run the
./docker-compose.shscript (or use thedocker-compose.ymlwith adocker-composecommand); -
Go to
${OF_HOME}/src/test/resources/; -
Run the following scripts:
./loadTestConf.sh && ./send6TestCards.sh; -
Open the front-end in a browser and look for any regression.
To automate build and API testing, you can use ${OF_HOME}/src/test/api/karate/buildAndLaunchAll.sh.
40.1.2.6. Merging a Pull Request
Once the pull request meets all the criteria from the above check list, you can merge it into the develop branch.
-
Go to the pull request page on GitHub
-
Check that the base branch for the pull request is
develop(orX.X.hotfixes). This information is visible at the top of the page.
-
If that is not the case, you can edit the base branch by clicking the
Editbutton in the top right corner. -
Click the
merge pull requestbutton at the bottom of the PR page -
Make sure that the corresponding GitHub issue was associated to the project for the current release. It should now be visible under the "Done" column. If not, add it to the project and put it there manually.
-
Go to the release-notes repository and add the issue to the list with the information provided in the PR comments.
40.1.2.7. Creating a release or hotfix
See the release process described in our CICD documentation for details.
40.2. Code Guidelines
-
We don’t mention specific authors by name in each file (in Javadoc or in the documentation for example), so as not to have to maintain these mentions (since this information is tracked by git anyway).
-
For ui code, you must use a linter with rules provided in ui/main/tslint.json
-
When adding a dependency, define a precise version of the dependency
40.2.1. Angular/TypeScript development caution and guidelines
-
Use
!!myVariableto test if a variable is undefined or null except for number where zero will return false ( !!0 is equal to false) -
Use
foreachto iterate over an array (instead offor(let i = ..) . In some cases, foreach do not work and you can use it this wayArray.prototype.forEach.call(myArray, element ⇒ …. )(see stackoverflow.com/questions/43743560/foreach-vs-array-prototype-foreach-call) -
Do not use ngFor / ngIf with methods with computing as angular will call these methods very regularly (around ten times per seconds), use instead variables and compute them only when necessary.
-
ngInit() : ngInit is called when component is created, the creation is made by the parent component : be careful to check when initialization is done when calling method inside ngInit. When the context of the parent component change, it can lead to a new initialization or not.
-
Do not store Moment objects in ngrx store (see for example : github.com/ngrx/platform/issues/2690)
-
Prefer using
*ngIfoverhiddenproperty to hide elements : stackoverflow.com/questions/51317666/when-should-i-use-ngif-over-hidden-property-and-vice-versa/51317774 -
Do not use console.log or console.error, use specific opfab service : OpfabLoggerService
40.3. Documentation Guidelines
The aim of this section is to explain how the documentation is currently organized and to give a few guidelines on how it should be written.
40.3.1. Structure
All the sources for the AsciiDoc documentation published on our website are found under the src/docs/asciidoc folder in the operatorfabric-core repository.
It is organized into several folders (architecture documentation, deployment documentation, etc.). Each of these folders represent a document and contain an index.adoc file, optionally referencing other adoc files (to break it down into sections).
In addition, an images folder contains images for all documents and a resources folder contains various appendices that might be of use to some people but that we felt weren’t part of the main documentation.
The table below gives a short summary of the content of each document as well as advice on which ones you should focus on depending on your profile.
| Contributor |
A developer who contributes (or wishes to) to the OperatorFabric project |
| Developer |
A developer working on an application using OperatorFabric or a businessconfig-party application posting content to an OperatorFabric instance |
| Admin |
Someone who is in charge of deploying and maintaining OperatorFabric in production as part of an integrated solution |
| Product Owner |
Project managers, anyone interested in using OperatorFabric for their business requirements. |
| Folder | Content | Contributor | Developer | Admin | Product Owner |
|---|---|---|---|---|---|
architecture |
Architecture documentation Describes the business objects and concepts handled by OperatorFabric as well as the microservices architecture behind it. |
Yes |
Yes |
Yes |
|
CICD |
CICD Pipeline documentation Describes our CICD pipeline and release process |
Yes |
|||
community |
OF Community documentation Everything about the OperatorFabric Community: Code of conduct, governance, contribution guidelines, communication channels. |
Yes |
|||
deployment |
Deployment documentation Explains how to deploy and configure an OperatorFabric instance |
Yes |
Yes |
Yes |
|
dev_env |
Development Environment documentation Explains how to set up a working development environment for OperatorFabric with all the appropriate tooling and how to run OperatorFabric in development mode. |
Yes |
|||
docs |
This folder contains the documentation that should be archived for previous releases (as of today, the release notes and single page documentation - see below). |
Yes |
Yes |
Yes |
Yes |
getting_started |
Getting Started Guide guides you through setting up OperatorFabric and experimenting with its main features |
Yes |
Yes |
Maybe |
|
reference_doc |
Reference Documentation contains the reference documentation for each microservice. It starts off with a high-level functional documentation and then goes into more technical details when needed. |
Yes |
Yes |
Yes |
In addition to this asciidoctor documentation, API documentation is available in the form of SwaggerUI-generated html
pages. It is generated by the generateSwaggerUI Gradle task, using the swagger.yaml files from each service (for
example for the
BusinessConfig API
). It can be found under the build/docs/api folder for each client or service project.
40.3.2. Conventions
-
In addition to the "visible" structure described above, documents are broken down into coherent parts using the "include" feature of AsciiDoc. This is done mostly to avoid long files that are harder to edit, but it also allows us to reuse some content in different places.
-
Given the number of files this creates, we try to keep header attributes in files to a minimum. Instead, they’re set in the configuration of the asciidoctor gradle task:
build.gradleasciidoctor { baseDirFollowsSourceFile() sources { include '*/index.adoc','docs/*' } resources { from('src/docs/asciidoc') { include 'images/*','pdf/*' } } attributes nofooter : '', revnumber : operatorfabric.version, revdate : operatorfabric.revisionDate, sectnums : '', sectnumlevels : '4', sectanchors : '', toc : 'left', toclevels : '4', icons : 'font', imagesdir : '../images', "hide-uri-scheme" : '', "source-highlighter": 'coderay' }In particular, the version and revision date are set automatically from the version defined in the VERSION file at the root of the project and the current date.
-
All files are created starting with level 0 titles so:
-
They can be generated on their own if need be.
-
They can be included at different levels in different documents using leveloffset.
-
-
In addition to being available as separate documents (architecture, reference, etc.) for the current release, the documentation is also generated as a single page document available for all releases from the releases page. This is also a way to make searching the documentation for specific terms easier, and could be used to generate a single page pdf documentation.
-
Unfortunately, this entails a little complexity for cross-references and relative links, because the path to the content is a little different depending on whether the content is generated as different pages or as a single page document.
For example, to link to the "Card Structure" section of the reference document from the architecture document, one needs to use the following external cross-reference:
<</documentation/current/reference_doc/index.adoc#card_structure, Card Structure>>
In the case of the single-page documentation however, both the architecture content and the reference content are part of the same document, so the cross-reference becomes a simple internal cross-reference:
<<card_structure, Card Structure>>
This is managed by using the
ifdefandindefdirectives to define which link syntax should be used:ifdef::single-page-doc[<<card_structure, Card Structure>>] ifndef::single-page-doc[<</documentation/current/reference_doc/index.adoc#card_structure, Card Structure>>]
The label ("Card Structure" in this example) is defined with each link because it seems that defining it in the target file along with the ID ( [[my_section_id, text to display]]) doesn’t work with relative links.In the same way, for relative links to external files (mostly the API documentation):
ifdef::single-page-doc[link:../api/cards/index.html#/archives[here]]
ifndef::single-page-doc[link:/documentation/current/api/cards/index.html#/archives[here]]
For this to work, the single_page_doc.adoc file needs to have :single-page-doc:as a header attribute. -
As you can see in the examples above, we are using custom-defined section ids as anchors rather than taking advantage of generated ones (see documentation). This is cumbersome but:
-
Generation will give a warning if duplicate ids are defined, whereas with generated ids it will silently link to the wrong section.
-
Restructuring the document might change the generated section ID, creating broken links.
-
Its easier to find referenced text (ctrl-f on id)
-
The presence of a custom-defined ID is a sign that the content is referenced somewhere else, which you should take into account if you’re thinking of deleting or moving this content.
-
-
The :imagesdir: attribute is set globally as
../images, because all images are stored undersrc/docs/asciidoc/images. -
In addition to links, it is sometimes necessary to display the actual content of files (or part of it) in the documentation (in the case of configuration examples, for instance). Whenever possible, this should be done by using the include directive rather than copying the content into the adoc file. This way the documentation will always be up to date with the file content at the time of generation.
See the build.gradle include above for an example using tags to include only part of a file.
-
Source-highlighting is done using Coderay. See their documentation for supported languages, and the AsciiDoctor documentation on how to apply source-highlighting.
-
Avoid long lines whenever possible (for example, try not to go beyond 120 characters). This makes editing the documentation easier and diffs more readable.
-
Most links to other OperatorFabric documents should be relative (see above) so they automatically point to the document in the same version rather than the latest version. Links starting with opfab.github.io/documentation/current/ should only be used when we want to always refer to the latest (release) version of the documentation.
-
If necessary, add the relevant copyright at the top of the file.
40.4. Copyright Headers
All source files and documentation files for the project should bear copyright headers.
40.4.1. Header templates
In the case of source files (*.java, *.css or *.scss, *.html, *.ts, etc.), we are working with the Mozilla Public License, v. 2.0, so the header should be something like this:
Copyright (c) YYYY-YYYY, Entity Name (website or contact info)
See AUTHORS.txt
This Source Code Form is subject to the terms of the Mozilla Public
License, v. 2.0. If a copy of the MPL was not distributed with this
file, You can obtain one at http://mozilla.org/MPL/2.0/.
SPDX-License-Identifier: MPL-2.0
This file is part of the OperatorFabric project.
In the case of documentation files (*.adoc), we use the Creative Commons Attribution 4.0 International license, so the header should be:
Copyright (c) YYYY-YYYY, Entity Name (website or contact info)
See AUTHORS.txt
This document is subject to the terms of the Creative Commons Attribution 4.0 International license.
If a copy of the license was not distributed with this
file, You can obtain one at https://creativecommons.org/licenses/by/4.0/.
SPDX-License-Identifier: CC-BY-4.0
These templates should of course be converted to comments depending on the file type. See src/main/headers for examples.
Please make sure to include the appropriate header when creating new files and to update the existing one when making changes to a file.
In the case of a first time contribution, the GitHub username of the person making the contribution should also be added to the AUTHORS file.
40.4.2. Examples
40.4.2.1. Creating a new file
Let’s say a developer from entity Entity X creates a new java file in 2020. The header should read:
Copyright (c) 2020, Entity X (http://www.entityX.org)
See AUTHORS.txt
This Source Code Form is subject to the terms of the Mozilla Public
License, v. 2.0. If a copy of the MPL was not distributed with this
file, You can obtain one at http://mozilla.org/MPL/2.0/.
SPDX-License-Identifier: MPL-2.0
This file is part of the OperatorFabric project.
40.4.2.2. Updating a file
Given an existing java file with the following header:
Copyright (c) 2020, Entity X (http://www.entityX.org)
See AUTHORS.txt
This Source Code Form is subject to the terms of the Mozilla Public
License, v. 2.0. If a copy of the MPL was not distributed with this
file, You can obtain one at http://mozilla.org/MPL/2.0/.
SPDX-License-Identifier: MPL-2.0
This file is part of the OperatorFabric project.
If a developer from entity Entity X edits it in 2021, the header should now read:
Copyright (c) 2020-2021, Entity X (http://www.entityX.org)
See AUTHORS.txt
This Source Code Form is subject to the terms of the Mozilla Public
License, v. 2.0. If a copy of the MPL was not distributed with this
file, You can obtain one at http://mozilla.org/MPL/2.0/.
SPDX-License-Identifier: MPL-2.0
This file is part of the OperatorFabric project.
However, if a developer from entity Entity X edits it in 2022, but no one from Entity X had touched it in 2021, the header should now read:
Copyright (c) 2020, 2022 Entity X (http://www.entityX.org)
See AUTHORS.txt
This Source Code Form is subject to the terms of the Mozilla Public
License, v. 2.0. If a copy of the MPL was not distributed with this
file, You can obtain one at http://mozilla.org/MPL/2.0/.
SPDX-License-Identifier: MPL-2.0
This file is part of the OperatorFabric project.
40.4.2.3. Multiple contributors
Given an existing java file with the following header:
Copyright (c) 2020-2021, Entity X (http://www.entityX.org)
See AUTHORS.txt
This Source Code Form is subject to the terms of the Mozilla Public
License, v. 2.0. If a copy of the MPL was not distributed with this
file, You can obtain one at http://mozilla.org/MPL/2.0/.
SPDX-License-Identifier: MPL-2.0
This file is part of the OperatorFabric project.
If a developer from entity Entity Y edits it in 2021, the header should now read:
Copyright (c) 2020-2021, Entity X (http://www.entityX.org)
Copyright (c) 2021, Entity Y (http://www.entityY.org)
See AUTHORS.txt
This Source Code Form is subject to the terms of the Mozilla Public
License, v. 2.0. If a copy of the MPL was not distributed with this
file, You can obtain one at http://mozilla.org/MPL/2.0/.
SPDX-License-Identifier: MPL-2.0
This file is part of the OperatorFabric project.
41. Project Governance
41.1. Project Owner
OperatorFabric is part of the LF Energy Foundation, a project of the Linux Foundation that supports open source innovation projects within the energy and electricity sectors.
41.2. Committers
Committers are contributors who have made several valuable contributions to the project and are now relied upon to both write code directly to the repository and screen the contributions of others. In many cases they are programmers but it is also possible that they contribute in a different role. Typically, a committer will focus on a specific aspect of the project, and will bring a level of expertise and understanding that earns them the respect of the community and the project owner.
41.3. Technical Steering Committee
See the dedicated page for more details on the Technical Steering Committee (scheduled meetings, minutes of past meetings, etc.).
41.4. Contributors
Contributors include anyone in the technical community that contributes code, documentation, or other technical artifacts to the project.
Anyone can become a contributor. There is no expectation of commitment to the project, no specific skill requirements and no selection process. To become a contributor, a community member simply has to perform one or more actions that are beneficial to the project.
42. Communication channels
In addition to issues and discussions on GitHub, we use the following communication channels:
42.1. Slack channel
We use the operator-fabric channel on the LFEnergy Slack for daily discussions, to warn of breaking changes
being merged into develop for example.
Everyone is welcome to join.
42.2. LF Energy Mailing Lists
Several mailing lists have been created by LF Energy for the project, please feel free to subscribe to the ones you could be interested in:
-
OperatorFabric Announcements (such as new releases)
-
OperatorFabric Technical Steering Committee (agenda, minutes and invitations for TSC)
-
OperatorFabric Developers for project development discussions (not really active, we might abandon it in favour of GitHub Discussions)
And if you’re interested in LF Energy in general: LF Energy General Discussion
43. Code of Conduct
The Code of Conduct for the OperatorFabric community is version 2.0 of the Contributor Covenant.
43.1. Our Pledge
We as members, contributors, and leaders pledge to make participation in our community a harassment-free experience for everyone, regardless of age, body size, visible or invisible disability, ethnicity, sex characteristics, gender identity and expression, level of experience, education, socio-economic status, nationality, personal appearance, race, religion, or sexual identity and orientation. We pledge to act and interact in ways that contribute to an open, welcoming, diverse, inclusive, and healthy community.
43.2. Our Standards
Examples of behavior that contributes to a positive environment for our community include:
-
Demonstrating empathy and kindness toward other people
-
Being respectful of differing opinions, viewpoints, and experiences
-
Giving and gracefully accepting constructive feedback
-
Accepting responsibility and apologizing to those affected by our mistakes, and learning from the experience
-
Focusing on what is best not just for us as individuals, but for the overall community
Examples of unacceptable behavior include:
-
The use of sexualized language or imagery, and sexual attention or advances of any kind
-
Trolling, insulting or derogatory comments, and personal or political attacks
-
Public or private harassment
-
Publishing others’ private information, such as a physical or email address, without their explicit permission
-
Other conduct which could reasonably be considered inappropriate in a professional setting
43.3. Enforcement Responsibilities
Community leaders are responsible for clarifying and enforcing our standards of acceptable behavior and will take appropriate and fair corrective action in response to any behavior that they deem inappropriate, threatening, offensive, or harmful. Community leaders have the right and responsibility to remove, edit, or reject comments, commits, code, wiki edits, issues, and other contributions that are not aligned to this Code of Conduct, and will communicate reasons for moderation decisions when appropriate.
43.4. Scope
This Code of Conduct applies within all community spaces, and also applies when an individual is officially representing the community in public spaces. Examples of representing our community include using an official e-mail address, posting via an official social media account, or acting as an appointed representative at an online or offline event.
43.5. Enforcement
Instances of abusive, harassing, or otherwise unacceptable behavior may be reported to the community leaders responsible for enforcement at opfab-tsc_AT_lists.lfenergy.org. All complaints will be reviewed and investigated promptly and fairly. All community leaders are obligated to respect the privacy and security of the reporter of any incident. Enforcement Guidelines Community leaders will follow these Community Impact Guidelines in determining the consequences for any action they deem in violation of this Code of Conduct:
-
Correction
- Community Impact
-
Use of inappropriate language or other behavior deemed unprofessional or unwelcome in the community.
- Consequence
-
A private, written warning from community leaders, providing clarity around the nature of the violation and an explanation of why the behavior was inappropriate. A public apology may be requested.
-
Warning
- Community Impact
-
A violation through a single incident or series of actions.
- Consequence
-
A warning with consequences for continued behavior. No interaction with the people involved, including unsolicited interaction with those enforcing the Code of Conduct, for a specified period of time. This includes avoiding interactions in community spaces as well as external channels like social media. Violating these terms may lead to a temporary or permanent ban.
-
Temporary Ban
- Community Impact
-
A serious violation of community standards, including sustained inappropriate behavior.
- Consequence
-
A temporary ban from any sort of interaction or public communication with the community for a specified period of time. No public or private interaction with the people involved, including unsolicited interaction with those enforcing the Code of Conduct, is allowed during this period. Violating these terms may lead to a permanent ban.
-
Permanent Ban
- Community Impact
-
Demonstrating a pattern of violation of community standards, including sustained inappropriate behavior, harassment of an individual, or aggression toward or disparagement of classes of individuals.
- Consequence
-
A permanent ban from any sort of public interaction within the community.
43.6. Attribution
This Code of Conduct is adapted from the Contributor Covenant, version 2.0, available at www.contributor-covenant.org/version/2/0/code_of_conduct.html. Community Impact Guidelines were inspired by Mozilla’s code of conduct enforcement ladder. For answers to common questions about this code of conduct, see the FAQ at www.contributor-covenant.org/faq. Translations are available at www.contributor-covenant.org/translations. www.contributor-covenant.org/version/2/0/code_of_conduct/code_of_conduct.txt
OperatorFabric CICD
44. Pipeline Configuration
This section briefly describes the organization of our CICD pipeline.
Most of the access and permissions required by our CICD plateform are managed by tokens that are created on each of the required services (SonarCloud, DockerHub, GitHub). A technical user account (opfabtech) has been created for each of these services so that these tokens are not linked to the account of any member of the team.
44.1. CICD Pipeline
44.1.1. Github Actions
We use github Actions to manage our pipeline (github.com/opfab/operatorfabric-core/actions).
44.1.2. SonarCloud
To be allowed to push results to SonarCloud, github needs to be authenticated. This is done by generating a token on SonarCloud with an account (opfabtech) that has admin rights to the organization, and then providing this token to github using actions secrets .
44.1.3. GitHub (documentation)
To be allowed to push the generated documentation to the opfab.github.io, Github needs write access to the repository. This is done by setting up a Personal Access Token in GitHub using the technical account. This token is then passed to Github using actions secrets .
| After new content is pushed to the opfab.github.io repository, it can take a few minutes before this content is visible on the website because it needs to be built by GitHub pages, and this can take a short while depending on how busy the service is. |
45. Release process
45.1. Version numbers
We work with two types of versions:
-
X.Y.Z.RELEASE versions are stable versions
-
SNAPSHOT version represents the current state of merged developments
Version numbers for X.Y.Z.RELEASE should be understood like this:
-
X: Major version, a major version adds new features and breaks compatibility with previous major and minor versions.
-
Y: Minor version, a minor version adds new features and does not break compatibility with previous minor versions for the same major version.
-
Z: Patch, a patch version only contains bug fixes of current minor version
45.2. Releasing a Major or Minor Version
| To release a version we use some GitHub Actions dedicated jobs. These jobs are triggered when pushing a commit in branches containing the keyword release at the end (**release) and rely on the VERSION file at the root of this repository to know which version is being produced. It is thus crucial to double-check the content of this file before any push (triggering the GitHub Actions jobs) is made. |
Before releasing a version, you need to prepare the release.
45.2.1. Checking the release notes
-
On the
Projectstab of the core repository, click on the project corresponding to the release that is about to be released. -
Make sure that the release_notes.md file lists all the issues, bugs, tags or feature requests that are relevant for OperatorFabric users along with explanations if need be.
-
Based on the content of this version and the rules listed above, make sure that the version number is appropriate.
-
Check if there is a migration guide for this version, if so include a link to it at the top of the release notes.
45.2.2. Creating a release branch and preparing the release
-
On the operatorfabric-core repository, create a branch off the
developbranch namedX.X.X.release(note the lowercasereleaseto distinguish it fromX.X.X.RELEASEtags).git checkout -b X.X.X.release
-
Use the ./CICD/prepare_release_version.sh script to automatically perform all the necessary changes:
./CICD/prepare_release_version.sh -v X.X.X.RELEASE
You should get the following output:
Current version is SNAPSHOT (based on VERSION file)
Preparing X.X.X.RELEASE
Updating version for pipeline in VERSION file
Replacing SNAPSHOT with X.X.X.RELEASE in swagger.yaml files
Using X.X.X.RELEASE for lfeoperatorfabric images in dev and docker environment docker-compose files
The following files have been updated:
 M VERSION
 M config/dev/docker-compose.yml
 M config/docker/docker-compose.yml
 M services/cards-publication/src/main/modeling/swagger.yaml
 M services/businessconfig/src/main/modeling/swagger.yaml
 M services/users/src/main/modeling/swagger.yaml
This script performs the following changes:
-
Replace SNAPSHOT with X.X.X.RELEASE in swagger.yaml files and the VERSION file at the root operator-fabric folder
-
Change the version from SNAPSHOT to X.X.X.RELEASE in the docker-compose files for dev and docker deployments
-
-
Commit the changes with the template message:
git add .
git commit -s -m "[RELEASE] X.X.X.RELEASE"
-
Push the commit
git push --set-upstream origin X.X.X.release
-
Check that the build is correctly triggered
You can check the status of the GitHub Actions triggered by the commit on Github Actions.
Wait for the build to complete (around 30 minutes) and check that all jobs have been successful. This ensures that the code builds, tests are OK and there is no error preventing documentation or Docker images generation.
45.2.3. Merging the release branch into master
Once the release branch build is passing, you should merge the release branch into master to bring the new
developments into master and trigger the CICD tasks associated with a release (Docker images for DockerHub and
documentation).
git checkout master (1)
git pull (2)
git merge X.X.X.release (3)
| 1 | Check out the master branch |
| 2 | Make sure your local copy is up to date |
| 3 | Merge the X.X.X.release branch into master, accepting changes from X.X.X.release in case of conflicts. |
git tag X.X.X.RELEASE (1)
git push (2)
git push origin X.X.X.RELEASE (3)
| 1 | Tag the commit with the X.X.X.RELEASE tag |
| 2 | Push the commits to update the remote master branch |
| 3 | Push the tag
|
Wait for the build to complete (around 40 minutes) and check that all jobs have been successful.
-
Check that the
X.X.X.RELEASEimages have been generated and pushed to DockerHub. -
Check that the
latestimages have been updated on DockerHub (if this has been triggered). -
Check that the documentation has been generated and pushed to the GitHub pages website : check the version and revision date at the top of the documents in the current documentation (for example the architecture documentation)
-
Check that the tag was correctly pushed to GitHub and is visible under the tags page for the repository.
45.2.4. Updating the version list on the website
On the website repository, edit the /_data/versions.yml file to:
-
Add the version being released to the list with the
currentbadge -
Remove the
currentbadge from the previous version
For example:
- id: SNAPSHOT
type: SNAPSHOT
external_devices_api: true
- id: D.E.F.RELEASE
badge: current
external_devices_api: true
- id: A.B.C.RELEASE
#... end of file omitted- id: SNAPSHOT
type: SNAPSHOT
external_devices_api: true
- id: X.X.X.RELEASE
badge: current
external_devices_api: true
- id: D.E.F.RELEASE
external_devices_api: true
- id: A.B.C.RELEASE
#... end of file omittedThis file determines which versions (and in which order) are displayed on the release page of the website.
Check that you see the X.X.X.RELEASE under the releases page and that the links work (It may need a few minutes for the website to be updated).
The external_devices_api property should be set to true for all new versions, so the API documentation for
the External Devices API is displayed on the website.
|
45.2.5. Checking the docker-compose files
While the docker-compose files should always point to the SNAPSHOT images while on the develop branch, on the master
branch they should rely on the latest RELEASE version available on DockerHub. Once the CI pipeline triggered by the
previous steps has completed successfully, and you can see X.X.X.RELEASE images for all services on DockerHub, you should:
-
Remove your locally built X.X.X.RELEASE images if any
-
Run the config/docker docker-compose file to make sure it pulls the images from DockerHub and behaves as intended.
People who want to experiment with OperatorFabric are pointed to this docker-compose so it’s important to make sure that it’s working correctly.
45.2.6. Publishing the release on GitHub
-
On the
releasesscreen for the core repository, draft a new release.-
Select the existing X.X.X.RELEASE tag
-
The title should be X.X.X.RELEASE
-
In the description field, paste the content from the release_notes.md file from the release-notes repository.
-
Replace any "TODO" comments with the appropriate links to the documentation.
-
Click "Publish release"
-
45.2.7. Publishing the jars for the client library to Maven Central
Once everything else looks ok, you can publish the jars for the client library to MavenCentral. This is done as a last step once we are pretty sure we won’t need to go back and change things on the release because jars are not meant to be removed from Maven Central once they are published (even briefly), and it’s not something that could be managed by the project.
To do so:
-
Set the appropriate properties (credentials and GPG key information) as described in the documentation for the publishing task
-
Run the following command from the project root:
./gradlew publish
-
After a while you should be prompted to enter the passphrase for the GPG key.
-
Once the task has completed, log in to the OSSRH Repository using the same credentials as for the Sonatype JIRA.
-
Click on
Staging repositorieslink on the left. After a while (and maybe after clicking the refresh button), you should see a repository with the name orgopfab-XXXX (where XXXX is a Sonatype-generated id, not related to the release number).
-
Click on the repository then on the "content" tab below to check its content and metadata.
-
If there is an issue with the repository, click on the "Drop" button and start the process again after making the necessary changes. If everything looks in order, click on the "Close" button and add a small comment when prompted to confirm.
-
This will trigger validation of the Sonatype requirements (for example, making sure that the pom file contains the required information), as you can see from the Activity tab below (Refresh might be needed).
-
If all the validations pass, the "Release" button will become available. Click it to send the jars to Maven Central. When prompted, write a comment then confirm (keeping the "Automatically Drop" option checked).
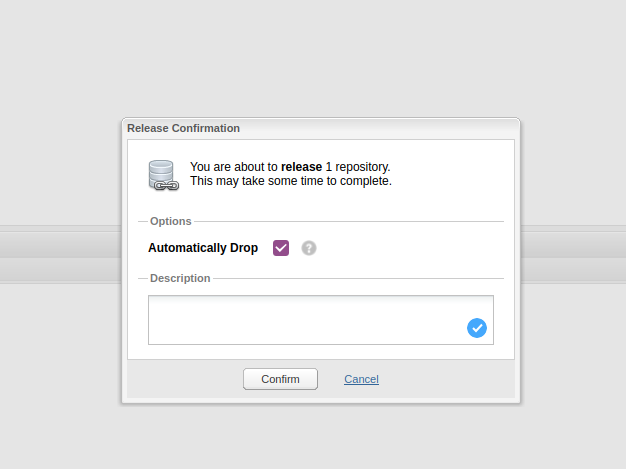
-
The jars for the release should then be available on the project space in the Maven repository within 10 minutes.
-
It can take up to two hours for them to appear on the Maven Central Repository Search.
45.2.8. Advertising the new release on the LFE mailing list
-
Send an email to the opfab-announce@lists.lfenergy.org mailing list with a link to the release notes on GitHub.
| Here is the link to the administration website for the LFE mailing lists in case there is an issue. |
45.2.9. Preparing the next version
45.2.9.1. On the release-notes repository
Remove the items listed in the release_notes.md file so it’s ready for the next version.
45.2.9.2. On the operatorfabric-core repository
Now that the release branch has served its purpose, it should be deleted so as not to clutter the repository and to
avoid confusion with the actual release commit tagged on master.
git branch -d X.X.X.release (1)
| 1 | Delete the branch locally |
| You should also delete the branch on GitHub. |
You should also close the project for this version, and create one for the next version if it doesn’t already exist (use the "Automated Kanban" template).
45.3. Releasing a Patch (Hotfixes) Version
Let’s say fixes are needed on version X.X.0.RELEASE, and will be released as X.X.X.RELEASE. If it’s the first patch
version to be released for this minor version (i.e. version X.X.1.RELEASE), you will need to create the X.X.hotfixes
branch.
To do so:
git checkout X.X.0.RELEASE (1)
git checkout -b X.X.hotfixes (2)| 1 | Checkout X.X.0.RELEASE tag |
| 2 | Create (and checkout) branch X.X.hotfixes from this commit |
If branch X.X.hotfixes already exists, you can just check it out.
git checkout X.X.hotfixesThen, follow the process described
here
to create feature branches, work on fixes and merge them back into X.X.hotfixes.
Once all the big fixes that need to go into the version X.X.X.RELEASE have been merged into branch X.X.hotfix, you
can release the patch version. To do so:
-
Write a release notes detailing the bug fixes in the release_notes.md file found under src/docs/asciidoc/docs in the operatorfabric-core repository.
-
Use the ./CICD/prepare_release_version.sh script to automatically perform all the necessary changes:
./CICD/prepare_release_version.sh -v X.X.X.RELEASE
-
Commit the changes, tag them and push both to GitHub:
git add . git commit -m "[RELEASE] X.X.X.RELEASE " (1) git tag X.X.X.RELEASE (2) git push --set-upstream origin X.X.hotfixes (3) git push origin X.X.X.RELEASE (4)
1 Commit the changes 2 Tag the release 3 Push the commit 4 Push the tag
This will trigger the build and tests in GitHub Actions.
If the build and tests are successful, launch manually GitHubActions with jobs : Build , Docker Push and Build and publish documentation
In the case of a patch on the last major/minor version tagged on master, this version will become the
latest version. In this case, add the jobs Docker Push - Latest and Build and publish documentation - Latest instead of Build and publish documentation to also update the latest docker images on DockerHub and the current documentation on the website.
|
You then need to release the client library jars for the hotfix version. To do so, refer to the corresponding section for standard releases.
Resources
46. Appendix B: Publication of the client library jars to Maven Central
This is a summary of the steps that were necessary to initially set up the publication of jars to Maven Central. The process to actually publish the jars for each release is detailed in the release process documentation.
-
Building and signing the jars
-
Publishing them to a staging repository where there are validations (e.g. check that the POM contains the required information, validating the signature against the public key)
-
If the validations pass, release the jar to Maven Central
46.1. Claiming the org.opfab namespace on Maven Central
This is done by logging an issue on the
Sonatype JIRA (create an account first). The namespace needs to match a domain that you
own (and this will be verified), which is why we had to rename our packages to org.opfab.XXX.
You can then request other users to be granted rights on the namespace as well.
46.2. Creating a GPG key pair
The key pair is generated with GPG2, keeping the default options and using the opfabtech technical account email as
contact. The key is further secured with a passphrase.
gpg2 --full-generate-key
gpg (GnuPG) 2.2.19; Copyright (C) 2019 Free Software Foundation, Inc.
This is free software: you are free to change and redistribute it.
There is NO WARRANTY, to the extent permitted by law.
Please select what kind of key you want:
(1) RSA and RSA (default)
(2) DSA and Elgamal
(3) DSA (sign only)
(4) RSA (sign only)
(14) Existing key from card
Your selection? 1
RSA keys may be between 1024 and 4096 bits long.
What keysize do you want? (3072) 3072
Requested keysize is 3072 bits
Please specify how long the key should be valid.
0 = key does not expire
<n> = key expires in n days
<n>w = key expires in n weeks
<n>m = key expires in n months
<n>y = key expires in n years
Key is valid for? (0) 18m
Key expires at Tue 11 Oct 2022 12:38:13 CEST
Is this correct? (y/N) y
You need a user ID to identify your key; the software constructs the user ID
from the Real Name, Comment and Email Address in this form:
"Heinrich Heine (Der Dichter) <heinrichh@duesseldorf.de>"
Real name: opfabtech
E-mail address: opfabtech@gmail.com
Comment: technical account for the OperatorFabric project
You selected this USER-ID:
"opfabtech (technical account for the OperatorFabric project) <opfabtech@gmail.com>"
Change (N)ame, (C)omment, (E)-mail or (O)kay/(Q)uit? o
We need to generate a lot of random bytes. It is a good idea to perform
some other action (type on the keyboard, move the mouse, utilise the
disks) during the prime generation; this gives the random number
generator a better chance to gain enough entropy.
gpg: key 469E7252B8D25328 marked as ultimately trusted
gpg: directory '/home/guironnetale/.gnupg/openpgp-revocs.d' created
gpg: revocation certificate stored as '/home/guironnetale/.gnupg/openpgp-revocs.d/FE0D7AFF9C129CFBBDC18A0B469E7252B8D25328.rev'
public and secret key created and signed.
pub rsa3072 2021-04-19 [SC] [expires: 2022-10-11]
FE0D7AFF9C129CFBBDC18A0B469E7252B8D25328
uid opfabtech (technical account for the OperatorFabric project) <opfabtech@gmail.com>
sub rsa3072 2021-04-19 [E] [expires: 2022-10-11]
| A standard practice is to have the key expire in 18 months, so I set up a calendar reminder for us to renew it. |
46.3. Sharing the signing key
For other developers to be able to sign jars, you need to share both the key pair and the passphrase.
-
Export the key pair to a file
gpg2 --export-secret-keys OPFAB_KEY_ID > key_pair.key
-
Send the file to the other developers via a secure channel
-
Then, they need to import this file to their keyring (see the documentation for the publishing task for details).
46.4. Publishing the public key
The public key needs to be published to (preferably several) key directories so people wanting to use the signed jars can check the signature against the public key. It is also checked as part of the validations performed on the staging repository.
Our public key was initially published to pool.sks-keyservers.net, which became deprecated (causing the publication to
fail), so it was then published to the two servers that the sonatype validations seem to rely on.
For OpenPGP you need to export the public key (and not the key pair) to a file and upload it to their web interface.
gpg2 --export OPFAB_KEY_ID > my_key.pub
For Ubuntu you need to export the public key as ascii-armored ascii and paste the result to their web interface
gpg2 --export --armor OPFAB_KEY_ID
The key can be retrieved from both these servers by searching either for opfabtech@gmail.com or for the key ID.
|
46.5. Setting up the signing and publication in Gradle
You can’t publish a jar with version "SNAPSHOT" to the Maven staging repositories (you would get a 403
BAD REQUEST), that’s why the Gradle publication task is configured so that if the version ends with "SNAPSHOT", the
jars should be published to a local directory (repos/snapshots) rather than to the Maven Central staging repository.
|
47. Migration Guide from release 1.4.0 to release 1.5.0
47.1. Refactoring of configuration management
47.1.1. Motivation for the change
The initial situation was to have a Third concept that was meant to represent third-party applications that publish
content (cards) to OperatorFabric.
As such, a Businessconfig was both the sender of the message and the unit of configuration for resources for card rendering.
| Because of that mix of concerns, naming was not consistent across the different services in the backend and frontend as this object could be referred to using the following terms: * Third * ThirdParty * Bundle * Publisher |
But now that we’re aiming for cards to be sent by entities, users (see Free Message feature) or external services, it doesn’t make sense to tie the rendering of the card ("Which configuration bundle should I take the templates and details from?") to its publisher ("Who/What emitted this card and who/where should I reply?").
47.1.2. Changes to the model
To do this, we decided that the publisher of a card would now have the sole meaning of emitter, and that the link
to the configuration bundle to use to render a card would now be based on its process field.
47.1.2.1. On the Businessconfig model
We used to have a Businessconfig object which had an array of Process objects as one of its properties.
Now, the Process object replaces the Businessconfig object and this new object combines the properties of the old Businessconfig
and Process objects (menuEntries, states, etc.).
| In particular, this means that while in the past one bundle could "contain" several processes, now there can be only one process by bundle. |
The Businessconfig object used to have a name property that was actually its unique identifier (used to retrieve it through
the API for example).
It also had a i18nLabelKey property that was meant to be the i18n key to determine the display name of the
corresponding businessconfig, but so far it was only used to determine the display name of the associated menu in the navbar in
case there where several menu entries associated with this businessconfig.
Below is a summary of the changes to the config.json file that all this entails:
| Field before | Field after | Usage |
|---|---|---|
name |
id |
Unique identifier of the bundle. Used to match the |
name |
I18n key for process display name. |
|
states.mystate.name |
I18n key for state display name. |
|
i18nLabelKey |
menuLabel |
I18n key for menu display name in case there are several menu entries attached to the process |
processes array is a root property, states array being a property of a given process |
states array is a root property |
Here is an example of a simple config.json file:
{
"name": "TEST",
"version": "1",
"defaultLocale": "fr",
"menuEntries": [
{"id": "uid test 0","url": "https://opfab.github.io/","label": "menu.first"},
{"id": "uid test 1","url": "https://www.la-rache.com","label": "menu.second"}
],
"i18nLabelKey": "businessconfig.label",
"processes": {
"process": {
"states": {
"firstState": {
"details": [
{
"title": {
"key": "template.title"
},
"templateName": "operation"
}
]
}
}
}
}
}{
"id": "TEST",
"version": "1",
"name": "process.label",
"defaultLocale": "fr",
"menuLabel": "menu.label",
"menuEntries": [
{"id": "uid test 0","url": "https://opfab.github.io/","label": "menu.first"},
{"id": "uid test 1","url": "https://www.la-rache.com","label": "menu.second"}
],
"states": {
"firstState": {
"name" :"mystate.label",
"details": [
{
"title": {
"key": "template.title"
},
"templateName": "operation"
}
]
}
}
}| You should also make sure that the new i18n label keys that you introduce match what is defined in the i18n folder of the bundle. |
47.1.2.2. On the Cards model
| Field before | Field after | Usage |
|---|---|---|
publisherVersion |
processVersion |
Identifies the version of the bundle. It was renamed for consistency now that bundles are linked to processes not publishers |
process |
process |
This field is now required and should match the id field of the process (bundle) to use to render the card. |
processId |
processInstanceId |
This field is just renamed , it represent an id of an instance of the process |
These changes impact both current cards from the feed and archived cards.
| The id of the card is now build as process.processInstanceId an not anymore publisherID_process. |
47.2. Change on the web-ui.json
The parameter navbar.thirdmenus.type has been removed from this file. Starting from this release the related functionality has been moved on bundle basis and it’s not more global. See "Changes on bundle config.json" for more information.
47.3. Changes on bundle config.json
Under menuEntries a new subproperty has been added: linkType. This property replace the old property navbar.thirdmenus.type in web-ui.json, making possible a more fine control of the related behaviour.
47.6. Migration steps
This section outlines the necessary steps to migrate existing data.
| You need to perform these steps before starting up the OperatorFabric instance because starting up services with the new version while there are still "old" bundles in the businessconfig storage will cause the businessconfig service to crash. |
-
Backup your existing bundles and existing Mongo data.
-
Edit your bundles as detailed above. In particular, if you had bundles containing several processes, you will need to split them into several bundles. The
idof the bundles should match theprocessfield in the corresponding cards. -
If you use navbar.thirdmenus.type in web-ui.json, rename it to navbar.businessmenus.type
-
Run the following scripts in the mongo shell to copy the value of
publisherVersionto a newprocessVersionfield and to copy the value ofprocessIdto a newprocessInstanceIdfield for all cards (current and archived):Current cardsdb.cards.updateMany( {}, { $rename: { "publisherVersion": "processVersion", "processId": "processInstanceId" } } )Archived cardsdb.archivedCards.updateMany( {}, { $rename: { "publisherVersion": "processVersion", "processId": "processInstanceId" } } ) -
Make sure you have no cards without process using the following mongo shell commands:
db.cards.find({ process: null})db.archivedCards.find({ process: null}) -
If it turns out to be the case, you will need to set a process value for all these cards to finish the migration. You can do it either manually through Compass or using a mongo shell command. For example, to set the process to "SOME_PROCESS" for all cards with an empty process, use:
db.cards.updateMany( { process: null }, { $set: { "process": "SOME_PROCESS"} } )db.archivedCards.updateMany( { process: null }, { $set: { "process": "SOME_PROCESS"} } ) -
If you have any code or scripts that push bundles, you should update it to point to the new endpoint.
48. Migration Guide from release 1.7.0 to release 1.8.0
48.1. Card detail definition in business configuration
There is no more the need for multiple definitions of card’s detail rendering because of the removal of multi-tab rendering. The rendering of the detail of a card is configured specifying the detail title, template name and the list of styles.
In the Businessconfig model definition the field details has been removed.
The new fields detailTitle, templateName and styles have been added.
Here is an example of a simple config.json file:
{
"id": "TEST",
"version": "1",
"name": "process.label",
"states": {
"firstState": {
"name" :"mystate.label",
"details": [
{
"title": {
"key": "template.title"
},
"templateName": "operation",
"styles": ["style1","style2"]
}
]
}
}
}{
"id": "TEST",
"version": "1",
"name": "process.label",
"states": {
"firstState": {
"name" :"mystate.label",
"detailTitle": {
"key": "template.title"
},
"templateName": "operation",
"styles": ["style1","style2"]
}
}
}48.2. Business menu definition
The business menu are not configured anymore in the business definition but in a specific single configuration file called ui-menu.json. You must move your configuration from the config.json to this new file, see documentation .
49. Migration Guide from release 1.8.0 to release 2.0.0
49.1. AcknowledgmentAllowed field in business configuration
In the process state definition the acknowledgementAllowed has been renamed to acknowledgmentAllowed.
The acknowledgmentAllowed field in no more a boolean type and can now assume one of the following values:
-
"Never": acknowledgment not allowed (default value)
-
"Always": acknowledgment allowed
-
"OnlyWhenResponseDisabledForUser": acknowledgment allowed only when the response is disabled for the user
Here is an example of a simple config.json file:
{
"id": "TEST",
"version": "1",
"name": "process.label",
"states": {
"firstState": {
"name" :"mystate.label",
"details": [
{
"title": {
"key": "template.title"
},
"templateName": "operation",
"styles": ["style1","style2"]
}
],
"acknowledgmentAllowed": "Never"
}
}
}50. Migration Guide from release 2.2.0 to release 2.3.0
50.1. Communication between template and opfab
50.1.1. Getting response data from template
Some renaming has been done in version 2.3.0 :
-
the method to have the response information from template is rename in getUserResponse instead of validyForm.
-
the return object of this method shall now contains the response data in field responseCardData instead of formData
So if you have the following code in your template :
templateGateway.validyForm = function () {
const response = document.getElementById('response').value;
const formData = { response: response };
return {
valid: true,
formData: formData
};
}It must be modify this way :
templateGateway.getUserResponse = function () {
const response = document.getElementById('response').value;
const responseCardData = { response: response };
return {
valid: true,
responseCardData: responseCardData
};
}50.1.2. Getting the information if the user can respond
To know from a template that the user can respond to a card you must now call templateGateway.isUserAllowedToRespond() instead of implementing the method templateGateway.setUserCanRespond()
So if you have the following code in your template :
templateGateway.setUserCanRespond = function(responseEnabled) {
if (responseEnabled) {
// do something
} else {
// do something
}
}It must be modify this way :
if (templateGateway.isUserAllowedToRespond()) {
// do something
} else {
// do something
}51. Migration Guide from release 2.3.0 to release 2.4.0
52. Migration Guide from release 2.4.0 to release 2.5.0
52.1. Send card
The API endpoint to send a card doesn’t return CardCreationReport object anymore.
The endPoint cards now returns :
-
status code 201 (Created) in case of success.
-
status code 400 (Bad request) in case of a request with wrong data.
So if you use CardCreationReport object when you send card, you need to modify your code to not use it anymore and to test the status code returned.
53. Migration Guide from release 2.5.0 to release 2.6.0
53.1. Inter-service communication - Ribbon
Ribbon was used by our Feign client that lets business services get information on the current user from the Users service.
Ribbon is no longer maintained, so we chose to remove it from our dependencies (mostly because it was blocking any update of the other Spring dependencies).
Instead, the Feign client now relies on an external property to know where the Users service can be reached, and there is no load-balancing for now.
This requires a change to service configuration: the users.ribbon.listOfServers property should be removed and
replaced with operatorfabric.servicesUrls.users.
It should be set in the configuration of all business services (except users), or in the common configuration.
operatorfabric:
servicesUrls:
users: "http://localhost:2103"According to the Feign documentation, the property should contain "an absolute URL or resolvable hostname (the protocol is optional)".
| This property is mandatory, if it is absent the application won’t start. |
| While the ribbon property could handle an array of several urls, this new property expects a single url as there is no load-balancing mechanism for now. |
55. Migration Guide from release 2.7.0 to release 2.8.0
55.1. UI Configuration Management
The web-ui container has two configuration files: web-ui.json and ui-menu.json.
To avoid maintaining separate copies of these files for each run environment (docker, dev, Cypress), the reference
configuration will be the one for the docker mode, with the others being created by script, changing only the
properties that should be different between environments (e.g. environmentName).
Only the docker configuration will be version-controlled. The scripts creating the configuration are launched by
the docker-compose.sh and docker-compose-cypress.sh.
As a consequence, the web-ui.json and ui-menu.json files have been moved from config/xxx/ to
config/xxx/ui-config. The volumes in the docker-compose.yml files have been updated accordingly.
|
This new organization will also allow us to run Cypress tests against different versions of the configuration, for example to test the behaviour of a property meant to hide a component. See the Cypress tests README (src/test/cypress/README.adoc) for more information.
All modes (dev, docker, config) now use the PASSWORD authentication flow by default. If you want to test
with another authentication flow, you should use the setSecurityAuthFlow.sh script AFTER the containers have been
started.
|
cd src/test/resources
.setSecurityAuthFlow.sh dev CODE55.2. Management of visible menus
The visibility of some core OperatorFabric menus (monitoring, logging, feed configuration screen,…) was so far
configurable for a given OperatorFabric instance through various properties in web-ui.json.
As of this version, it has been unified with that of custom menus:
-
It will now be managed in
ui-menu.jsonalong with custom menus -
It is now possible to make these menus visible only for certain groups
web-ui.json are no longer supported and should be removed-
navbar.hidden(array of menus to hide) -
admin.hidden(boolean) -
feedConfiguration.hidden(boolean) -
realTimeUsers.hidden(boolean) -
settings.nightDayMode(boolean)
ui-menu.json{
"coreMenusConfiguration":
[
{
"id": "coreMenuId1",
"visible": true
},
{
"id": "coreMenuId2",
"visible": false
},
{
"id": "coreMenuId3",
"visible": true,
"showOnlyForGroups": ["ADMIN","SOME_OTHER_GROUP"]
}
]
}All core menus should be listed under this new coreMenusConfiguration property in ui-menu.json, each with their own
visible and (optionally) showOnlyForGroups property.
Necessary actions for the migration:
-
Remove the deprecated properties listed above from your
web-ui.json -
Add a
coreMenusConfigurationblock to yourui-menu.json(see the documentation for details and a full example)
55.3. Simplification MongoDB Configuration
We are getting rid of our specific MongoDB configuration to let SpringBoot autoconfigure it. As a result, we are
removing support for the spring.data.mongodb.uris property in favour of the standard spring.data.mongodb.uri
property. Please change the application configuration files for the services accordingly.
| This property can only hold a single URI. |
56. Migration Guide from release 2.10.0 to release 2.11.0
56.1. Logging screen : Filter with tags list
As for archives screen, now you have to specify the list of tags you want to see in the filter of logging screen.
You have to set this list in the web-ui.json file, with the parameter logging.filters.tags.list. For example :
"logging": {
"filters": {
"tags": {
"list": [
{
"label": "Label for tag 1",
"value": "tag1"
}
]
}
}
}57. Migration Guide from release 2.11.0 to release 3.0.0
57.1. Changes in configuration due to business translation mechanism removal
In order to remove unnecessary complexity for third-party, we have decided to remove translation for some of business data, this implies the following migration tasks :
57.1.1. Template directory
The template directory does not contain language repository anymore. There is one template per process/state
and the templates are located directly in this directory. So you have to move your template for your language directly to the template directory
57.1.2. Changes in config.json
In config.json, the fields process.name, state.name and state.description must not contain i18n data anymore, they must only contain string data. These data will be simply displayed on the screen.
57.1.3. New file i18n.json
The bundle shall contain a new i18n.json file in the root directory. The i18n.json file contains internationalization information for title and summary fields. We keep an i18n mechanism for these two fields in order to have the possibility to adapt the title or summary of the card without having to modify the code of the third party tool sending the card (using only one "language" for translation)
Here is an example file :
{
"message":{
"title":"Message",
"summary":"Message received"
},
"chartDetail" : { "title":"A Chart"},
"chartLine" : { "title":"Electricity consumption forecast"},
"question" : {"title": "⚡ Planned Outage"},
"contingencies": {"title" : "⚠️ Network Contingencies ⚠️","summary":"Contingencies report for French network"},
"processState": {
"title":"Process state ({{status}})"
}
}
57.1.5. Processes groups
There is no possibility anymore to have translation for the process group name. You can just define the name of the group in the uploaded file. Here is an example of this file :
{
"groups": [
{
"id": "processgroup1",
"name": "Process Group 1",
"processes": [
"process1",
"process2"
]
},
{
"id": "processgroup2",
"name": "Process Group 2",
"processes": [
"process3",
"process4"
]
}
]
}57.1.6. Script to migrate an existing database
Opfab 3.0 needs two new fields in database : titleTranslated and summaryTranslated.
In order to add these two new fields to an existing database, you have to pull the image migration-opfab3,
go to the directory OF_HOME/src/tooling/migration-opfab3 and execute the script docker-compose.sh, this way :
./docker-compose.sh <containerNameMongoDB> <portMongoDB> <loginMongoDB> <passwordMongoDB> <pathToBundlesDirectory>
The bundles directory is the directory where you store all the "untar" bundles in the new
format with the i18n.json file. It is not the directory where the opfab instance stores the bundles.
|
57.2. Configuration file web-ui.json
Some attributes have been renamed to be more consistent with their meaning. Here are these attributes :
-
settings.infos.descriptionrenamedsettings.infos.hide.description -
settings.infos.languagerenamedsettings.infos.hide.language -
settings.infos.timezonerenamedsettings.infos.hide.timezone -
settings.infos.tagsrenamedsettings.infos.hide.tags -
settings.infos.soundsrenamedsettings.infos.hide.sounds
So if you use these fields in web-ui.json file, you have to rename them.
57.3. Configuration file common-docker.yml
A new parameter named operatorfabric.servicesUrls.businessconfig has to be added to your configuration file common-docker.yml (or equivalent)
For example the following configuration:
operatorfabric:
businessLogActivated: true
servicesUrls:
users: "users:8080"becomes:
operatorfabric:
businessLogActivated: true
servicesUrls:
users: "users:8080"
businessconfig: "businessconfig:8080"58. Migration Guide from release 3.0.0 to release 3.1.0
58.1. Kafka date format
The signature for sending card dates via Kafka have been changed to better reflect the REST API. Instead of sending the date in seconds since epoch, you can now use the Java Instant object. The following methods are affected:
-
startDate -
endDate -
lttd -
publishDate -
TimeSpan.setStart -
TimeSpan.setEnd
For example the following code:
Card card = Card.newBuilder().setStartDate(12345L).build();
becomes:
Card card = Card.newBuilder().setStartDate(Instant.now()).build();
59. Migration Guide from release 3.1.0 to release 3.2.0
59.1. Cache configuration for i18n files
Add the following lines in your nginx.conf to avoid keeping in cache old translation files when migrating opfab
location /ui/assets/i18n/ {
add_header Cache-Control "no-cache";
alias /usr/share/nginx/html/assets/i18n/;
}see the reference nginx configuration file : github.com/opfab/operatorfabric-core/blob/master/config/docker/nginx.conf
60. Migration Guide from release 3.4.0 to release 3.5.0
60.1. Timezone management removal
The feature to manage timeline inside opfab has been removed. In consequence, you can remove the following parameters in your web-ui.json configuration file:
-
i10n.supported.time-zones
-
settings.infos.hide.timezone
60.2. Kafka card format changes
The Kafka message schema has been changed. The single card used to send messages to and receive from Operator Fabric
has been split into two cards; one for sending to OpFab and one for receiving messages from OpFab. The CardCommand structure now contains a card (to OpFab) and a responseCard (from OpFab).
You will need to change the Kafka listener to get the response card.
For example change
@KafkaListener
public void receivedResponseCard(@Payload ConsumerRecord<String, CardCommand> consumerRecord) {
CardCommand cardCommand = consumerRecord.value();
Card = cardCommand.getCard();to
@KafkaListener
public void receivedResponseCard(@Payload ConsumerRecord<String, CardCommand> consumerRecord) {
CardCommand cardCommand = consumerRecord.value();
ResponseCard = cardCommand.getResponseCard();60.2.1. Redirect to business application from a card
The templateGateway.redirectToBusinessMenu function to redirect to business application from a card has changed. The third argument of the function is now a url extension that can contain sub paths and/or parameters instead of only parameters.
You will need to change the call adding a '?' character at the beginning of the third argument.
For example change:
templateGateway.redirectToBusinessMenu('myMenu','myEntry','param1=aParam¶m2=anotherParam')
to
templateGateway.redirectToBusinessMenu('myMenu','myEntry','?param1=aParam¶m2=anotherParam')